Worldox Connector
The Worldox Connector node allows you to scan and index documents and other data into the Worldox® Document Management System by World Software® Corporation. Documents can be sent to Worldox via an automated workflow, or you can log into Worldox and specify Worldox Profile Groups and Profile Fields before scanning your documents into Worldox directly at the MFP panel.
Important! In order to use the Worldox Connector, you must be running a 32-bit version of Dispatcher Phoenix (on a 32-bit or 64-bit system).
Other requirements include:
-
Supported Versions: Worldox GX2 and GX3. Note that Worldox GX2 is supported via the Worldox GX3 Bridge System, which is available free of charge to Worldox GX2 customers with active maintenance. For more information on the Worldox GX3 Bridge, email Worldox support at support@worldox.com.
-
Operating System: Windows 10 or higher
BEFORE STARTING: Before using the Worldox Connector node, you must configure Dispatcher Phoenix to use Worldox. Choose the Options item from the Tools menu pull-down list on the main application screen to access the Worldox Configuration window.
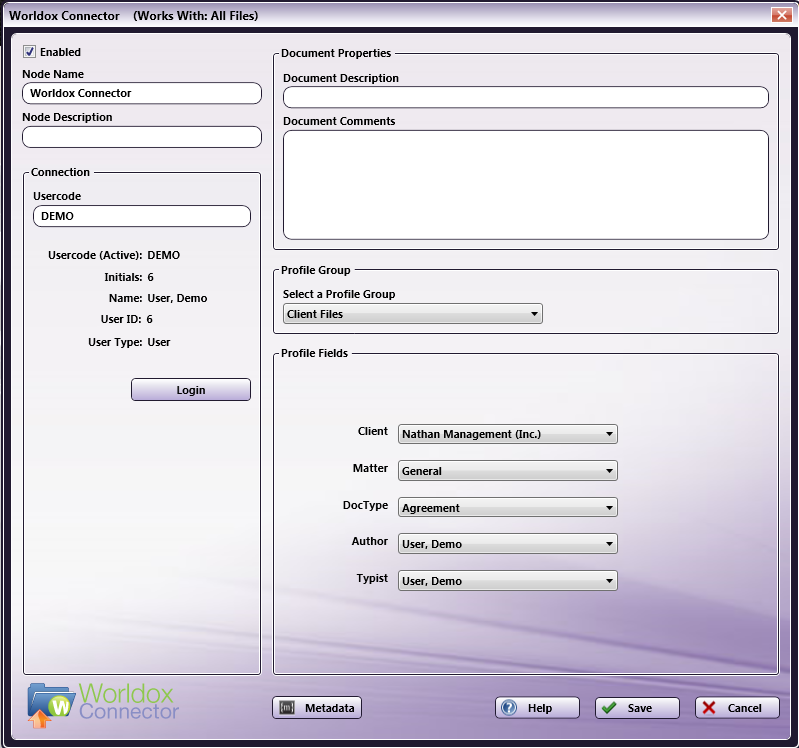
To open the Worldox Connector node’s properties window, add an output node for Worldox to your workflow and double-click on it.
-
Check the Enabled box when there are multiple output locations. When unchecked, this output will be ignored. While the workflow will still validate, documents will not be output and may be lost.
-
In the Node Name field, enter a meaningful name for the Worldox Connector node.
-
In the Description field, enter a description for the Worldox Connector node. Although this is not required, it can be helpful to distinguish multiple destination nodes from each other. If the description is long, you can hover the mouse over the field to read its entire contents.
Connecting to Worldox
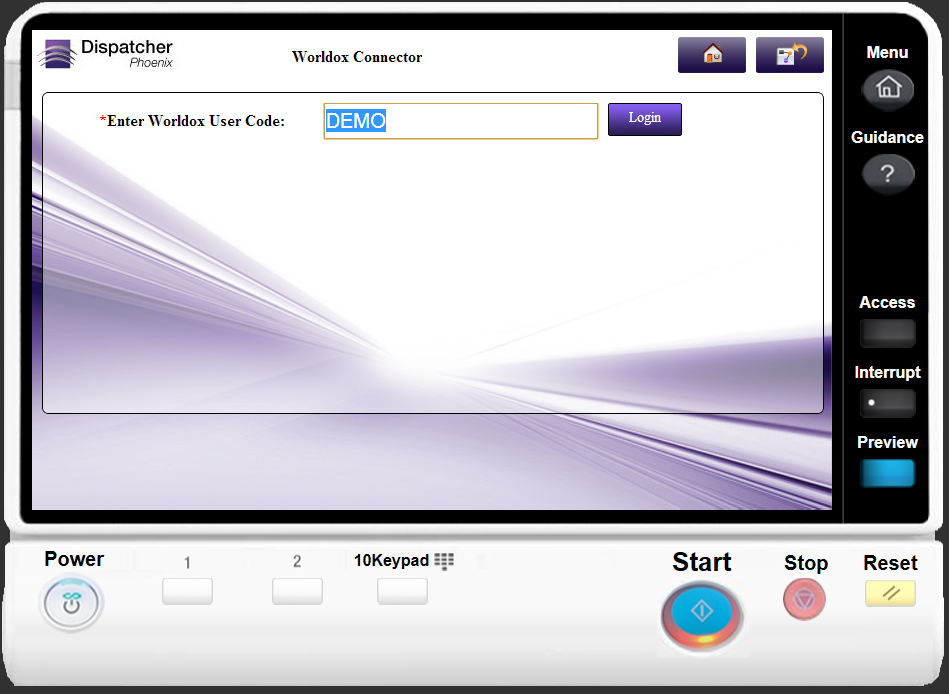
To begin, you must first connect to Worldox. Do the following:
-
In the Connection area’s Usercode field, enter the Worldox User Code. The Profile Groups and Profile Fields that are available to you are set by the User Code that is entered.
-
Select the Login button.
If Log in was successful, you will see details about the logged-in user, such as the user’s initials, name, user type (User or Manager), unique user ID, etc., as in the following illustration:
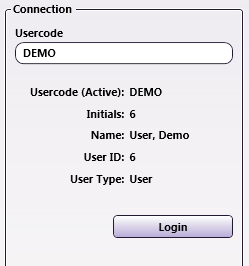
Note: Please check with your Worldox Administrator if you do not remember your User Code.
Document Properties
Specify Document Properties for the scanned document:
-
Document Description – Enter a document name/description for the document.
Note: In the Worldox Client, a unique ID is automatically assigned to each document, and the Description field is typically used to store the file name. To integrate the Dispatcher Phoenix file name into Worldox, you can use the File Level variable of {file:name} in the Document Description field.
-
Document Comments – Enter any comments that you want included with the document in Worldox.
Note: Although available as a feature in Worldox, you cannot specify security settings for your files using this connector.
You can also use metadata variables in these fields. Click on the Metadata button to open up the Metadata Browser window and drag-and-drop the metadata that you want to use to populate these fields in Worldox.
Profile Group
Worldox organizes its documents via Profile Groups, which contain unique set of fields describing the documents that belong to it. For example, one Profile Group may be designated for administrative documents and forms while another Profile Group is for documents associated with litigation.
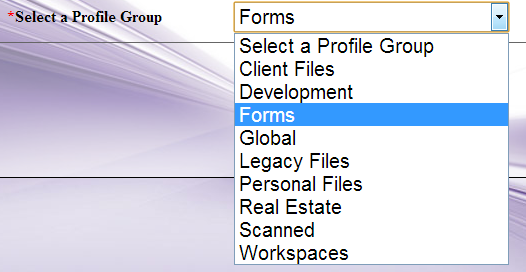
Only those Profile Groups available to the specific logged-in user will appear in the Select a Profile Group drop-down list.
Select a Profile Group from the drop-down list. At that point, the Profile Fields associated with that Profile Group will appear below in the Profile Fields area.
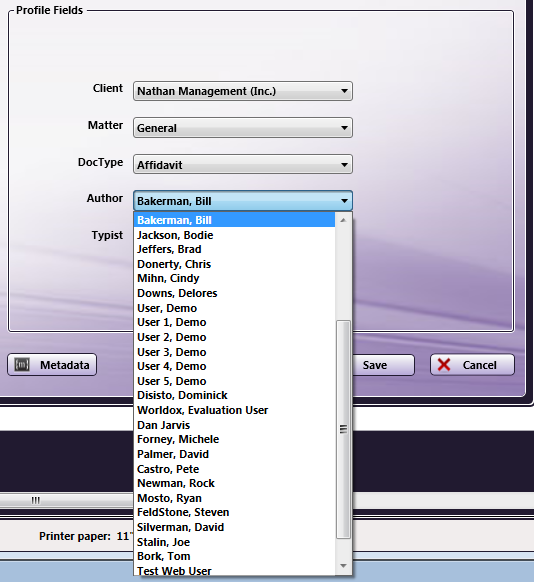
Profile Fields
To further organize your documents in Worldox, you can specify information using Profile Fields, which are key document attributes. Each document in Worldox will have profile fields associated with it. Worldox Profile Fields include basic document information, such as Client, Matter, etc. The Profile Fields and profile data that are available to you depend on the Profile Group that you selected.
Select profile information using the Profile Fields drop-down lists.
The Profile Fields are linked, meaning the data associated with other Profile Fields may depend on a Profile Field that has already been selected (e.g., “Matter” data that is listed is linked to the “Client” that has already been selected).
Using With Index Form
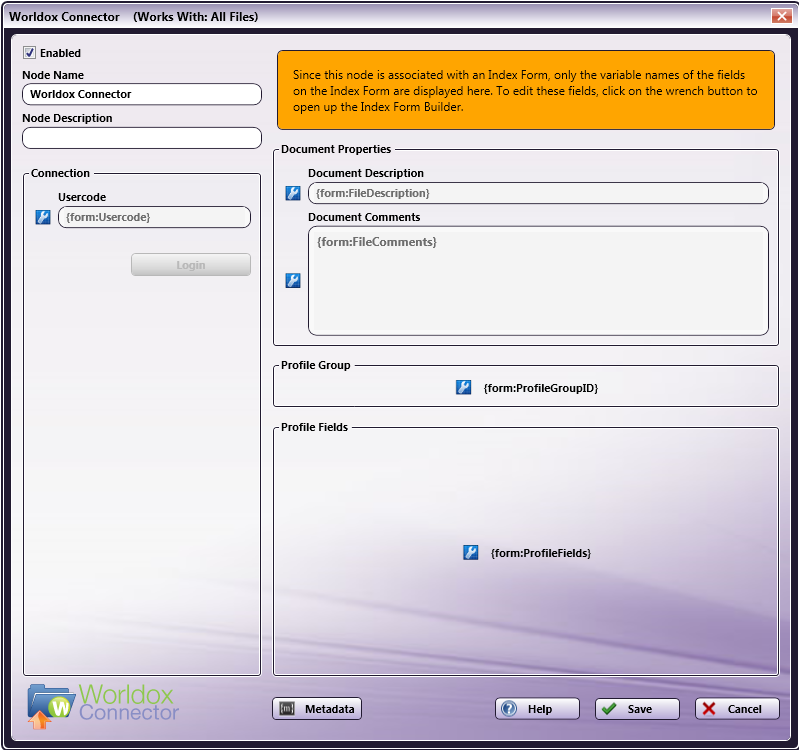
When using the Worldox Connector node on an Index Form, the window will be automatically populated with the variable names of the fields on the Index Form. Although you cannot edit the fields on this window, you can click on the wrench tool button to go to that section or field in the Index Form Builder. See the following illustration:
Using Worldox Connector Index Form With Multiple Inputs
Once you associate your Worldox Connector node with a MFP Panel node’s index form, all the information necessary to connect and route to Worldox is entered at the MFP. Because of this, you cannot connect any other types of collection nodes (Input Folder, MFP User Box, etc.) to that indexed Worldox Connector node in your workflow. In this case, if you need to add other collection nodes to your workflow, you must add a new Worldox node that is not connected to an index form.
Creating A Worldox Index Form
You can create an index form that allows you to upload scanned documents to Worldox at the MFP. Do the following:
-
Make sure that your workflow includes a MFP Panel node and Worldox Connector node.
-
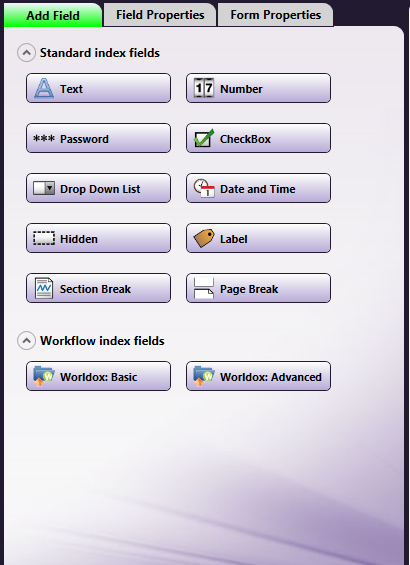
Open up the Index Form Builder from the MFP Panel node. You should see two Worldox Connector buttons under the Workflow Index Fields area:
-
Worldox: Basic - Creates a Worldox Index Form for the MFP panel that allows you to log into Worldox, choose a Profile Group for your scanned documents, and enter Profile indexing information before scanning to Worldox.
-
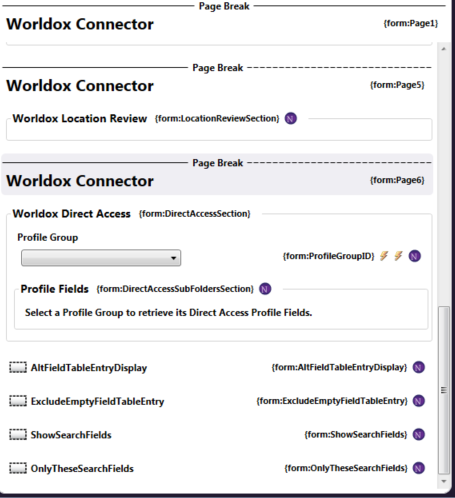
Worldox: Advanced - Creates a Worldox Index Form for the MFP panel that displays Worldox features, such as “Direct Access,” “Quick Profiles,” “Bookmarks,” “Favorite Matters,” and “Workspaces,” for you to choose from.
See the following illustration for an example:
-
-
Drag and drop the appropriate Worldox Connector button to the Index Form work area.
-
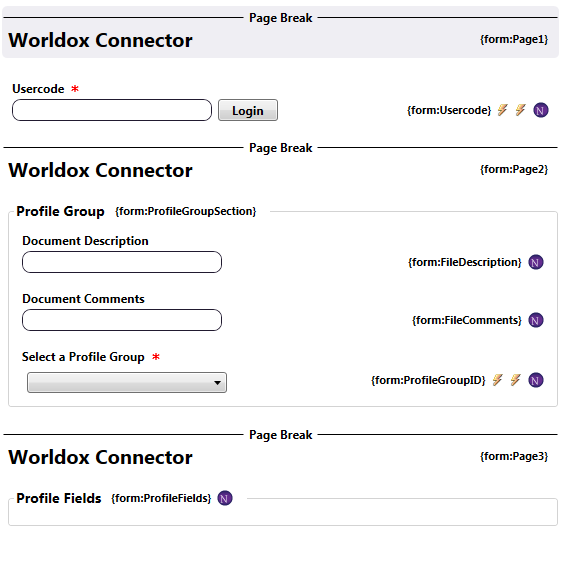
If the Worldox Connector node has already been configured, an index form with prepopulated fields will appear; otherwise, an index form with blank fields will appear. The following illustration is an example of a Basic Worldox Index Form:
-
You can assign default values to the Usercode, Document Description, and Document Comments field.
-
Both the Basic and Advanced Index Forms have hidden fields that you can modify, if appropriate. See the following illustration:
-
AltFieldTableEntryDisplay – If the default value is set to False, Profile Field information on the MFP panel is displayed as <code> :: <description> (e.g., “0043 : Smith & Co). If the default value is set to True, Profile Field information on the MFP panel is displayed as <description> :: <code> (e.g., Smith & Co : 0043). The default value is False.
-
ExcludeEmptyFieldTableEntry – If the default value is set to True, any Profile Field entries without a description are not displayed. The default value is False.
-
ShowSearchFields – If the default value is set to True, Search fields are displayed above all Profile Fields. The default value is False.
-
OnlyTheseSearchFields – If the ShowSearchFields hidden field is set to True, you can use the OnlyTheseSearchFields hidden field to specify which fields to display a Search field for. For example, to only add a Search field to the Client Profile Field, you would specify ‘Client’ in the Default Value field. Or, to have both Client and Matter Profile Fields to have search fields, you would specify ‘Client, Matter’ in the Default Value field.
Note: The Basic Worldox Index Form only lists the AltFieldTableEntryDisplay and ExcludeEmptyFieldTableEntry fields. The Advanced Worldox Index Form includes all of them.
-
Adding Search Fields To The Index Form
To speed up your indexing process, you can add Search fields to the Index Form to filter Profile Data that appears in specific Profile Fields. For example, you can add a “Client” Search field that can be used to filter the list of clients that appear in the Clients Profile Field drop-down list.
To set up a Search field to filter Profile Data that is listed in the first Profile Field, do the following:
-
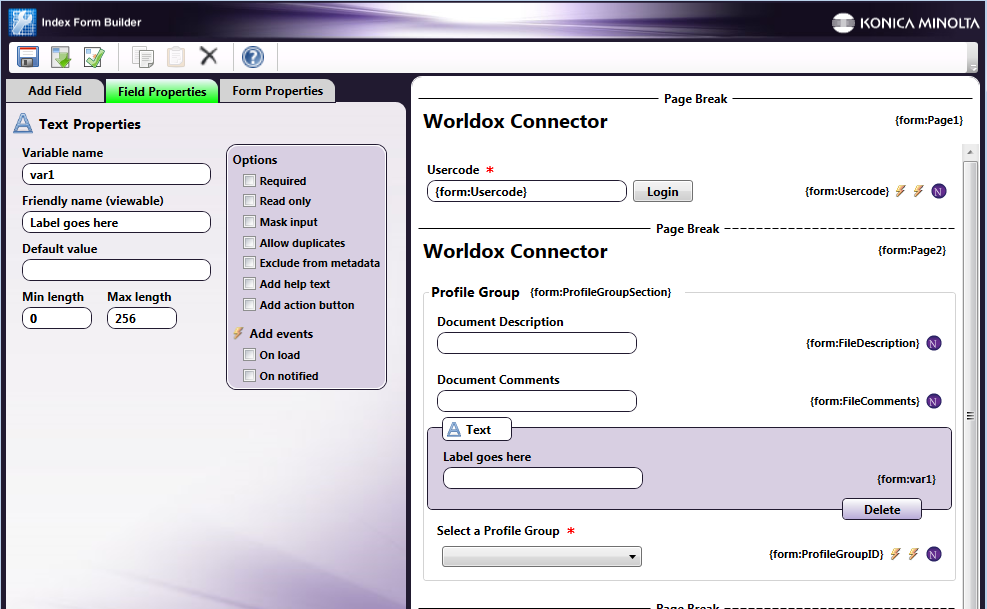
Add a Text field to the Profile Group section of the Index Form, as in the following illustration:
-
For the newly added Text field, do the following:
-
Enter a name that will appear above the field on the MFP panel in the Friendly name field (e.g., Client).
-
Enter “Field1Search” in the Variable name field (since you are interested in filtering results that appear in the first Profile Field).
-
-
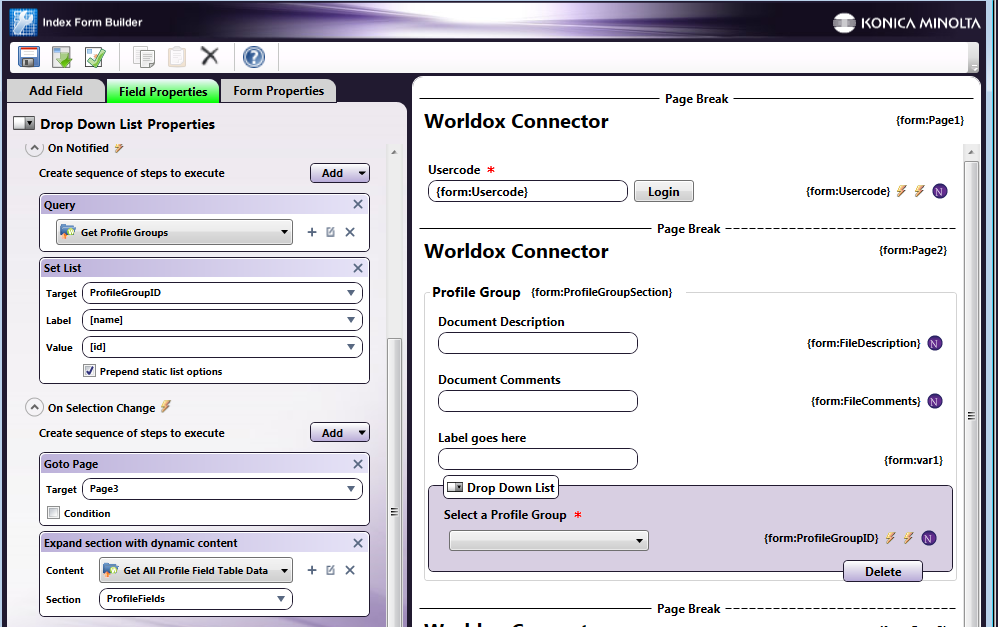
Select the Select a Profile Group drop-down list in the work area of the Index Form Builder.
-
Edit the Expand section with dynamic content – Get All Profile Field Table Data data source configuration (circled in red in the following illustration):
The Worldox Data Source Configuration window appears, as in the following illustration:
-
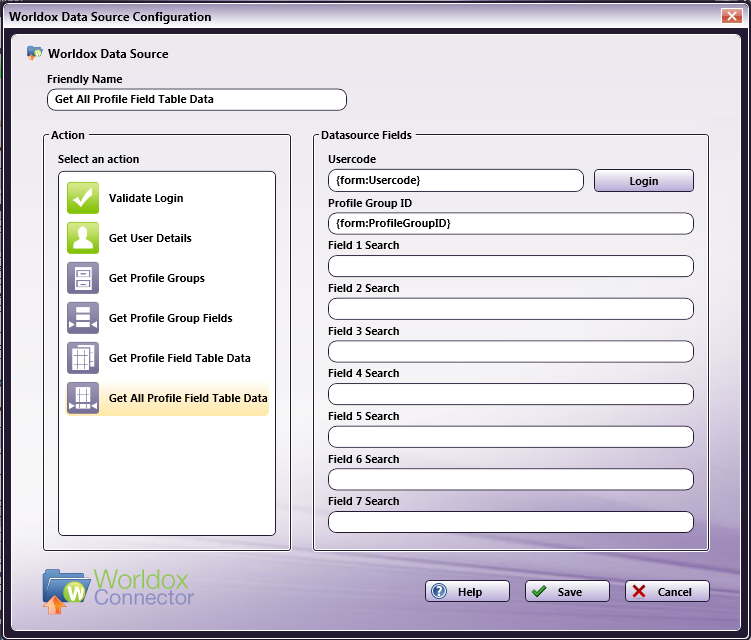
Enter {form:Field1Search} in the Field 1 Search field to reference the variable name of the newly added Text field; then select the Save button. This allows Worldox to display filtered results in the first Profile Field, based on what was entered in the Search field on the MFP.
Note: If you want to create a Search field for another Profile Field, change the variable name of the Text field accordingly (e.g., Field4Search); in the Worldox Data Source Configuration window, add a metadata reference in the correct Field Search field (e.g., Enter {form:Field4Search} in the Field 4 Search field).
Basic Worldox Index Form On MFP
At the MFP, the Basic Worldox Index Form will be separated into three separate screens, as follows:
-
Worldox Log In Screen. Log into the Worldox Server on the following screen:
-
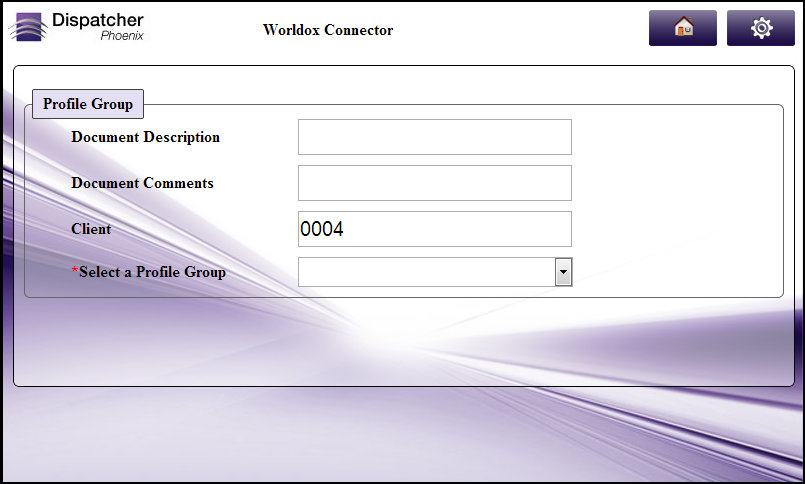
Worldox Log In Screen. Enter a description and comments for the scanned document; then select a Worldox Profile Group. See the following illustration:

-
Worldox Indexing Screen. Index your scanned document using Worldox Profile fields. See the following illustration:

Advanced Worldox Index Form On MFP
At the MFP, the Advanced Worldox Index Form will be separated into the following screens, as follows:
-
Worldox Log In Screen. Log into the Worldox Server on the following screen:
-
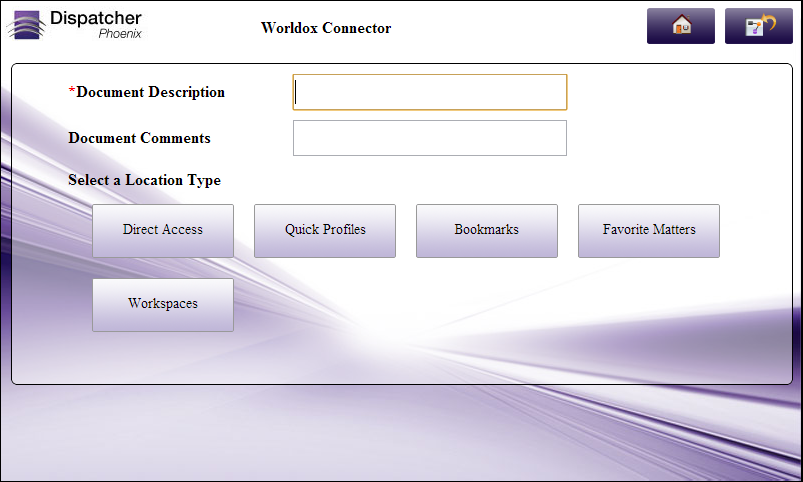
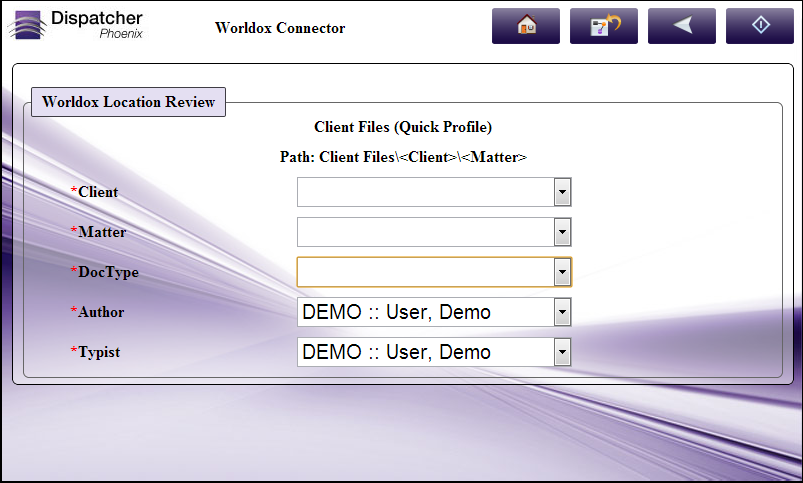
Choose a Worldox Location. Choose a location in Worldox for your scanned documents, using Quick Profiles, Bookmarks, Favorite Matters, Workspaces, and Direct Access to Profile Groups. See the following illustration:
-
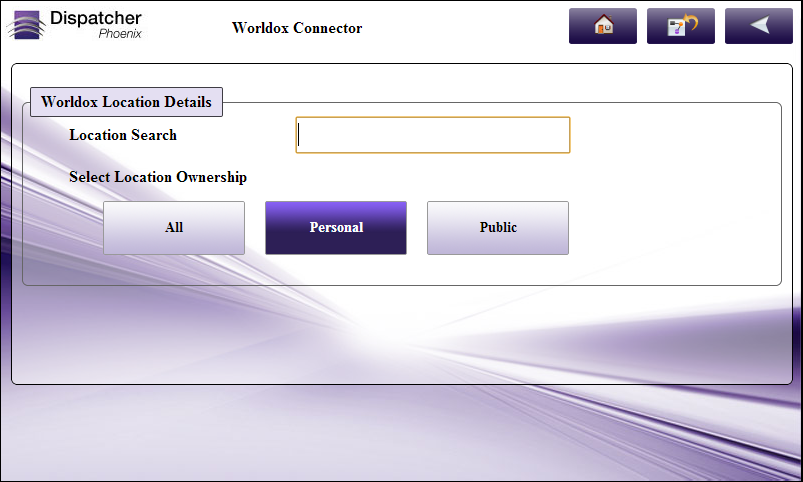
Choose the Type of Worldox Location. Choose to view Public, Private, or both Public and Private locations in Worldox. This screen also includes a Search field to filter your location list. See the following illustration:
-
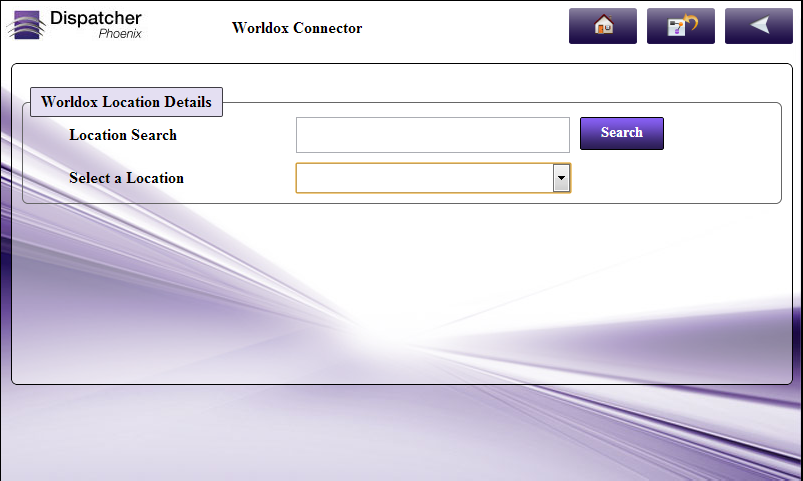
Choose the Location. Choose the Worldox location on this screen. A Search field is included to filter the list of locations displayed in the drop-down menu. See the following illustration:
-
Review / Modify Index Fields & Scan. The last screen displays the index fields that are already set up within Worldox for the Location that you selected. You can modify fields as appropriate and then scan your document(s) into Worldox. See the following illustration:
Worldox Index Form On MFP – Using Search Fields
When a Search field has been added to the Worldox Index Form, the MFP user will see the search field on the second “Profile Group” screen.
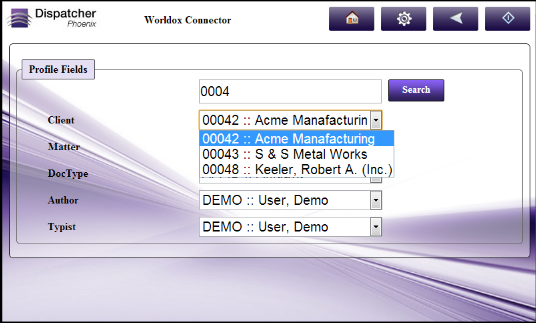
In the following example, a “Client” search field has been added, allowing the user to filter Profile Data based on a specific Client Code.
The MFP user enters “0004” in the Client field to filter the list of Clients that are retrieved from the Worldox Server; then the user selects the “Clients” Profile Group from the drop-down list.
On the next page, the initial search criteria will be displayed and the Client drop-down menu will be filtered accordingly, as in the following illustration:
Database Browsing - Worldox Configuration
You can also manually configure a query to retrieve data (e.g., list of folders, validation, etc.) from Worldox. Using the Index Form Builder, do the following:
-
Add a new field, such as a drop-down list.
-
Define an On Load event for the field; then add a Query.
-
Choose Worldox Data Source from the Query drop-down list.
-
The Worldox Data Source Configuration window appears, which allows you to perform specific actions in order to retrieve data from Worldox.

Do the following:
-
In the Friendly Name field, enter an identifying name for the Worldox data source configuration.
-
In the Datasource Fields area, enter the Worldox User Code that is necessary to connect to Worldox.
-
Select the Login button to make sure that you are connected properly to Worldox.
-
In the Action area, choose what kind of action to perform on the Worldox data source. Options include:
-
Validate login - Validates the login credentials that are entered at the MFP (user code) against the Worldox data source. This action returns the following records:
-
[result] - The result of the login: true or false
-
[message] - Text regarding a successful or unsuccessful login.
-
-
Get User Details – Validates the user code and returns specific details about the logged-in user (User initials, full name, user ID, user type, etc.) You can choose to return one of the following information from Worldox:
-
[Number] – The ID of the logged-in User
-
[Ismanager] – The User’s type (Manager or User)
-
[Usercode] – The User Code of the logged-in User
-
[Initials] – The User’s initials
-
[Name] – The User’s full name
-
-
Get Profile Groups - Retrieves information about the Profile Groups that are available to the Worldox User within Worldox. You can choose to return the following information from Worldox:
-
[ID] – The ID numbers of the Profile Group in Worldox
-
[netmap] – The network mapping paths of the Profile Groups in Worldox
-
[basepath] – The folder paths of the Profile Groups in Worldox
-
[name] - The names of the Profile Groups in Worldox
-
-
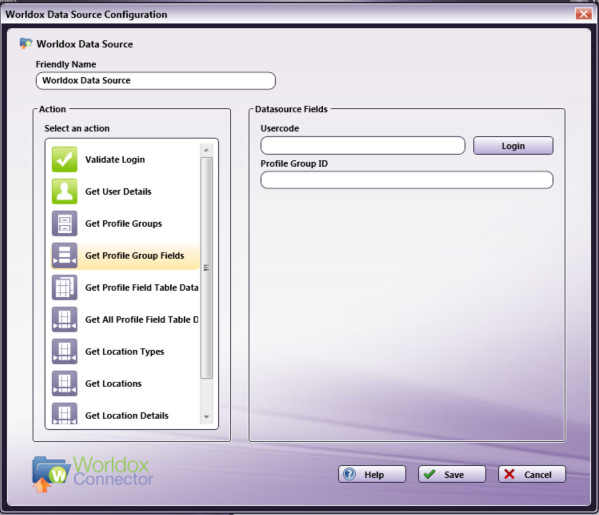
Get Profile Group Fields - Retrieves Profile Fields (Client, Matter, etc.) for the User Code and Profile Group ID that is specified. When you select this item, an empty field appears in which you can enter the appropriate Profile Group ID. See the following illustration for an example:
-
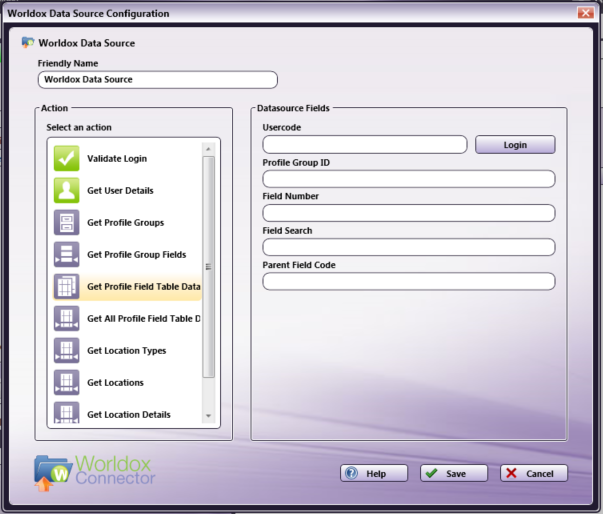
Get Profile Field Table Data – Retrieves entries for a specific Profile Field within a Profile Group. When you select this item, empty fields appear in which you can enter the appropriate Profile Group ID, Profile Field number, and (if applicable) the Parent Field number. You can choose to return the following information from Worldox:
-
[code] – The Worldox code for the Profile Field table entries
-
[description] – The name of the Profile Field table entries
See the following illustration for an example:
-
-
Get All Profile Field Table Data – Retrieves ALL Profile Fields and their associated entries based on the Profile Group ID that has been chosen. When you select this item, an empty field appears in which you can enter the appropriate Profile Group ID.
In addition, this area allows you to specify that search criteria can be entered at the MFP panel to filter the list of Profile Field table entries retrieved, using the Field 1 Search-Field 7 Search fields, as in the following illustration:
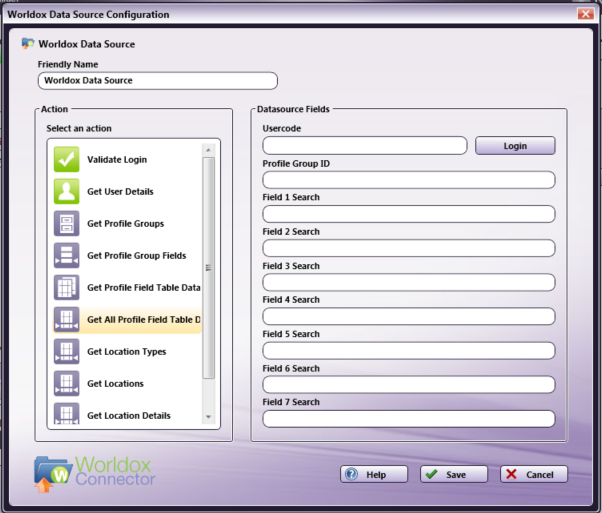
Because this retrieves dynamic content, this action is used with the Expand Section trigger.
-
Get Location Types – Retrieves all types of Worldox Locations (Direct Access, Quick Profiles, Bookmarks, Favorite Matters, Workspaces) based on user log in.
-
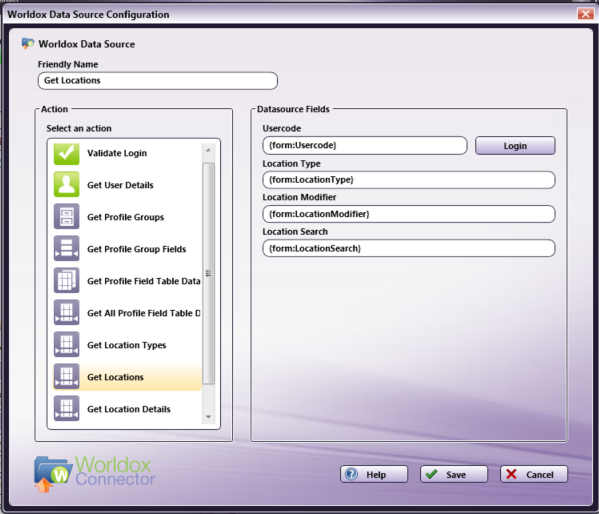
Get Locations – Retrieves the Location based on user log in, type of Location that was chosen, the Location Ownership that was chosen, and search field results, as in the following illustration:
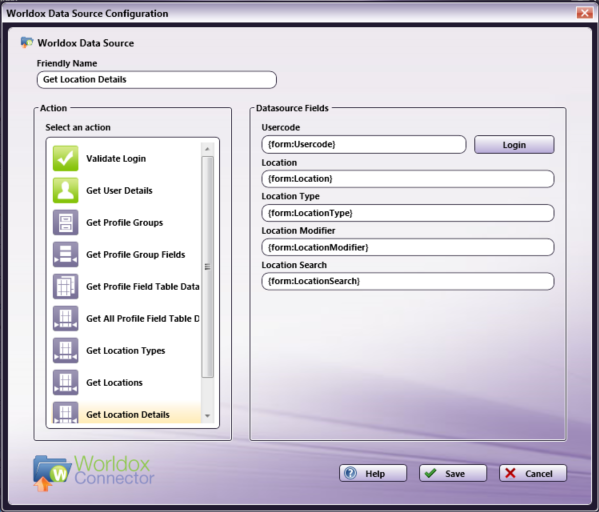
- Get Location Details – Retrieves Details of the Location based on user log in and what was chosen at the MFP panel for Worldox Location, type of Location, ownership, and search field results, as in the following illustration:
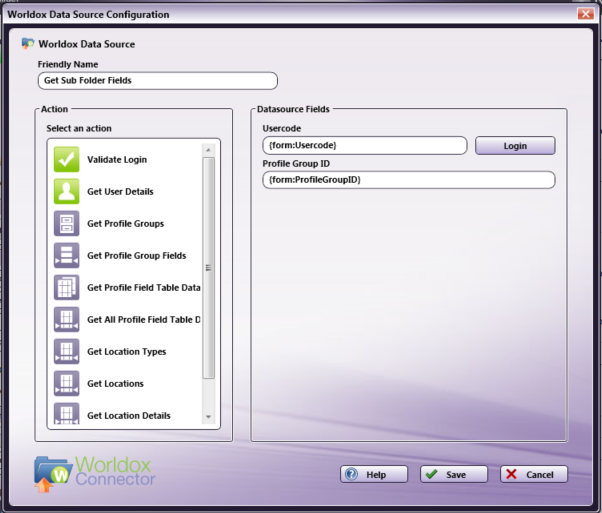
- Get SubFolder Fields –Retrieves Field tables that are marked to be subdirectories in Worldox, for the Profile Group that was selected at the MFP. This is used for Direct Access. See the following illustration:
-
-