OneDrive for Business Connector

Use the OneDrive for Business Connector node to distribute documents to OneDrive for Business, Microsoft’s cloud storage service that allows organizations to provide each team member with a storage place. The connector allows you to send documents to OneDrive for Business via an automated workflow, or you can access OneDrive for Business directly at the MFP panel.
This node supports Government Community Cloud (GCC) and GCC High environments to meet the security needs of government agencies and the contractors that support them. More information about configuring Dispatcher Phoenix in a GCC High environment can be found here.
Notes:
- To use the OneDrive for Business Connector, you must have a OneDrive account.
- The maximum file size for uploading documents to OneDrive for Business is 250 GB.
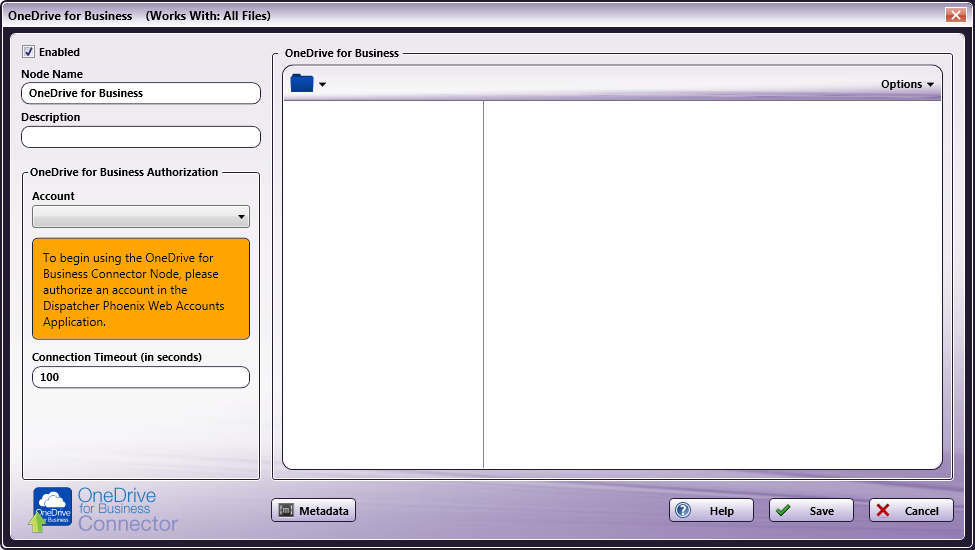
To open the OneDrive for Business Connector node’s properties window, add an output node for OneDrive for Business to your workflow and double-click on it.
-
Enabled - To enable this node in the current workflow, check the box at this field. If you leave the box blank, the workflow ignores the node and documents pass through as if the node was not present. Note that a disabled node does not check for logic or error conditions.
-
Node Name - The node name defaults into this field. This name appears in the workflow below the node icon. Use this field to specify a meaningful name for the node that indicates its use in the workflow.
-
Node Description - Enter an optional description for this node. A description can help you remember the purpose of the node in the workflow or distinguish nodes from each other. If the description is long, you can hover the mouse over the field to read its entire contents.
Buttons
- Metadata - To access the Metadata Browser window, click this button.
- Help - To access Dispatcher Phoenix Online Help, click this button.
- Save - To preserve your node definition and exit the window, click this button.
- Cancel - To exit the window without saving any changes, click this button.
Configuring the OneDrive for Business Connector
To configure the OneDrive for Business Connector, you must first log into your OneDrive for Business account via Dispatcher Phoenix Web’s Authentication Manager. Once you complete this initial set up, logging into OneDrive for Business within the node or at the MFP panel is no longer necessary, providing an optimized single-sign-on experience.
Note: If your organization has configured Microsoft Azure to require Admin permission for application registration at the machine, your administrator can override this restriction and allow users to register without an Admin present when creating accounts for OneDrive for Business Connector. If you choose to configure OneDrive for Business Connector in this way, we recommend the Admin log in first and grant consent before other users attempt to create their accounts. Otherwise, any account created for OneDrive for Business Connector via Dispatcher Phoenix Web’s Authentication Manager will require Admin credentials and the Admin will be the user registered.
To override the Admin permission requirement when creating a OneDrive for Business Connector account, follow the steps in the Set Up section below. In Step 4, log in using Admin credentials. If this is the first time the Admin logged in, the “Consent on behalf of your organization” checkbox will appear. Check the box at this field, then proceed to the next step in the Set Up procedure.
Important! The “Consent on behalf of your organization” option appears only the first time the Admin logs in. To regain this option, Dispatcher Phoenix must be removed from the Enterprise Applications list in Azure. The next time the Admin logs in, the option will appear.
Set Up
To begin, you must first log into OneDrive for Business via the Dispatcher Phoenix Web’s Authentication Manager. Do the following:
-
Log into Dispatcher Phoenix Web.
-
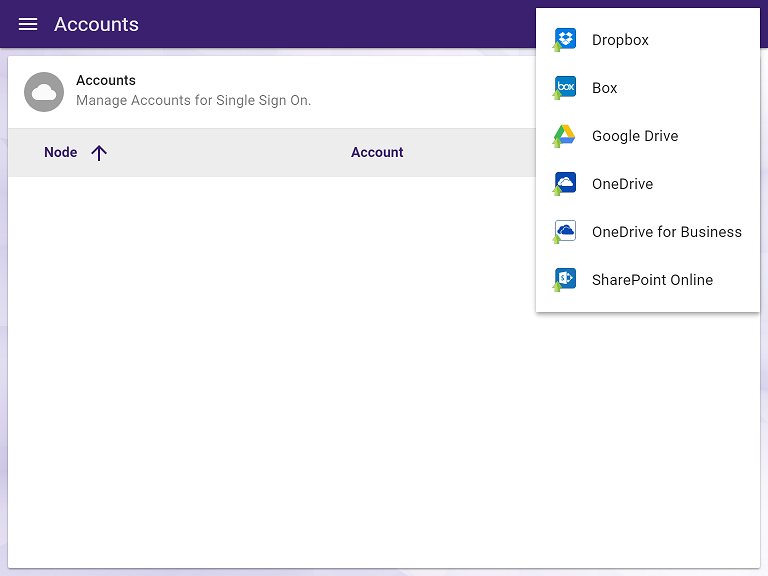
Select the Accounts tool on the Home page.
-
On the Accounts page, select the + button and choose the OneDrive for Business option. See the following illustration:
-
Log into OneDrive for Business using your account credentials (email address/OneDrive for Business account username and password).
-
Select Yes if asked for permission to let the application access your info.
-
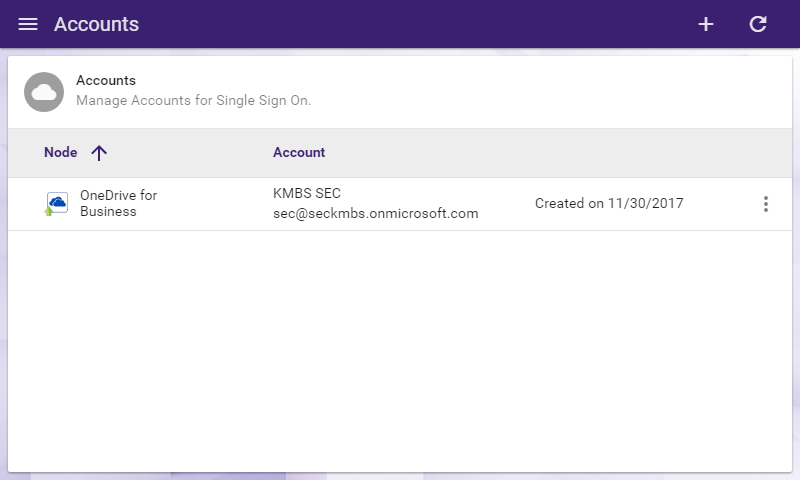
The OneDrive for Business account will now be listed on the Accounts page. See the following illustration for an example:
-
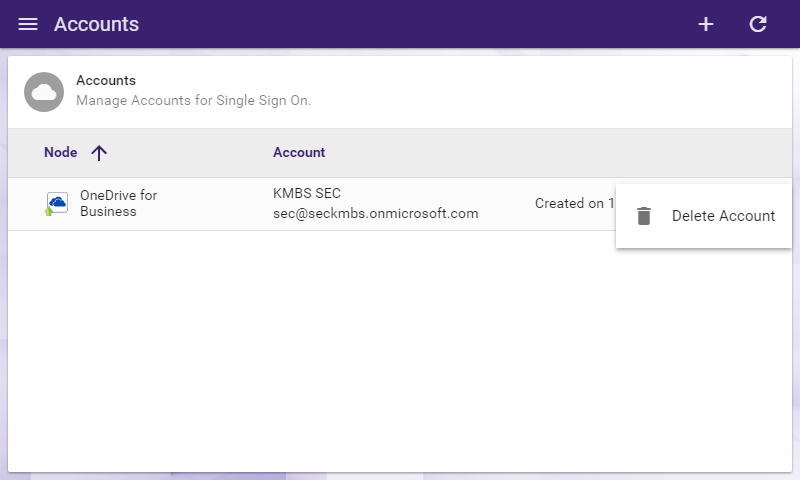
If you need to delete the account, select the vertical ellipsis button and choose Delete Account, as in the following illustration:
-
If you add multiple accounts, the first account you added will be marked as the Primary Account with a star icon. The benefit of a primary account is that when you sign into the MFP, you will have immediate access to this account. You can switch to a different account at the MFP by selecting the check icon, then selecting the back arrow icon on the next screen. You can also switch your primary account by selecting the vertical ellipsis button and selecting Enable Primary Account. You can also Disable Primary Account to always be prompted with the account screen at the MFP.
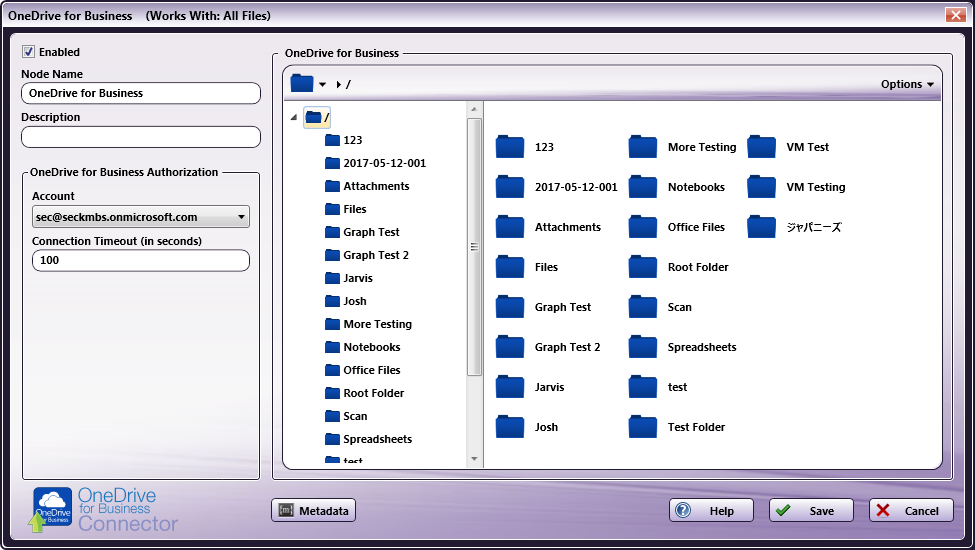
Customizing the OneDrive for Business Connector Node
Once connected, the right hand side of the OneDrive for Business node properties window displays a tree-view of your folders, sub-folders, and files in OneDrive for Business. You can use this area to browse through your OneDrive for Business folder structure and choose a folder to store your documents in.
See the following illustration for an example:
To choose another OneDrive for Business account, choose the account from the Account drop-down list.
To modify the default Connection Timeout (the seconds allotted for the time without communication, after initial connection to the server, before a timeout occurs), enter a value in the Connection Timeout field.
Sending Documents to a New Folder
To create a new folder in OneDrive for Business to scan to, select the New folder option from the Options drop-down menu or press Ctrl + Shift + N.
In the Create New Folder window that appears, enter the name for the new folder in the Name field; then select the Create button. The newly created folder will now appear in the Folder view.
File Name Restrictions
The following restrictions apply to file names:
-
File names cannot start with a space or end with a space.
-
You cannot start a file name with two period characters (..).
-
Non-printable characters cannot be included in a file name (tabs, newlines, etc.)
-
Do not use < > : " / \ | ? *
View Options
You can adjust the default view of your OneDrive for Business folders in the node properties window by using the Options button on the top right hand side of the window. Choose the following items from the Options pull-down menu:
-
To turn off the default view, uncheck the Show tree view option or press Ctrl + T.
-
To hide the files stored in OneDrive for Business folders, uncheck the Show files option or press Ctrl + E.
-
To search for a specific folder, select Search or press Ctrl + S. Searches are always performed from the root folder. Search results are limited to the first 200 results (this can be adjusted up to 2000 folders when using an Index Form). If the search returns a large number of folders, it is recommended that the user enter more specific search criteria to narrow down the search results.
Notes:
- Symbols are not supported in the search string.
- Folder paths are limited to 400 characters.
-
To refresh the current view with the most up-to-date folders/files, select the Refresh option or press F5.
Creating a OneDrive for Business Connector Index Form
You can create an index form that allows you to log into OneDrive for Business automatically at the MFP. Do the following:
-
Make sure that you have logged into OneDrive for Business from Dispatcher Phoenix Web’s Account Manager.
-
Make sure that your workflow includes a MFP Panel node and OneDrive for Business Connector node.
-
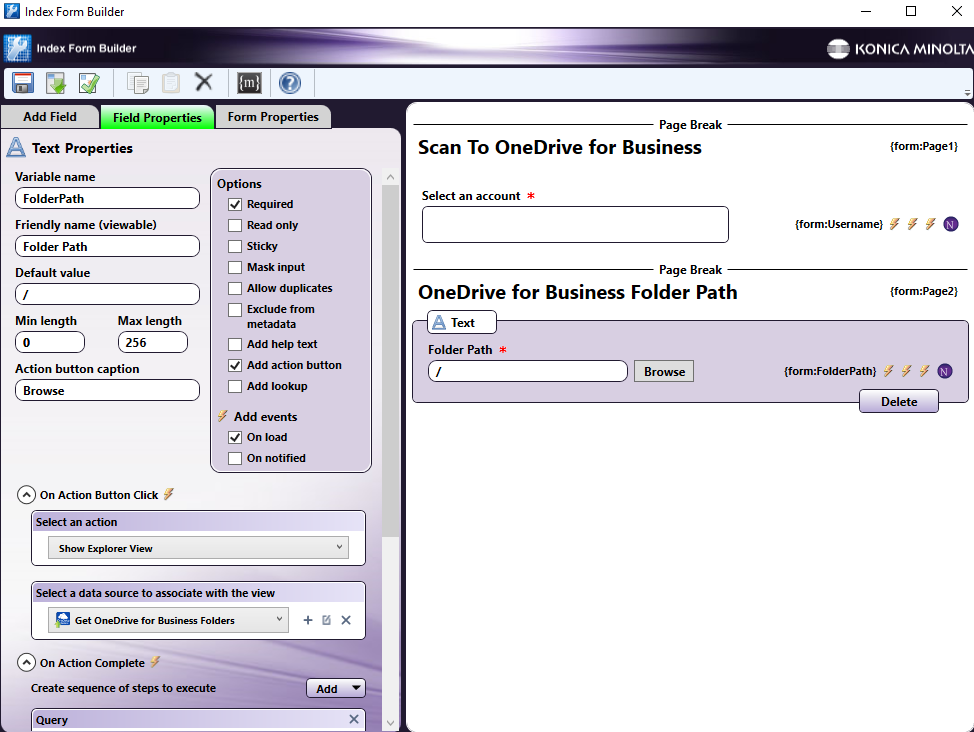
Open up the Index Form Builder from the MFP Panel node. You should see a OneDrive for Business Connector button under the Workflow Index Fields area.
-
Drag and drop the OneDrive for Business Connector button to the Index Form work area. A Scan to OneDrive for Business index form will automatically appear, as in the following illustration:

Note: The OneDrive for Business Connector defaults to displaying 200 folders during folder browsing. To update this default, Select the Folder Path field and then the Edit button next to the Get OneDrive Folders dropdown, as in the following illustration:
-
Save and close the Index Form Builder.
-
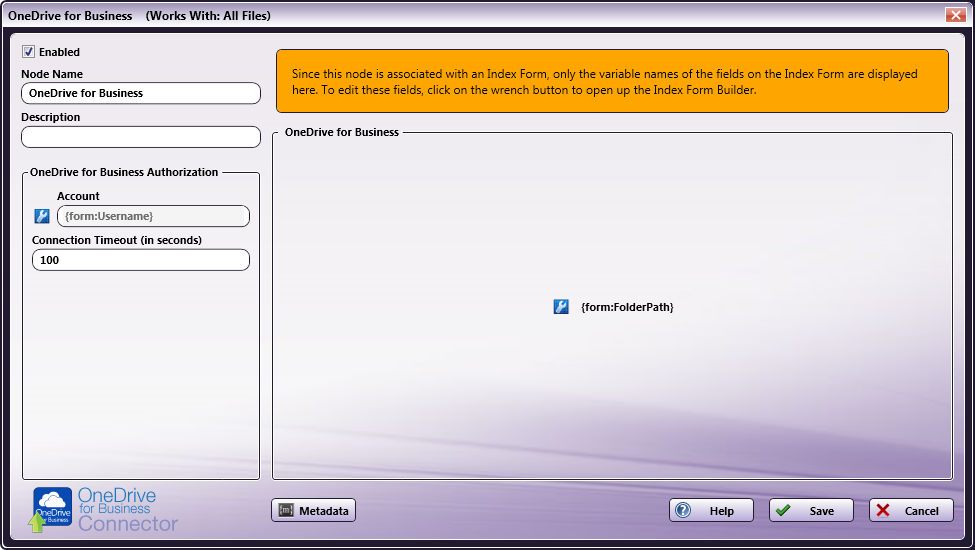
The OneDrive for Business Connector node properties window will be automatically populated with the variable names of the fields on the Index Form. Although you cannot edit the fields on this window, you can click on the wrench tool button to go to that section or field in the Index Form Builder. See the following illustration:
OneDrive for Business Index Form on MFP
At the MFP, the OneDrive for Business Index Form will appear as follows:
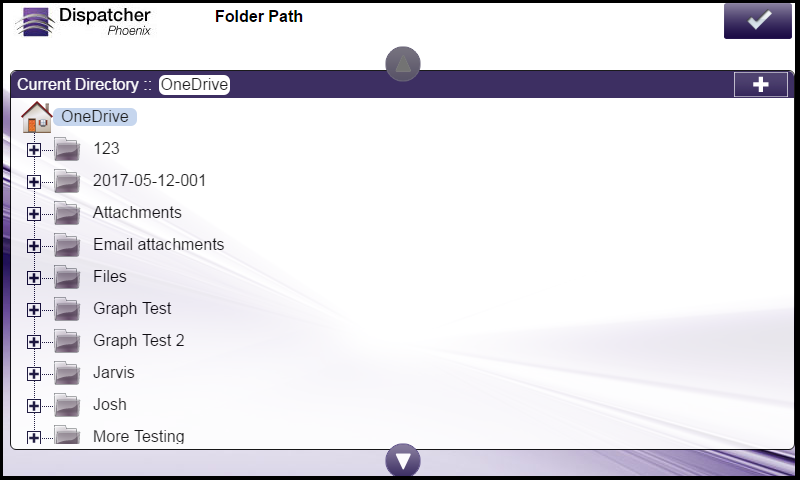
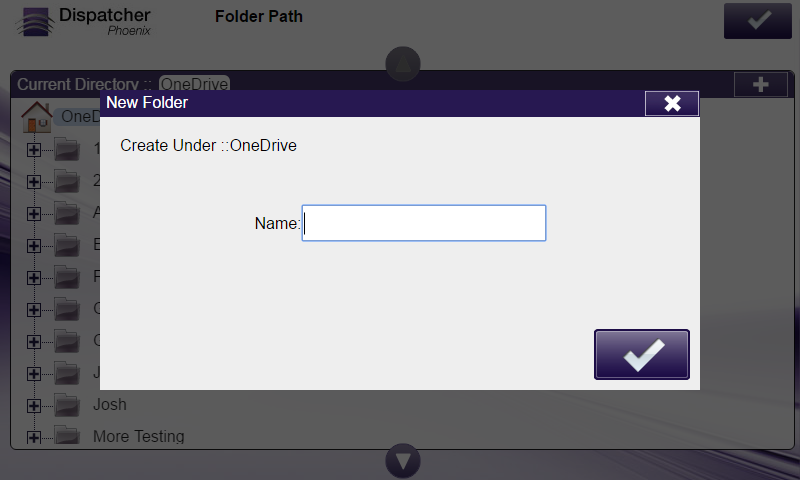
You can add a new folder by selecting the + icon at the top of the screen. The New Folder window will appear, as shown in the following illustration:
Database Browsing - OneDrive for Business Configuration
You can also manually configure a query to retrieve data (e.g., list of folders, validation, etc.) from OneDrive for Business.
Using the Index Form Builder, do the following:
-
Add a new field, such as a drop-down list.
-
Define an On Load event for the field; then add a Query.
-
Choose OneDrive for Business Data Source from the Query drop-down list.
-
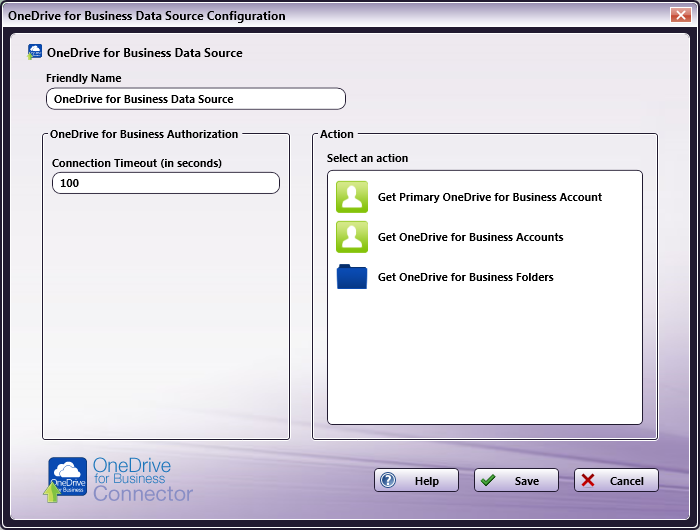
The OneDrive for Business Data Source Configuration window appears, which allows you to perform specific actions in order to retrieve data from OneDrive for Business.
Do the following:
-
In the Friendly Name field, enter an identifying name for the OneDrive for Business data source configuration.
-
In the Action area, you can choose what kind of action to perform on the OneDrive for Business data source. Options include:
- Get Primary OneDrive for Business Account – This option returns the primary OneDrive for Business account for the user.
- Get OneDrive for Business Accounts - This option returns all the OneDrive for Business accounts for the user.
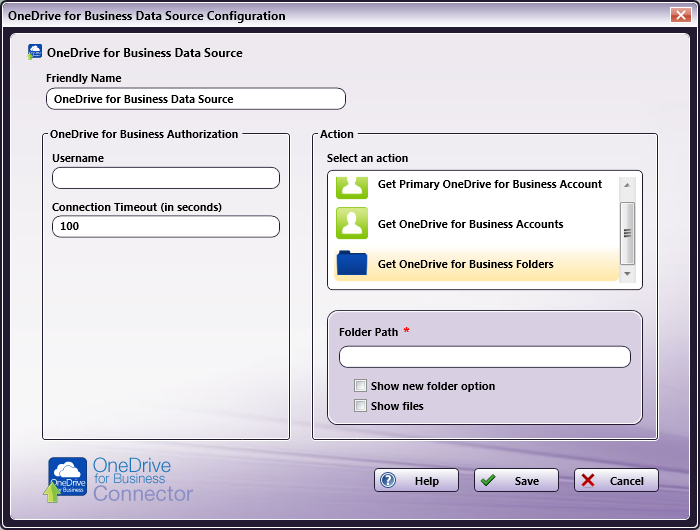
- Get OneDrive for Business Folders - Use this action to display a list of folders within a specific OneDrive Folder Path. When you select the Get OneDrive for Business Folders item, new fields will appear for configuration, as in the following illustration:
-
Folder Path – Enter the folder ID of the OneDrive for Business root folder that you want displayed at the MFP panel.
-
Show new folder option – Check this option to allow the user to create a new OneDrive for Business folder at the MFP.
-
Show files - Check this option to display files in OneDrive for Business folders at the MFP.
-
-