Watermark
The Watermark Node applies a watermark to an image file. Acceptable file types for the Watermark Node include: PDF, TIFF, JPG, GIF, PNG, and BMP. Note that the Watermark Node does not support AES (Advanced Encryption Standard) PDFs.
Note: When building a workflow with other OCR process nodes (e.g., Convert to PDF, Redact, etc.) the Watermark Node must be the last process node in the workflow.
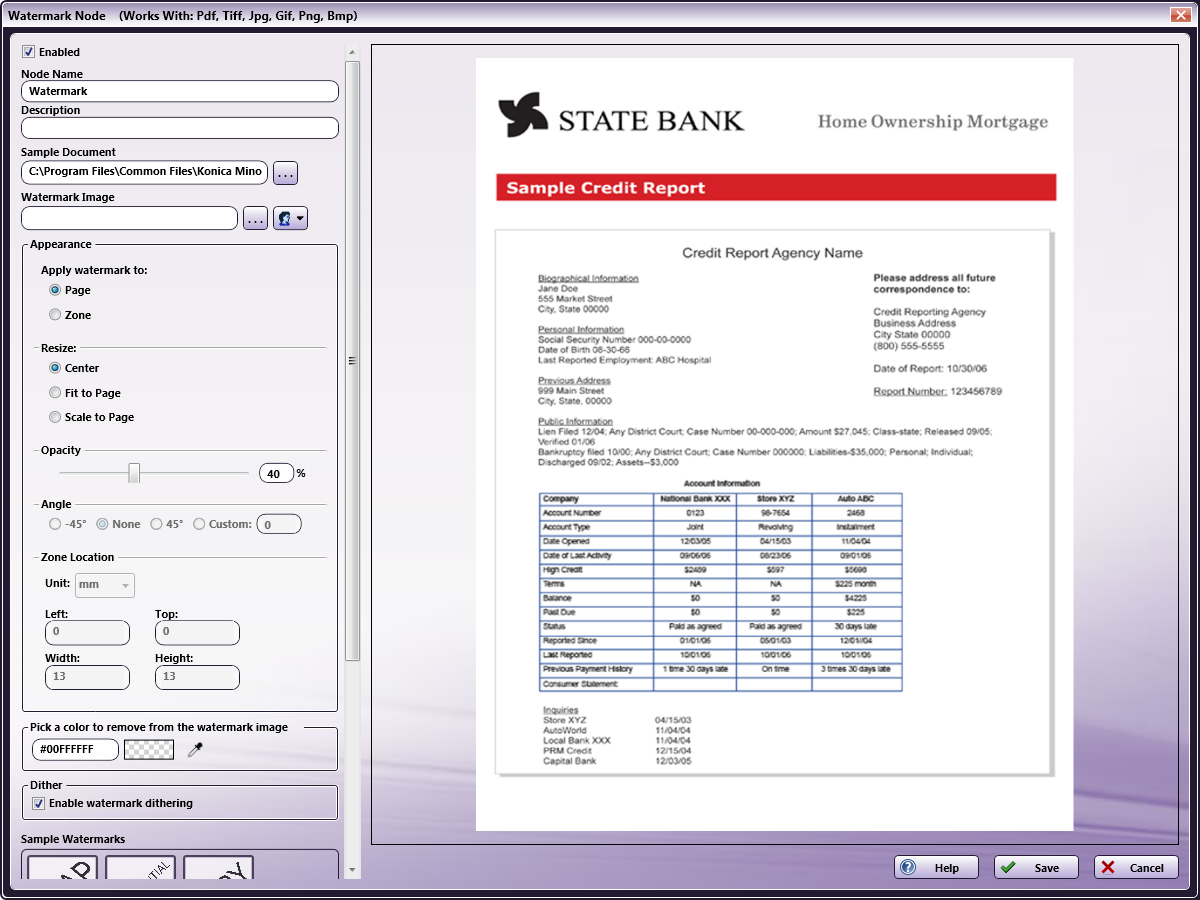
To open the Watermark Node window, add a process node for Watermark to the Workflow Builder canvas, then double-click on the node. The Watermark Node window will open, as shown in the following illustration:
-
To enable the node, check the Enabled box. When this box is unchecked, this process node will be ignored and documents will pass through as if the node was not present. Note that a disabled node will not check for logic or error conditions.
-
In the Node Name field, enter an alternative name for the Watermark Node. Although this is not required, it can be helpful if you have multiple Watermark Nodes in a workflow.
-
In the Description field, enter a description for the Watermark Node. Although this is not required, it can be helpful in reminding you which process is active in the workflow. If the length of the description exceeds the amount of space in the field, you can hover the mouse over the field to read the entire description.
-
In the Sample Document field, specify a different sample document to use to preview the results of your watermark process. Note that even if you upload a sample document, the display may not match the actual results exactly. For a true result, you must run the workflow. Note that PDFs cannot be used as sample documents.
-
In the Watermark Image field, specify a different watermark image to use in the watermark process. Several Sample Watermarks are included in PNG format and can be used for the watermark process. Click on the Sample Watermark that you want to use under Sample Watermarks, or click on the ellipsis button (
 )to browse and use one of your own images. If you choose to use one of the many common watermarks included with this node, they all have transparent backgrounds and will output the same image shown in the preview (as shown in the above illustration). When using a watermark image that resides on a network directory, you will need to enter network credentials. Select the Network Credentials button to the right of the ellipsis button to access the Network Credentials window; on this window, you can select your username and enter the appropriate password.
 -
In the Appearance area you can select various options to modify the appearance of the watermark.
-
Apply watermark to:
-
Page - Select this radio button to apply the watermark to the entire page.
-
Zone - Select this radio button to apply the watermark within a zone on the page. With this option, you can move, resize, and rotate the zone.
Note: You can use the keyboard arrow keys to move the zone around the preview of the document. Holding down the Shift key or the Ctrl key at the same time allows for faster movement.
-
-
Resize - Select a radio button to determine how the watermark image will resize on the page:
-
Center - Center the watermark image to the input document. Note that the watermark image will take on the DPI of the input document and this may change its apparent height and width. For example, if a 300x300 pixel watermark is applied to a 400 dpi image, the watermark will appear to be 3/4" x 3/4".
-
Fit to Page/Zone - Resize both the height and width of the image until the entire page is covered. Note that this will not resize the image proportionally and the resulting image could look distorted.
-
Scale to Page/Zone - Resize the height and width of the image proportionally as large as the page can hold without distorting the aspect ratio of the image.
-
-
Opacity - Use the slider bar or enter a value in the percentage field to set the opacity level for the watermark.
-
Angle - Select a radio button to modify the angle of the watermark. You can also enter a custom angle by selecting the Custom radio button and entering a value in the Custom field. The Angle option is only available if you have selected Apply watermark to zone.
-
Zone Location - Select a unit of measurement (millimeters, inches, or points), then enter values in the fields below. Left and Top refer to the distance from the left and top of the page, respectively. Width and Height refer to the size of the watermark zone. The Zone Location option is only available if you have selected Apply watermark to zone.
-
-
Pick a color to remove from the watermark image - Enter the color code of a color you do not want included on the watermark. You can also use the eye dropper to mark any color you do not want included on the watermark.
-
Dither - Check the Enable watermark dithering box to speckle the watermark image overlay. This is useful for improving transparency when watermarking black & white or limited-index color format images.
-
Sample Watermarks - Various common watermarks are available to use on your document.
Note: You can use Ctrl + mouse wheel to zoom in/out on the preview of the document.
-
Select the Save button to keep the Watermark definition. You can also select the Help button to access online help and select the Cancel button to exit the window without saving any changes.
Note: Special considerations should be taken when watermarking black and white TIFF images. This is due to the very limited color depth (black or white pixels only) of the image. As a result, it is recommended that the watermark brightness be set to 100% and that the watermark image be transparent, or to select a background color. This will result in an opaque stamp of the watermark over the black and white source document.