Forms Processing

Use the Forms Processing node to conduct advanced searches for unique identifiers in imaged documents via barcode or text searches. You can search for identifiers such as Social Security numbers and telephone numbers. You can extract and/or process (redact, highlight, or strikeout) information based on rules you define - without knowing the exact content of the information or even its exact position on the page.
For example, to redact all numbers found in an Invoice Number field on a form, you can set up rules in the Forms Processing node to automatically search for an Invoice Number label and then redact all numbers to the right of that label.
The Forms Processing node allows you to create rules to search for and process information in forms. You first define a “base rule”. You can then associate one or more “subrules” with the base rule. For example, a base rule can search for the static text “Social Security number” on a field in a form and the subrule can find all social security numbers (using the pattern XXX-XX-XXXX) after the base rule field. You can assign multiple base/sub rule combinations to a node.
The Forms Processing node can also search for barcodes on the page. You can define rules so that Dispatcher Phoenix uses the barcode data to search for other fields on the form.
This node works with the following file types:
- TIFF
- JPG
Note: The recommended minimum DPI for scanned documents is 200. Better results can be expected for documents 300 DPI and above.
Note: This node includes the OmniPage and Tesseract OCR engines.
For more information, click on the following links to sections in this topic.
- Using the Rules List Area (creating base rules and subrules)
- Working with Rules and Zones
- Using the Actions Tab
- Using the Preview Area
- Using the Toolbar
- Searching Using Regular Expressions
- Using the Pattern Matching Tool
- Running Rule Configuration
- Regular Expression Examples
Opening the Forms Processing Node
To open the Forms Processing node properties window, add a process node for Forms Processing to a workflow and double-click on it. The following illustration shows the Forms Processing node:

-
Enabled - To enable this node in the current workflow, check this box. If you leave the box blank, the workflow ignores the node and documents will pass through as if the node was not present. Note that a disabled node does not check for logic or error conditions.
-
Node Name - The node name defaults into this field. This name appears in the workflow below the node icon. Use this field to specify a meaningful name for the node that indicates its use in the workflow.
-
Description - Enter an optional description for this node. If the workflow contains multiple processes, a description can help to distinguish multiple processes from each other. If the description is long, you can hover the mouse over the field to read its entire contents.
-
OCR Engine - If multiple OCR engines are licensed and installed in Dispatcher Phoenix, a dropdown menu appears from which you can select the engine you want to use. If only one engine is available on your system, the name of the engine displays at this field.

Buttons
- Advanced Settings - To access the Advanced OCR Settings window, click this button.
- Help - To access Dispatcher Phoenix Online Help, click this button.
- Save - To preserve your node definition and exit the window, click this button.
- Cancel - To exit the window without saving any changes, click this button.
Uploading a Sample Document
When you first open the Forms Processing node properties window, the Preview area contains no sample document. See the following illustration:
To proceed with the node configuration, you must first upload a sample document to display in the Preview Area. The document should resemble the document(s) you intend to search with the node. Do the following:
-
Upload - Click this icon to access the Open Sample browse folder. The icon appears in the following places on the page. Click on one.
- On the toolbar.
- In the Upload your document box in the Preview area.
In the Open Sample browse folder, you have the following options to choose a sample document:
- Choose from several sample documents provided by the application. The documents are of various sizes and reside in the Images folder.
- Navigate to another folder to select your own sample document.
The following illustration shows the Images folder:

Note: You can replace the sample file at any time by clicking the Sample Document icon ![]() in the Preview area’s toolbar. If you previously uploaded a sample document using the node properties window, Dispatcher Phoenix automatically opens the most recent folder you used when selecting a sample file. For more information about the Preview area’s toolbar, see Using the Toolbar.
in the Preview area’s toolbar. If you previously uploaded a sample document using the node properties window, Dispatcher Phoenix automatically opens the most recent folder you used when selecting a sample file. For more information about the Preview area’s toolbar, see Using the Toolbar.
Using the Rules List Area
All defined rules display in the Rules List area on the left side of the node properties window. You can adjust the width of this area by clicking and dragging its right-hand border to the left or right.
You can add a rule, delete a rule, or add a new subrule using the toolbar at the top of the Rules List area:

Creating a Base Rule
-
Add New Rule - Select this button to add a base rule. A drop-down palette appears, as in the following illustration:

-
Rule Name - Enter a name for the rule. Base rule names are limited to 100 characters with no restrictions on the type of characters you can use.
-
Rule Type - Select Forms Processing or Checkbox Detection. Note that this option only appears when you are using the aiDocuDroid or aiDocuDroid Handwritten OCR engines (deprecated).
-
Select Rule Location - Choose a default location for the rule by marking a button in this area. You can adjust this location later by either using the Location tab in the Rule Properties panel or by dragging-dropping the rule’s boundary box in the Preview area.
-
Save - Click this button when you are done. The rule’s bounding box appears in the specified default location in the Preview area, as shown in the following illustration:

Note: Base rules appear as a dark-green box.
Creating a Sub Rule
-
Add New Sub Rule - To create a subrule of a base rule or another subrule, click on this button. You cannot create subrules until you create a base rule first. A pop-up palette appears, as in the following illustration:

-
Rule Name - Enter a name for the subrule. Subrule names are limited to 100 characters with no restrictions on the type of characters you can use.
- Select Base Rule - Select the base rule you to associate the subrule with using the drop-down list.
-
Zone Position - Specify how to position the subrule zone using the drop-down list. Options are:
- Absolute
- Above
- After
- Below
- Before
Zones with positions set to “Above,” “After,” “Below,” or “Before” are called relative zones. A relative zone is positioned relative to the zone of the rule or subrule that precedes its subrule in the Rules List area. Conversely, zones configured with absolute positioning have locations that don’t depend on the positions of other zones.
Note: You can adjust the location of a relative zone by dragging-dropping its boundary box in the Preview area; if a zone’s position is set to “Absolute,” you can move it either via dragging and dropping, or by using the Location tab in the Rule Properties panel. For more information about positioning different zone types, see About Relative Zones and Using the Location Tab.
-
Save - Select this button when you are done. The subrule’s bounding box appears in the specified default location in the Preview area. In addition, the subrule appears indented below its parent rule in the Rules List. In the following illustration, the “All Text in Field” rule is a subrule of the “search for name” rule:

Note: Subrules appear as a light-green box. If a rule cannot complete its search using the criteria entered, and you attempt to create a subrule with a relative zone under this rule, the subrule will not be created. For example, in the rule configuration shown above, if the search for “Patient’s Name” did not return any results, the subrule “All Text in Field” would not have been created. If this occurs, re-enter the search criteria for the rule, and then try to create the subrule again.
-
About Relative Zones - If you configure your subrule as a relative zone (i.e., a zone positioned above, after, below, or before the zone of a base rule or another subrule), Dispatcher Phoenix automatically aligns the relative zone with the content specified as a search term in the base rule or subrule preceding it in the Rules List area. By default, the relative zone extends to the edge of the preview area to enable enhanced identification of content that matches your search criteria.
For example, the below image depicts a relative zone configured to search for text above the word “agency” in a sample file:

Notes:
-
Although the zone of the base rule extends across several lines of text, the subrule’s relative zone aligns specifically with the text defined as the base rule’s search term (e.g., “agency”).
-
Although relative zones automatically extend across a page, you can resize them by clicking and dragging their handles in the Preview area, or by changing their height and width using the Properties panel. For more information on the Preview area and Properties panel, refer to the sections that follow.
-
Rules Processing
When setting up your rules, note that processing will stop if the results of a rule do not match the Search criteria. For example, if you have a base rule and two subrules and the 1st subrule does not match, then the 2nd subrule will not be processed.
Working with Rules and Zones
To access additional options for rules and zones, open the “More Actions” menu by clicking the ![]() icon at the upper right of the Rules List area, as shown below:
icon at the upper right of the Rules List area, as shown below:

The below table describes the options available in the “More Actions” menu:
| Menu Option | Menu Action | Keyboard Shortcut |
|---|---|---|
| Show/Hide all zones | Shows or hides all zones in the Preview area. Note that you can also choose to show or hide individual zones or groups of zones. See Showing or Hiding Zones for additional information. | F6 |
| Delete all zones | Deletes all zones from the current node. | Ctrl+Shift+Del |
| Export rules | Exports rules in the current Rules List area to an XML file. See Importing and Exporting Rules for additional information. | Ctrl+E |
| Import rules | Imports rules from an XML file to the Rules List area. See Importing and Exporting Rules for additional information. | Ctrl+I |
| Expand/Collapse Rules | Expands or collapses the tree structure of rules and subrules in the Rules List area. You can also expand or collapse individual base rules and subrules by clicking the |
F12 |
| Show/Hide Move Handles | Shows or hides a handle tool |
F11 |
| Rename | Renames the currently selected rule or subrule to a value that you specify. | F2 |
| Show/Hide Properties | Shows or hides the Properties panel for the selected rule or subrule. See Using the Properties Panel for additional information. | F4 |
Note: You can also rename, delete, and/or show or hide the properties of individual rules or zones by right-clicking them in either the Rules List area or the Preview area and selecting an option from the context menu that appears. You can additionally access this menu by clicking the ![]() icon to the right of individual rules in the Rules List area.
icon to the right of individual rules in the Rules List area.
Showing or Hiding Zones
The Forms Processing node enables you to show or hide zones associated with each rule you create via several methods. You can access these options either from the Rules List area at the left of the screen, or through the Preview area. To show or hide a zone using the Rules List area, you can either:
- Click the “eye” icon
 to the right of the name of its rule or subrule; or
 - Select one of the options under the Show/Hide Zones menu.
To access the Show/Hide Zones menu, either open the “More Actions” menu by clicking the ![]() icon, or right-click a rule name, as shown in the image below. You can also access this menu by right-clicking a zone in the Preview area.
icon, or right-click a rule name, as shown in the image below. You can also access this menu by right-clicking a zone in the Preview area.

The below table lists the options available via the Show/Hide Zones menu. In addition to the methods described above, you can also access each option using keyboard shortcuts.
| Menu Option | Menu Action | Keyboard Shortcut |
|---|---|---|
| Show/Hide all zones | Toggles the visibility of all zones on or off in the Preview area. | F6 |
| Show/Hide this zone | Toggles the visibility of the selected zone on or off in the Preview area. | F7 |
| Show/Hide zones from this group | Toggles the visibility of the zones associated with the selected base rule or subrule and all of its subrules on or off in the Preview area. | F8 |
| Hide all zones but this | Hides all zones except the selected zone from view in the Preview area. | F9 |
| Hide all zones but this group | Hides all zones except those associated with the selected base rule or subrule and all of its subrules from view in the Preview area. | F10 |
Note: When a zone is visible in the Preview area, an “eye” icon ![]() appears to the right of its associated rule or subrule in the Rules List area.
appears to the right of its associated rule or subrule in the Rules List area.
Importing and Exporting Rules
In addition to creating rules and subrules, you can also use an XML file to import rules to the Rules List area. You can additionally export existing rules to an XML file for later use. To import rules, follow the steps below:
-
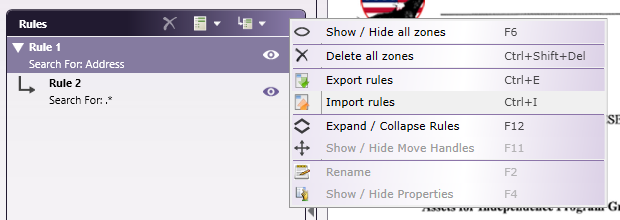
Click the “More Actions” menu, and select “Import Rules,” as shown below:
-
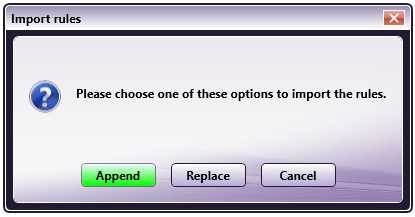
Navigate to the folder containing your rules file and open it. If no rules currently exist in the node, Dispatcher Phoenix imports your rules into the Rules List area. If rules are already present, the below dialog box appears:
-
If the above dialog box appears, select one of the following options:
a) To add the rules from your XML file to the existing set of rules in the Rules List area, click “Append.”
b) To replace all currently defined rules with the rules from your XML file, click “Replace.” Note that clicking “Replace” deletes all previously defined rules from the Rules List area.
To export rules, follow the steps below:
-
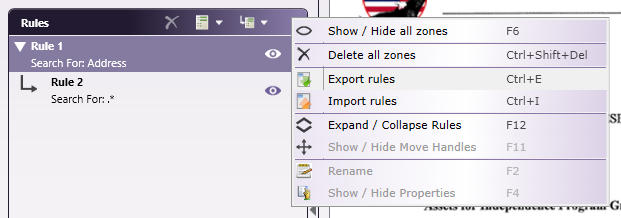
Click the “More Actions” menu, and select “Export Rules,” as shown below:
-
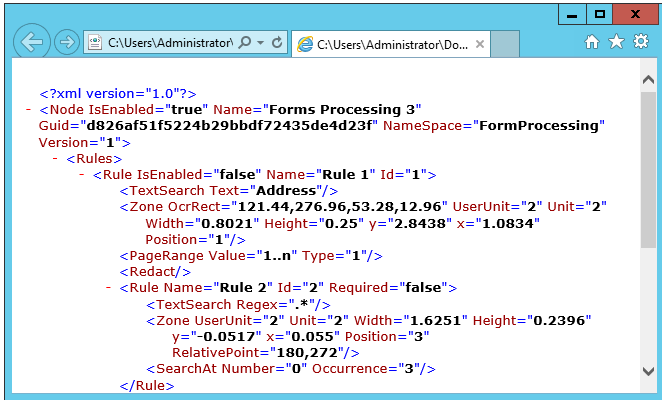
Navigate to a folder in which to store your rules file. Select a name for your file and click the “Save” button. A preview of the XML content of your rules file appears in a browser window:
-
Close the preview window at any time, once you’ve finished using it. To access your exported XML file again, navigate to the folder in which it’s stored.
Using the Properties Panel
The Properties Panel resembles the following illustration:

Editing Rule Names
On the Properties Panel title bar, you can rename the name of the rule by clicking on the Edit Rule Name button. The rule name becomes a text entry field, as in the following illustration:

Using The Search Tab
On the Search Tab, you can use the options provided under the Search Mode and Search Type menus to define your search criteria. Options available under the Search Mode menu include “Normal” (e.g., static text), “Regular Expression,” or “Pattern.” You can choose to apply these values either to a text or barcode search using the Search Type menu. For example, in the above image, a search is being conducted in Normal mode for the text value “Date of Birth.”
For more information, see the following sections:
Making Subrule Matches Required
Subrules have an additional field on the Search tab that allows you to specify whether or not the subrule must be required to match in order for the previous rules to be acted upon.
If you enable the If match not found, do not perform parent rule action option, the base rule will not be processed if the subrule is not found. See the following illustration:

Using the Location Tab
Use the Location tab to specify which pages to process and the location of the rule’s zone on the page.
For Base Rules

For base rules, you can specify the page range to process and the zone’s location/size. Do the following:
-
Using the Page Range drop-down list, you can choose one of the following options:
-
Every page - Process every page.
-
Every even page - Process even pages.
-
Every odd page - Process odd pages.
-
First page - Process the first page only.
-
Last page - Process the last page only.
-
Define your own page range - Process a custom page range. Once you choose this option, an empty field will appear to enter the page range. Do the following:
-
Specify a page range by using commas and/or dash signs counting from the start of the document. For example, enter 1, 2, 5-7 to process pages 1, 2, 5, 6, and 7.
-
Specify a specific stamping sequence within a range of pages by using parentheses. For example, enter 1-10(3) to process every third page from pages 1 to 10.
-
Specify the last page by using ‘end.’ For example, enter end(-5) - end to process pages 15-20 of a 20-page document.
Other examples include:
-
To process pages 1, 2, 5, 6, 7, and 19 of a 20-page document, enter: 1,2,5-7, end(-1).
-
To process pages 10-15 of a 20-page document, enter: 10-end(-5).
-
To process every other page from pages 10-15 of a 20-page document, enter: 10-end(-5)(2).
-
To process pages 15-20 of a 25-page document, enter: end(-10)-end(-5).
-
To process pages 10-20 of a 20-page document, enter: end(-10)-end.
Note: If you specify a page range that does not correspond to the number of pages in the incoming document (e.g., processing pages 10-20 for a three-page document), then the file will go out on error.
-
-
-
-
Using the Left and Top fields, you can configure the location of the zone by entering pixels, inches, or millimeters measurements.
-
Using the Height and Width fields, you can change the size of the zone by entering pixels, inches, or millimeters measurements.
For Subrules

For subrules, you can specify where and when to search and the zone’s location/size. Do the following:
-
Specify when to search using the Search At drop-down list. Options are:
-
First Occurrence – Search from the previous rule’s zone to the first occurrence of the subrule.
-
Last Occurrence – Search from the previous rule’s zone to the last occurrence of the subrule.
-
All Occurrences – Search from the previous rule’s zone to all occurrences of the subrule.
-
Occurrence Number – Search from the previous rule’s zone to a specific occurrence within the subrule match results. Once you choose this option, a blank field will appear, allowing you to enter a number.
-
-
Configure size and position settings for subrule zones using the Zone Location area or Zone Size area of the Properties panel. Options vary based on zone type, as described below.
-
If the Zone Position is set to “Absolute,” the location of the subrule zone will always be at a fixed position. You can do the following:
-
Specify the Top/Left position of the zone using the Top and Left fields.
-
Specify the size of the zone using the Height and Width fields. You can also specify the size of the zone by dragging the zone’s boundary box in the Preview area.
-
Customize the measurement units (pixels, inches, or millimeters) used for positioning.
-
You can also drag-drop the zone displayed on the Preview area to its appropriate position and the fields in the Rules Properties panel will change accordingly.
-
-
If the Zone Position is set to “Above”, “After,” “Below,” or “Before,” the subrule’s zone is positioned relative to the position of the previous rule’s zone. If one of these options is selected, you can do the following:
-
Specify the size of the zone using the Height and Width fields in the Zone Size area. Customize the measurement units (pixels, inches, or millimeters) used to indicate the zone size. You can also specify the size of the zone by dragging the zone’s boundary box in the Preview area.
-
To change the location of a relative zone, click and drag it to a new position in the Preview area.
-
-
Using the Actions Tab

Using the Actions tab, you can do the following:
-
Select the process to perform on the search results by checking the Modify Document box and then selecting either Redact, Highlight, or Strikeout.
Note: You must check the Associate Metadata box first to enable the Overwrite Metadata Value and Remove Duplicates options.
-
Associate metadata with the search results by checking the Associate Metadata box. You must also enter an identifying name for the metadata in the Metadata Key field. Note that the group name of the metadata will be “forms.” For example, if you enter “names” in the Metadata Key field, the metadata can be referenced using the following variable: {forms:names}.
-
You can choose to overwrite the metadata value with a hard-coded value by checking the Overwrite Metadata Value box and then entering a specific value in the empty box below. This is useful for routing files based on a specific value. For example, if you want to route all files that contain redacted text (regardless of the redacted text’s value), you could enter a value of “redact” in this field and then set up a Metadata Route node to route files that contain a Forms metadata of “redact.”
-
You can choose to Remove Duplicates. By default, this option is unchecked for new workflows, so all metadata values associated with a metadata key are saved. Checking this box will cause the node to save ONLY the first metadata value associated with that metadata key and ignore any other values it finds during the OCR process.
Note: The Remove Duplicates option is new as of Dispatcher Phoenix 8.9.1. For workflows created before this release, the Remove Duplicates box is checked by default (ON) to maintain workflow functionality.
Using the Preview Area
The Preview area displays the rules’ bounding boxes on a sample document.
Using the Preview area, you can do the following:
-
Resize a rule’s bounding box by selecting the bounding box and dragging the appropriate handle(s) until the box is the desired size.
-
Reposition a rule by clicking on the bounding box and then dragging the box to its desired position.
-
Define your zones on a different sample document by clicking on the Upload icon on the toolbar.
Tip: You can adjust the width and height of the Preview area by clicking and dragging its left and bottom borders.
Using the Toolbar
The toolbar at the top of the window allows you to customize the view of the node properties window.
When using the drop-down palettes on the toolbar, pressing the Enter key or clicking anywhere outside of the palette will apply those changes to the zone.
| Toolbar Icons | Description |
|---|---|
| Run Rule Configuration icon. Click on this icon to test the rules that you have defined. | |
 |
Run Rule Configuration Settings icon. Click on this icon to change the seconds allotted for the time without communication before a timeout occurs. |
| Delete icon. Click on this icon to delete a selected rule. | |
| Pages icons. Click on the arrows to navigate through multiple pages of the sample document (if available). | |
| Sample Document icon. Click on this icon to find and upload another sample document to use in the Preview area. | |
| Actual Size icon. Click on this icon to revert the preview sample document to its original size. | |
| Fit to Width icon. Click on this icon to stretch the sample document to fit the width of the Preview area. | |
| Whole Page icon. Click on this icon to fit the sample document completely in the Preview area. | |
| Zoom controls. Use either the magnifying glass icons or the sliding bar to zoom in and out of the Preview area. |
Searching for Static Text
To search for static text in a document, do the following:
-
Select Normal from the Search Mode drop-down list.
-
Select Text from the Search Type drop-down list.
-
Enter the static text to search for in the Search For field.
-
You can further refine your search by choosing the following Search Options:
-
Match Whole Word - Check this box to search for complete words (not words that merely contain what you’ve specified).
-
Match Case – Check this box if capitalization matters during your search operation.
-
Fuzzy Match - Check this box to search for words or text strings that either match or come close to matching what you entered. This option is provided to compensate for any OCR errors.
-
In the following illustration, “Patient’s Name” is being searched for:

Searching for Barcodes
You can search for barcode values in a document using Normal, Regular Expression, or Pattern Searches.
Note: The TesseractOCR engine does not support this functionality.
Once you have chosen your Search Mode, do the following:
-
Select Barcode from the Search Type drop-down list.
-
Select the Select Barcodes button to choose the type of barcode to search for from the pop-up screen that appears. Check a box next to the barcode that you are interested in; then select the OK button. See the following illustration for an example:

When searching for barcode values, the barcode will be treated as a single entity.
For example, if you set up a Regular Expression search that matches part of the barcode value, the entire barcode value will be processed (redacted/highlighted/strikeout) and extracted as metadata, as a result.
In the following example, a barcode value is ‘12345’. A regular expression search is set up to find ‘123’, redact the barcode, and extract the barcode value as metadata. In this case, the entire barcode will be redacted and the metadata value for the barcode will be returned as ‘12345’.
See the following illustrations:
Barcode Search Rule Configuration:

Result:

Searching Using Regular Expressions
To use regular expressions in your search, do the following:
-
Select Regular Expression from the Search Mode drop-down list.
-
Select Text or Barcode from the Search Type drop-down list.
-
Enter the regular expression to use in the Search For field.
Changing the Search Criteria
In some cases, you may decide to change the search criteria for a rule or subrule to search for content that is located in a different position in your document. In this scenario, if you change the search criteria for a rule or subrule that precedes other subrules in the Rules List area and wish to detect content whose position aligns with content identified by the new search critera, you’ll need to either:
- re-create the subrules located under the rule or subrule for which the search criteria were changed; or
- manually resize and/or re-position the zones of the subrules below the rule or subrule for which the search criteria were changed.
For example, in the below image, Rule 1 is configured to search for the word “agency,” and Rule 2 is configured to search for everything above this term. If the search term for Rule 1 is changed to “representative,” Rule 2 would either need to be re-created or manually re-positioned in order to detect content located above the new search criteria.

Note: if you change the search criteria for a rule or subrule that precedes other subrules with zones whose positions don’t need to align with content that the search identifies, then you don’t need to re-create or re-position the zones associated with these subrules. For example, in the configuration below, if you change Rule 1 to search for “Smith” rather than “Mary,” you can continue to use Rule 2 and Rule 3 to detect “Phone” and “Address,” if their zones don’t need to specifically line up with the word “Smith.”

Using the Pattern Matching Tool
To use patterns in your advanced search, choose Pattern from the Search Mode drop-down list; then select the Add/Edit Pattern button in the Pattern Details area. The Pattern Matching Tool opens, as in the following illustration:

On the Pattern Matching Tool, groups of predefined patterns are listed on the left-hand side of the window. You can do the following:
-
To view the patterns within each group, select a specific category. The patterns will appear on the right hand side of the window. For an example, Telephone Number Patterns may resemble the following illustration:

-
To add a pattern to the Forms Processing node, do the following:
-
Select a category from the Patterns list in the Pattern Matching Tool.
-
Check the box next to the pattern that you are interested in.
-
Select the Save button.
-
The Pattern Matching Tool will close and the regular expression associated with the pattern will appear in the Forms Processing node’s Search For field, as in the following illustration:

-
Creating a New Pattern
To create a new pattern, click on the + button in the Patterns area. The New Pattern window will appear, as in the following illustration:

Do the following:
-
Select a group for the new pattern using the Group drop-down list. If you want to create a new group, select the Create New Group… option.
a. If you select the Create New Group option, an empty Group Name field will appear underneath the Group drop-down list, as in the following illustration:

b. You must enter a name for the new group in the Group Name field. The new group will appear under the Patterns list.
-
In the Name field, enter identifying text for the new pattern. This will appear in the Pattern Matching Tool window next to the newly created pattern.
-
In the Mask field, enter the masked characters that make up the new pattern.
-
In the Regular Expression field, enter the regular expression for the new pattern.
-
Select the Save button when you are done.
The new pattern will then appear in Pattern Matching Tool window, categorized under the Group that you specified.
For example, if you want to create a pattern that searches for Telephone Numbers with the following format: (1) – XXX-XXX-XXXX, you could do the following:
-
Click the Add New Pattern icon to open the New Pattern window.
-
Choose Telephone Number from the Group drop-down list.
-
Enter a description for the new pattern in the Description field (i.e., Country Location).
-
Enter 1-XXX-XXX-XXXX in the Mask field
-
Enter 1-\d{3}-\d{3}-\d{4} in the Regular Expression field.
-
Select the Save button.
The new pattern would then be added to the Telephone Number patterns, as in the following illustration:

Working with Patterns
Each pattern listed in the Pattern Matching Tool window include copy, edit, and delete icons. Patterns that come standard with the application can only be copied (not edited or deleted). However, you can copy, edit, or delete patterns that you have created. See the following illustration:
Copying Patterns
To copy patterns, click on the Copy Pattern icon next to the pattern you are interested in copying. The Copy Pattern window will appear, as in the following illustration:

On this screen, you can modify the Group that the pattern is associated with, its name, mask and regular expression. When you are done, select the Save button. A copy of the original pattern will automatically appear at the end of the list in the Pattern Matching window.
Editing Patterns
To edit a pattern that you have created, click on the Edit Pattern icon next to the pattern you are interested in editing. The Edit Pattern window will appear, as in the following illustration:

On this screen, you can change the Group that the pattern is associated with, its name, mask and regular expression. When you are done, select the Save button. The edited pattern will automatically appear at the end of the list in the Pattern Matching window.
Deleting Patterns
To delete a pattern that you have created, click on the Delete Pattern icon next to the pattern you are interested in removing. A message will appear, asking you to confirm the delete operation.
Running Rule Configuration
The Forms Processing node enables you to test rules and subrules you create before running your workflow—you can either choose to test all rules in the Rules List area, or a subset of rules that you select.
Testing All Rules
To test all rules, you can select the Rule Configuration button on the toolbar to see the results of your process. The Rule Query Results panel will appear at the bottom of the page, as in the following illustration:

Note: Running the Rule Configuration will return results for the current page being viewed only.
Testing a Specific Group of Rules
To test only a specific group of rules, right-click the base rule of the group in the Rules List area and select “Test this group,” as shown below. You can also access the menu shown by clicking the ![]() icon to the right of the name of the base rule, or by pressing the F5 key on your keyboard:
icon to the right of the name of the base rule, or by pressing the F5 key on your keyboard:

This action tests the base rule and all of its associated subrules—the results of the test will appear in the Preview area in a similar format to the example shown in the previous section for testing all rules configured in the node.
Regular Expression Examples
Matching Regular Expression
Email Addresses
To match an email, such as john@doe.com, the regular expression should be set up to match one or more lowercase letters, numbers, underscores, dots, or hyphens, following by the @ sign, and a domain name that can contain one or more lowercase letters, numbers, underscores, dots, or hyphens.
^([a-z0-9_\.-]+)@([\a-z0-9_\.-]+)\.([a-z\.]{2,6})$
Where:
^ indicates the beginning of the line
[a-z0-9_\.-] matches letters, numbers, underscores, dots, or hyphens in the user name or domain name
+ indicates one or more @ is the symbol that appears in every email address prior to the domain name
. is the symbol that appears before the domain name extension
[a-z\.] matches letters or dots
{2,6} indicates 2 to 6 letters are allowed
$ indicates the end of the line
For example: ^([a-z0-9_\.-]+)@([\da-z\.-]+)\.([a-z\.]{2,6})$
Matches: john@doe.com
User Names
To match a user name, the regular expression should be set up to match letters, numbers, underscores, or hyphens.
For example:
/^[a-z0-9_-]{3,16}$
Where:
^ indicates the beginning of the line
[a-z0-9_-] matches letters, numbers, underscores or hyphens
{3,16} indicates that there should be at least 3 of those characters but no more than 16
$ indicates the end of the line
Matches my-us3r-n4m3
Credit Card Numbers
Credit cards adhere to a basic numbering scheme, which is an opening digit sequence followed by a specific number of digits. For example, MasterCard numbers are 16 digits, with the first digit always set at “5” and the second digit being between 1-5.
For example:
5[1-5]\d{14}
Where:
5 is the first digit
[1-5] matches a digit that is from 1 through 5
d{ 14} matches the next 14 digits.
Matches: 5212345678901234