SFTP Out
![]()
The SFTP Out node is very suitable for transmitting sensitive files as it supports algorithms that help address the following concerns:
- Your data stays confidential throughout the transmission. You wouldn’t want valuable or sensitive information such as Personally Identifiable Information (PII), trade secrets, customer lists, key employee salaries, marketing strategies, source codes, etc. falling into the wrong hands.
- Data integrity is upheld. Your data remains unchanged and if it ever undergoes even the slightest accidental or intentional change, you have a way of knowing.
- You are able to verify the authenticity of its source. You will want to make sure it really came from the party who you were expecting to be the sender (and not from an impostor).
Overview of the SFTP Out Node
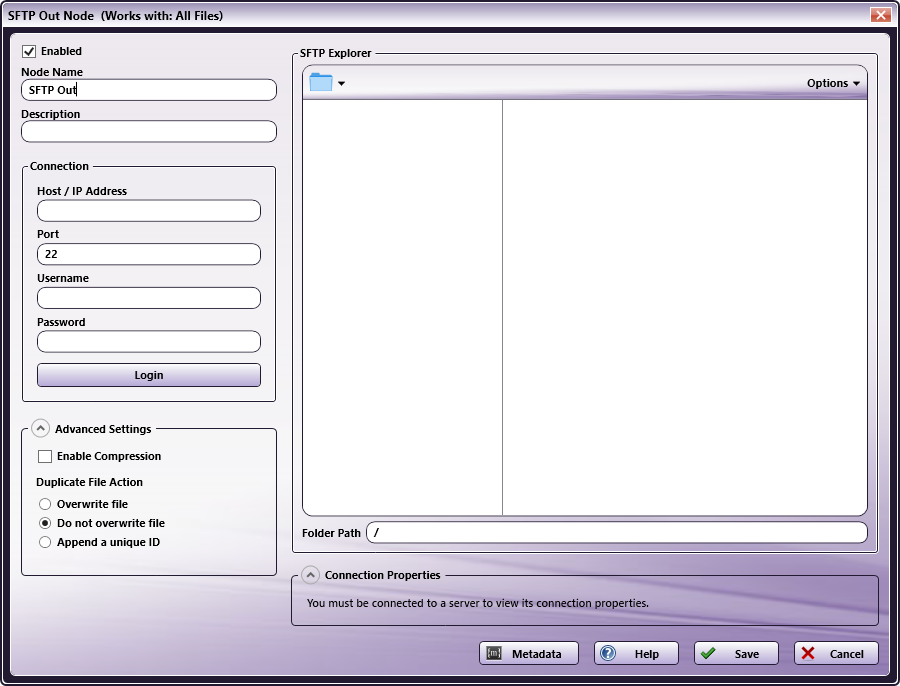
This node distributes output files to an SFTP server. To configure the SFTP Out node, add a node for SFTP Out to the workflow canvas and double-click on it.
-
Make sure the Enabled box is checked. When unchecked, this output will be ignored. While the workflow will still validate, documents will not be distributed and may be lost.
-
In the Node Name field, enter a meaningful name for the SFTP Out node.
-
In the Description field, enter a description for the SFTP Out node. This is not required, but it can be helpful when you have more than one output destination. If the description is long, you can hover the mouse over the field to read its entire contents.
-
In the Connection area, enter the system information for the SFTP server:
-
Host/IP Address - Enter the identifying host name for this server or its IP address.
-
Port - Enter the port used by the server for SFTP communication (default is 22).
-
Username - Enter the user name needed to connect to the SFTP server.
-
Password - Enter the password needed to successfully login to the SFTP server.
-
Select the Login button to test the connection with the SFTP server.
-
-
In the Advanced Settings area, customize advanced configuration options, if necessary:
-
Select the Enable Compression box to enable data compression in the SSH connection. By enabling compression, data sent by the server will be compressed before sending and decompressed once received.
-
In the Duplicate File Action area, choose one of the following actions:
-
Overwrite file - Save the new document over the previous document.
-
Do not overwrite file - Do not overwrite the file and take no other action.
-
Append a unique ID - To keep both versions of a processed file.
-
-
-
The SFTP Explorer area will auto-populate with the available folders on the server once you have successfully connected to the SFTP server.
- Folder Path - Using the SFTP explorer, you can dynamically create the folder in which Dispatcher Phoenix should output documents.
-
Connection Properties displays the algorithms and other specifications applicable to your SFTP transmission.
-
Select the Save button to keep your SFTP Out settings. You can also select the Help button to access online help and select the Cancel button to exit the window without saving any changes.
Configuring the SFTP Server
The SFTP Out node supports the following Ciphers, Key Exchange, Message Authentication Code (MAC) and Public Keys for SFTP transmissions:
| Ciphers | Key Exchange | MAC | Public Key |
|---|---|---|---|
| AES256_CTR | CURVE25519_SHA256 | HMAC_SHA1 | SSH_ED25519 |
| AES192_CTR | ECDH_SHA2_NISTP256 | HMAC_SHA2_256 | ECDSA_SHA2_NISTP256 |
| AES128_CTR | ECDH_SHA2_NISTP384 | HMAC_SHA2_512 | ECDSA_SHA2_NISTP384 |
| AES256_CBC | ECDH_SHA2_NISTP521 | ECDSA_SHA2_NISTP521 | |
| AES192_CBC | DH_GROUP1_SHA1 | SSH_RSA | |
| AES128_CBC | DH_GROUP14_SHA1 | RSA_SHA2_512 | |
| BLOWFISH_CBC | DH_GROUP16_SHA512 | RSA_SHA2_256 | |
| 3DES_CBC | DH_GROUP18_SHA512 | SSH_DSS |
Creating an SFTP Out Index Form
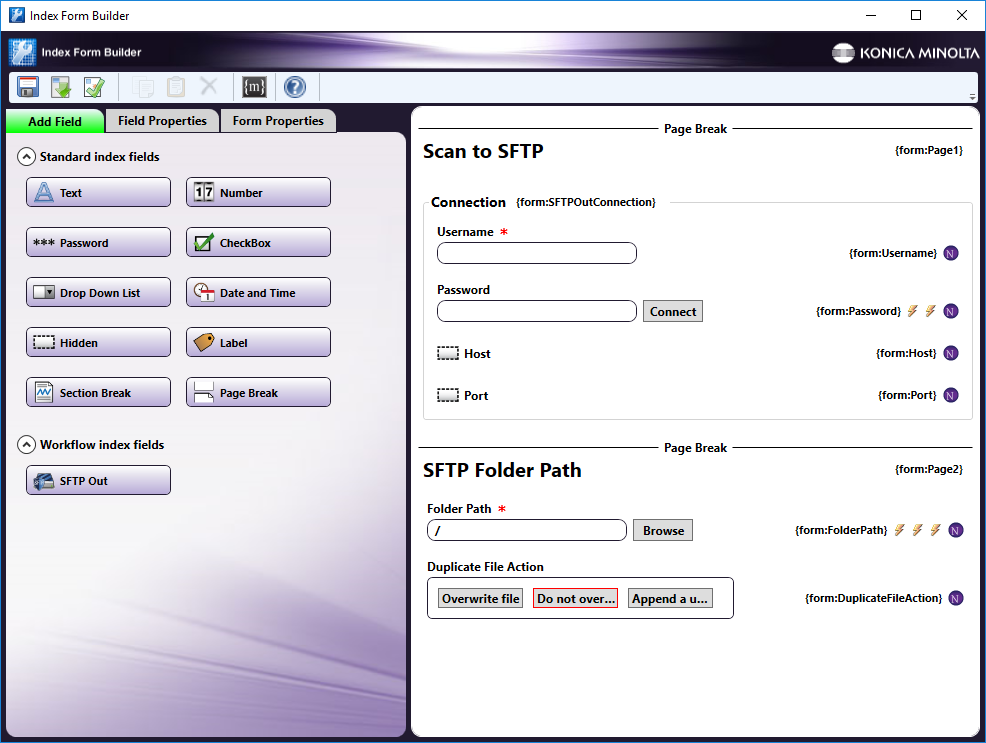
You can create an index form that allows you to log into your SFTP Out server automatically at the MFP. Do the following:
-
Make sure that your workflow includes a MFP Panel node and SFTP Out node.
-
Open up the Index Form Builder from the MFP Panel node. You should see a SFTP Out button under the Workflow Index Fields area.
-
Drag and drop the SFTP Out button to the Index Form work area. A Scan to SFTP index form will automatically appear, as in the following illustration:
-
Save and close the Index Form Builder.
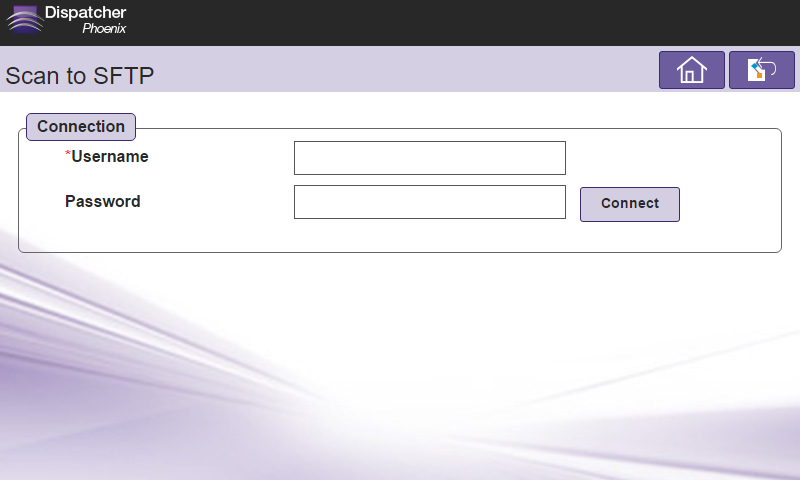
SFTP Index Form on MFP
At the MFP, the SFTP Index Form will appear as follows:
Database Browsing
You can also manually configure a query to retrieve data (e.g., list of folders, validation, etc.) from your SFTP Server.
Using the Index Form Builder, do the following:
-
Add a new field, such as a drop-down list.
-
Define an On Load event for the field; then add a Query.
-
Add an SFTP Data Source from the Query list. The options are:
- Browse SFTP Folders to view a listing of the folders and files available at the specific location on your SFTP server.
- Connect to SFTP to connect directly to the SFTP server (does not require a folder path).
Creating a Browse SFTP Folder Query
After selecting the Browse SFTP Folders from the query drop down, the SFTP Data Source Configuration window appears, which allows you to perform specific actions in order to retrieve data from your SFTP Server.
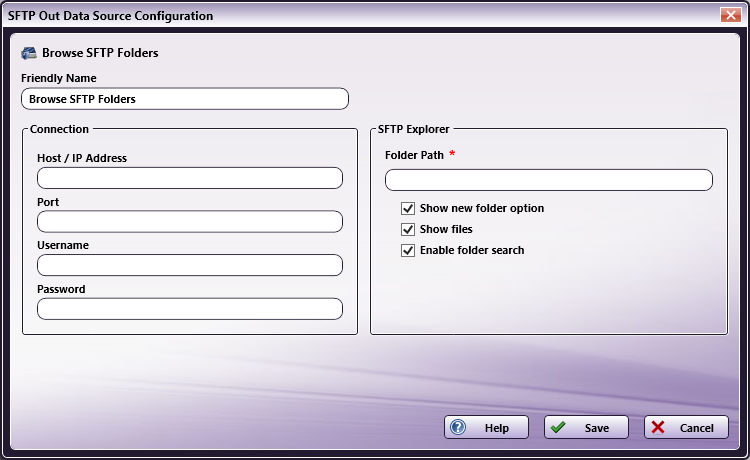
Do the following:
-
In the Host / IP Address field, enter in the host or IP Address for the SFTP server.
-
In the Port field, enter the port number used by the server for SFTP communication (default is 22).
-
In the Username field, enter in the user name needed to connect to the SFTP server.
-
In the Password field, enter the password needed to successfully login to the SFTP server.
-
In the SFTP Explorer area, enter in the Folder Path of the SFTP root folder that you want displayed at the MFP panel.
- Show new folder option – Check this option to allow the user to create a new folder at the MFP.
- Show files - Check this option to display files in Dropbox folders at the MFP.
- Enable folder search - Check this option to enable folder search at the MFP.
-
Select the Save button to keep your Browse SFTP Folders query settings. You can also select the Help button to access online help and select the Cancel button to exit the window without saving any changes.
Creating a Connect to SFTP Query
After selecting the Connect to SFTP from the query drop down, the SFTP Data Source Configuration window appears, which allows you to perform specific actions in order to retrieve data from SFTP.
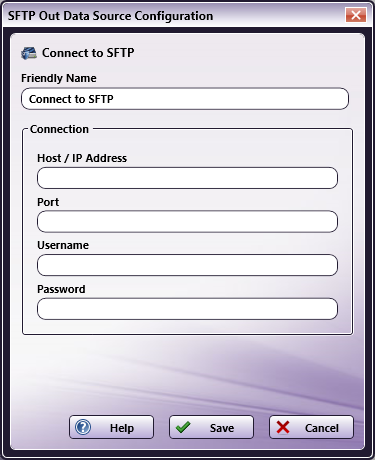
Do the following:
-
In the Host / IP Address field, enter in the host or IP Address for the SFTP server.
-
In the Port field, enter the port number used by the server for SFTP communication (default is 22).
-
In the Username field, enter the user name needed to connect to the SFTP server.
-
In the Password field, enter the password needed to successfully login to the SFTP server.
-
Select the Save button to keep your Connect to SFTP query settings. You can also select the Help button to access online help and select the Cancel button to exit the window without saving any changes.