M-Files Connector
![]()
The M-Files Connector node for Dispatcher Phoenix allows for a seamless connection with M-Files, a unique intelligent information management solution that improves how businesses secure, process, and manage data and content. The M-Files Connector node accelerates document management at the MFP by allowing users to easily:
-
upload documents
-
add class descriptions
-
add document properties, and more
This guide provides a step-by-step description of how to set up the node, several typical use cases, and basic troubleshooting.
M-Files is unique in its approach to document storage. Unlike most information management solutions, M-Files does not utilize folder trees; all documents are stored on the same level. M-Files documents contain additional information, called classes and properties, which are added by the user. Users can then search and sort documents by their class and property.
There are four main ways to set up an M-Files workflow:
-
Fully-Automated - All settings are pre-configured. The user can only scan a single document type and cannot change properties at the MFP panel.
-
Department or M-Files Service User Indexing - Most settings are pre-configured. The user can specify the document Class and specify the pre-configured document Properties at the MFP panel.
-
User Account Indexing - Some settings are pre-configured. The user must sign in at the MFP to select their Vault, document Class, and to specify pre-configured document Properties at the MFP panel.
-
Custom Indexing - Similar to Fully-Automated in that all settings are pre-configured, but with pre-configured default and Additional Properties that can be added and modified to meet the needs of your document uploads.
The M-Files Connector also supports Workflows and Workflow States. If an M-Files Document has a required Workflow, it is automatically selected for you. Workflows are editable, even when they are configured as “required” and prefilled. The M-Files Connector automatically sends the document to the first Workflow State. You can also select the Workflow and Workflow State during node configuration or at the MFP at scan time.
Note: You may only select a Workflow State that is considered a “first step.” Generally, there is only one “first step” to select for the Workflow State.
Configuring an M-Files Server
To utilize the M-Files Connector, the user must first connect to the M-Files server. Do the following:
-
Open the M-Files node.
-
In the Connection area, enter the following information:
-
In the M-Files “Server URL” field, enter the URL of the M-Files server.
-
In the “Username” and “Password” fields, enter the username and password that is used to connect to the M-Files server.
-
Click the Login button to verify the connection credentials.
-
-
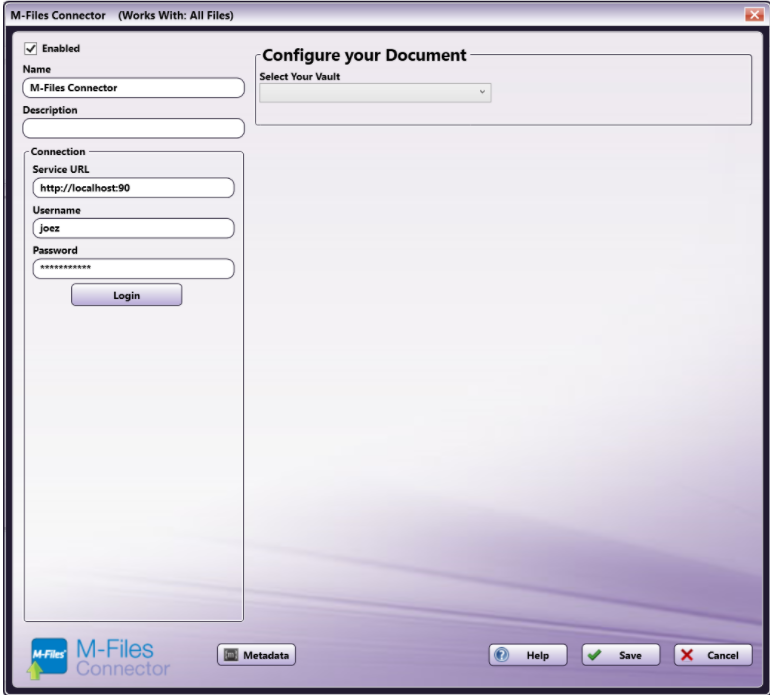
If the connection is successful, the “Configure your Document” area appears, as in the following illustration:
Fully-Automated Workflow Configuration
With a fully-automated workflow configuration, an administrator would configure the M-Files Connector to scan documents to a specific location in M-Files with standard document classes and properties. The user would scan their document into a pre-configured workflow and would not have the capability to specify a vault or edit the document class or properties at the MFP panel. This will most commonly be used for repetitive scanning and uploading tasks with no customization needed. To set up a fully-automated workflow configuration, do the following:
-
Open the M-Files node.
-
Select the Vault from the drop-down list of all available Vaults. If only one Vault is available, the configuration for the Vault is static.
-
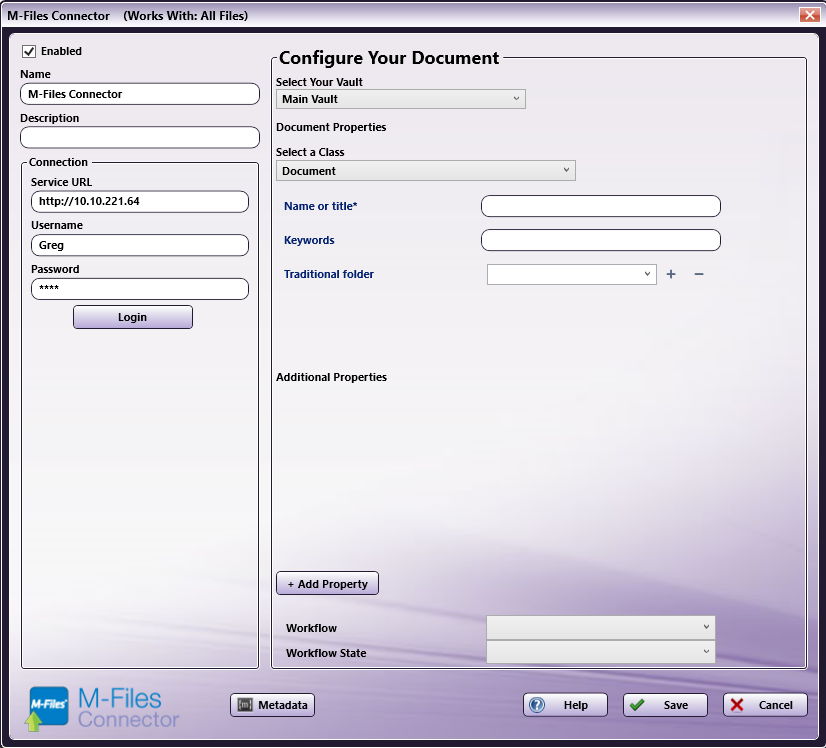
Select a document Class from the drop-down list of all available document Classes. The list of Classes is pre-configured by the M-Files administrator. After selecting the Class, the document Properties will populate, as in the following illustration:
Notes:
-
Properties marked with an asterisk are required.
-
Document Properties are dependent on the document Class and will only populate after the Class has been selected.
-
For this case, since the Properties are pre-configured, the user is not able to add any additional properties at the MFP. Users will only be able to add information to the Properties that have been pre-configured.
-
-
Select the Workflow and Workflow State from the dropdown, if needed. After selecting a Workflow, the first Workflow State will automatically populate, though you can select a different state as needed.
-
Click Save to save the configuration and close the node.
Department or M-Files Service User Indexing Workflow Configuration
In the department indexing configuration, the administrator will configure the M-Files Connector node with an M-Files Service account to capture scanning documents and their associated properties. Utilizing this configuration, users will not be prompted to log in to their M-Files Account at the MFP Panel. The user will also be able to configure the document Class and Properties at the MFP Panel during the scanning process. To set up a department indexing workflow, do the following:
-
Create a new workflow with an MFP Panel node and the M-Files Connector.
-
Configure the M-Files node according to the Configuring an M-Files Server section.
-
Open the MFP Panel node.
-
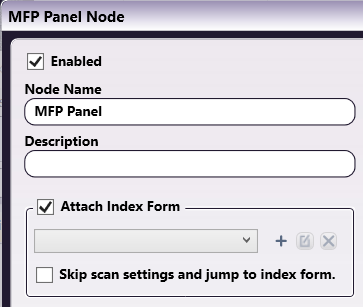
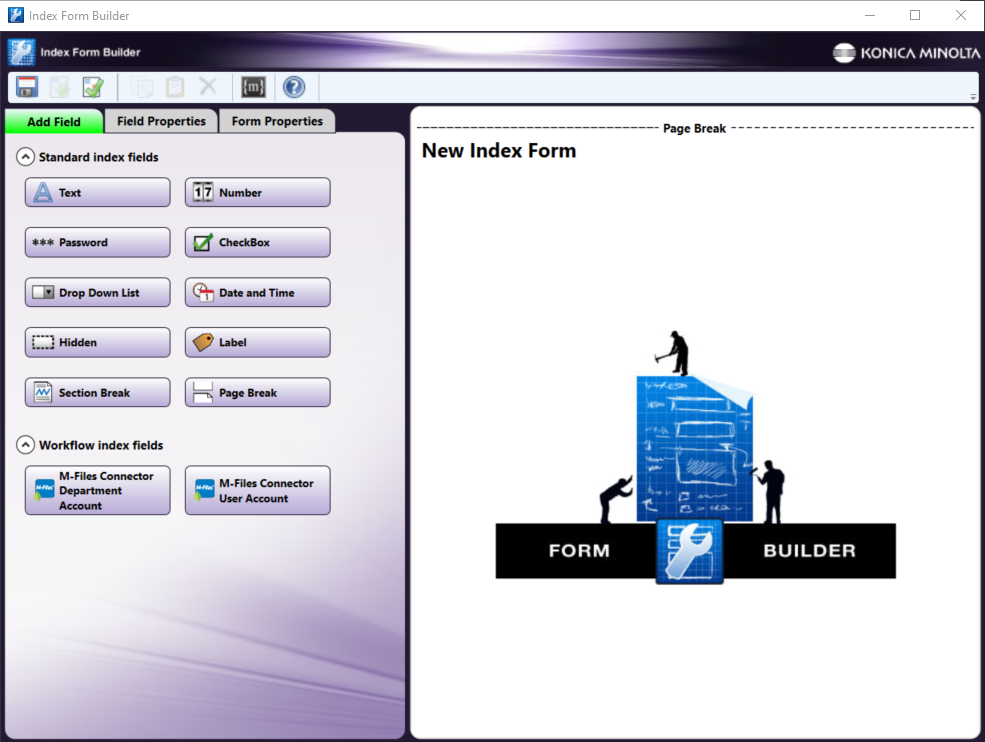
Click the checkbox next to Attach Index Form and then the + icon to open the Index Form Builder, as in the following illustration:
-
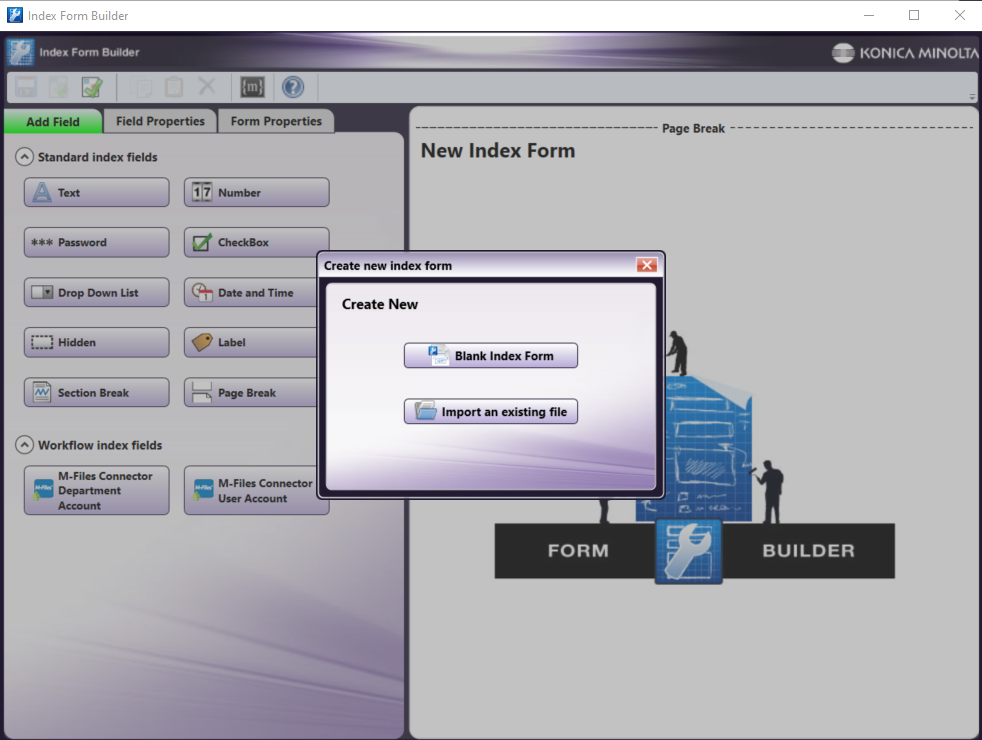
Select the Blank Index Form option in the pop-up, as in the following illustration:
-
You will then see the Blank Index Form Builder, as in the following illustration:
Note: The M-Files Workflow index fields will only populate if the M-Files Connector is placed in the workflow prior to opening the Index Form Builder. The M-Files Connector Department Account Index Form will only appear after an administrator has entered the ServerURL, username, and password and selected the appropriate Vault for the department/service user in the M-Files node.
-
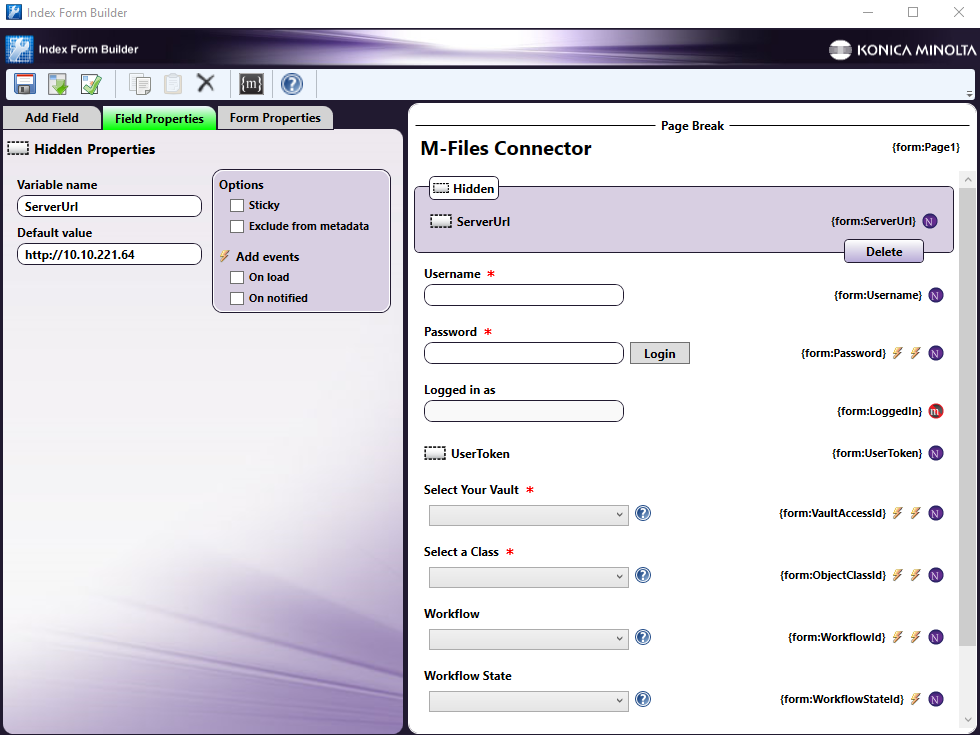
Drag the M-Files Connector Department Account icon to the Index Form Builder working area. Several fields will populate, as in the following illustration:
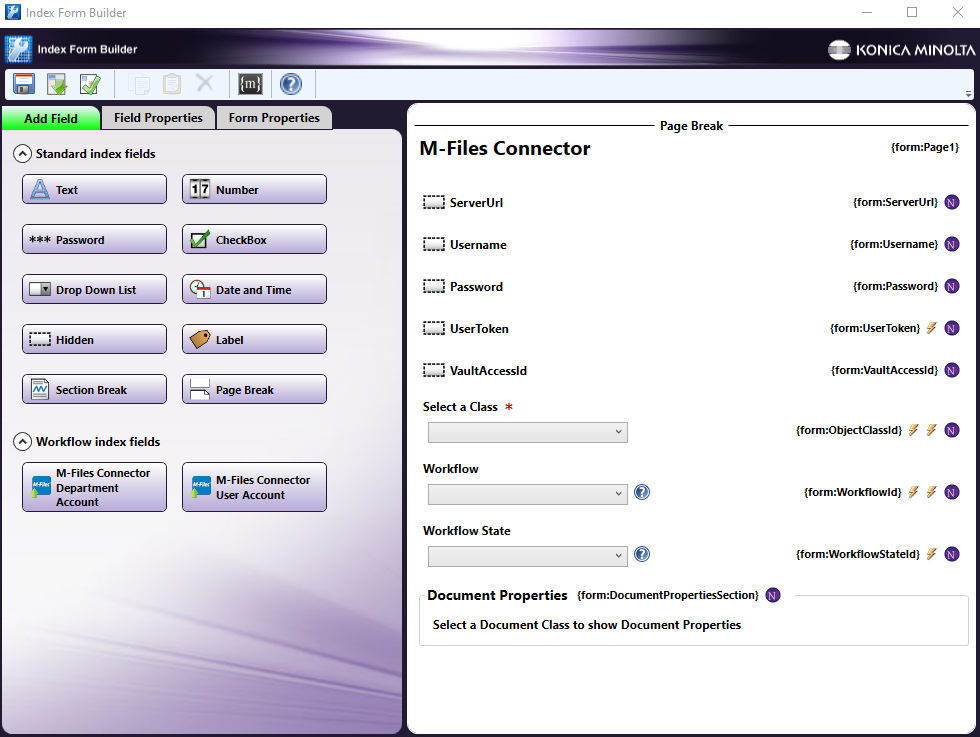
Note: Fields with the dotted outline - such as ServerUrl, Username, Password, UserToken, and VaultAccessId in the illustration - are hidden fields. They are pre-configured by the M-Files Administrator in the M-Files node and will not appear on the MFP to the user.
-
Validate, Save, and close the Index Form Builder.
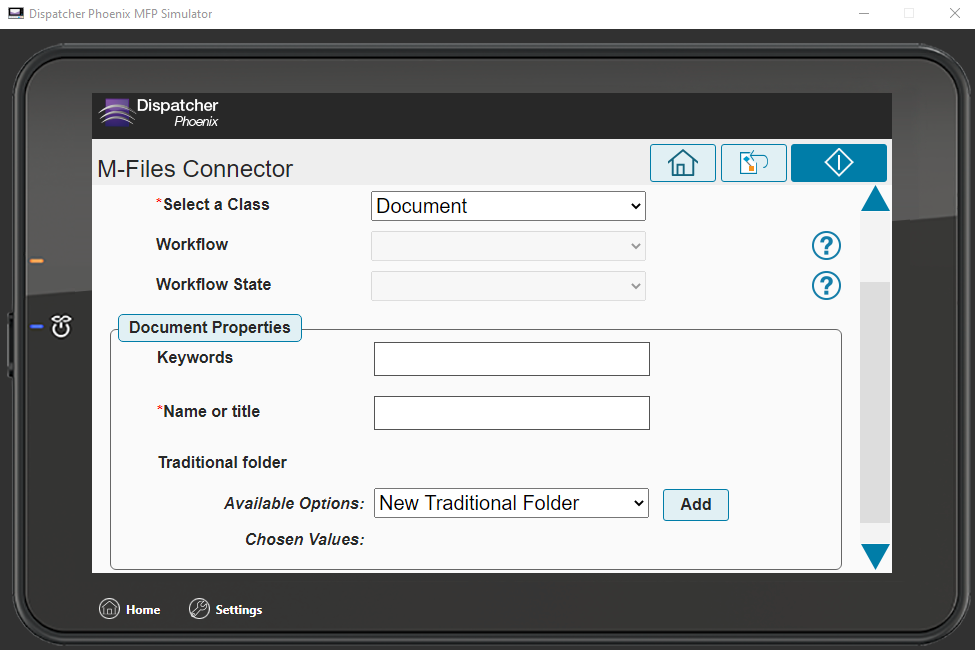
Note: At the MFP panel, the user will have the ability to select a Class from a preconfigured list, which will populate fields for Keywords, Workflow, Workflow State, and Name, as in the following illustration:
User Account Indexing Workflow Configuration
In the user account indexing configuration, the user will utilize the User Account Index form, which will convert the standard node configuration values to metadata that is entered by the user at the MFP panel. For this configuration, the user will be prompted to log into their M-Files account at the MFP before they begin their scanning and indexing. To set up a user account workflow, do the following:
-
Create a new workflow with an MFP Panel node and the M-Files Connector.
-
Configure the M-Files node according to the Configuring an M-Files Server section.
-
Open the MFP Panel node.
-
Click the checkbox next to “Attach Index Form” and then the + icon to open the “Index Form Builder”, as in the following illustration:
-
Select the Blank Index Form option in the pop-up, as in the following illustration:
-
You will then see the Blank Index Form Builder, as in the following illustration:
-
Drag the M-Files Connector User Account icon to the “New Index Form” Form Builder area. Several fields will populate, as in the following illustration:
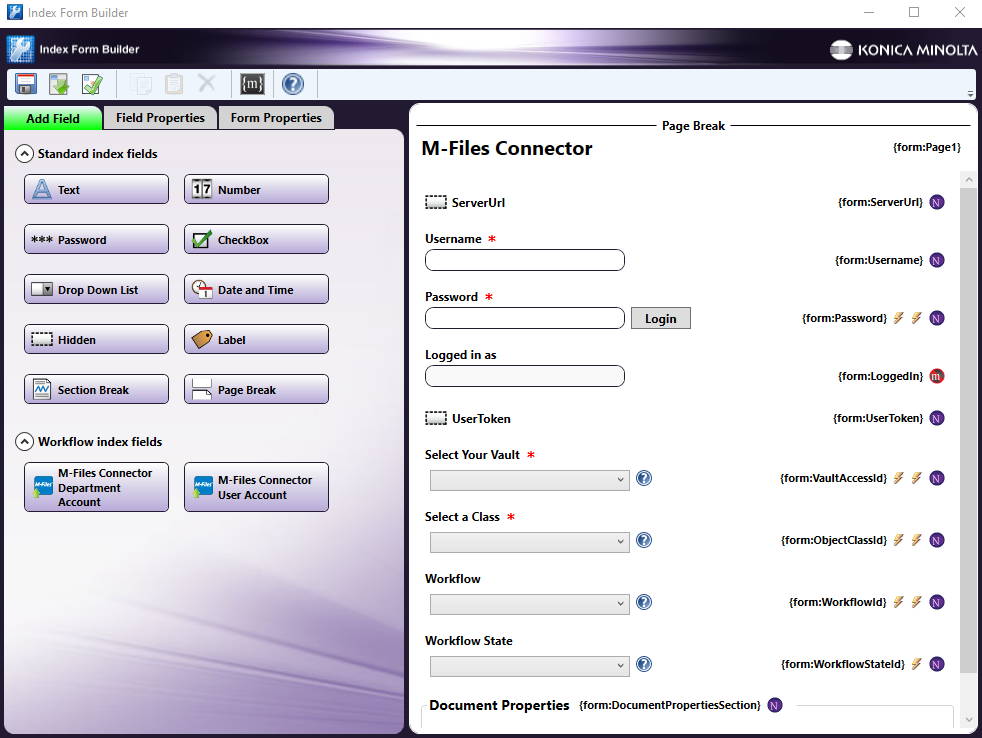
Note: Fields with the dotted outline - such as ServerUrl in the illustration - are hidden fields set up by the M-Files Administrator. They will not appear on the MFP to the user.
-
Click the ServerURL area to open the “Field Properties” editor. Enter the M-Files server URL into the “Default Value” field, as in the following illustration:
-
Validate, Save, and close the Index Form Builder.
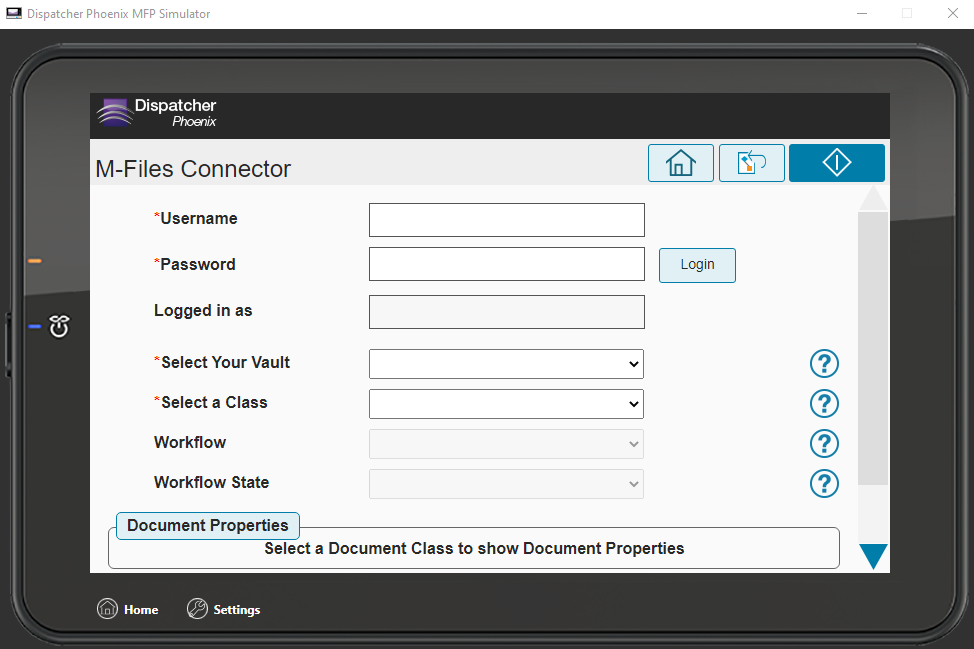
Note: At the MFP panel, the user will be prompted to sign in using their M-Files Username and Password, as in the following illustration:
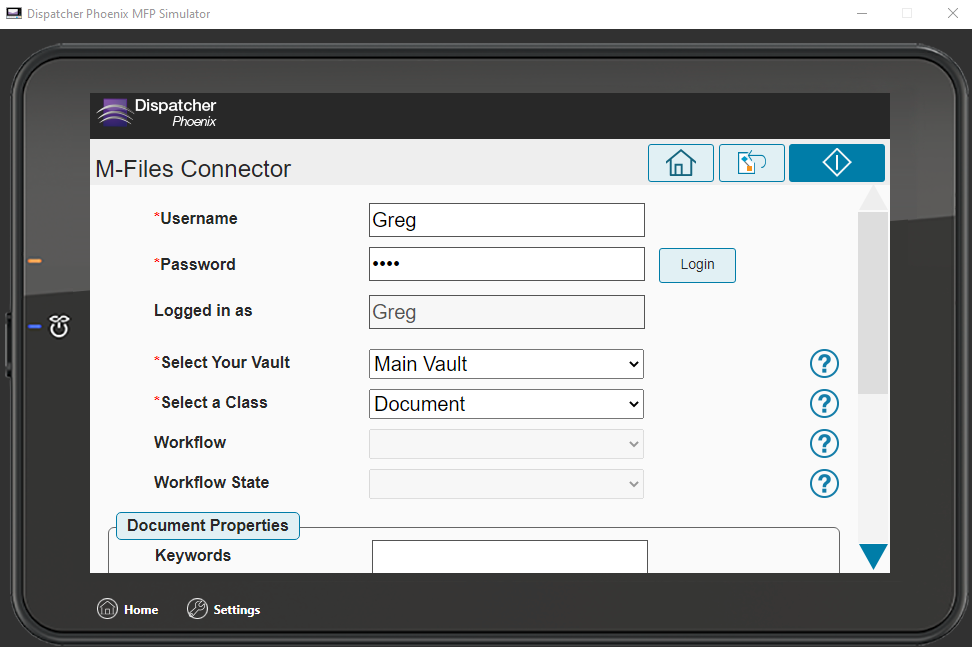
Note: The user will enter their Username and Password in the required fields and click Login. After a successful login, the username will populate in the “Logged in as” field. The user will then be able to select their Vault and Class. After selecting a Class, the document Properties will populate, including Workflow and Workflow State, as in the following illustration:
Custom Indexing Workflow Configuration
Utilizing a custom indexing workflow, the administrator will be able to create a unique indexing experience for the users. In this case, the administrator will configure the M-Files Connector node to accept Document Property and Additional Property values via metadata. The user will be able to enter all M-Files Document Property information at the MFP panel. To set up a custom workflow, do the following:
-
Create a new workflow with an MFP Panel node and the M-Files Connector.
-
Configure the M-Files node according to the Configuring an M-Files Server section.
-
Open the MFP Panel node.
-
Click the checkbox next to “Attach Index Form” and then the + icon to open the “Index Form Builder”, as in the following illustration:
-
Select the Blank Index Form option in the pop-up, as in the following illustration:
-
Click Blank Index Form. You will see the Blank Index Form Builder, as in the following illustration:
-
Drag a Drop Down List to the “New Index Form” Form Builder area.
Note: The instructions below (Steps 8-15) will demonstrate the process of adding fields that populate with metadata. Specifically, the user will be able to add up to two Additional Classes to a document. Exact form setup will vary based on use case.
-
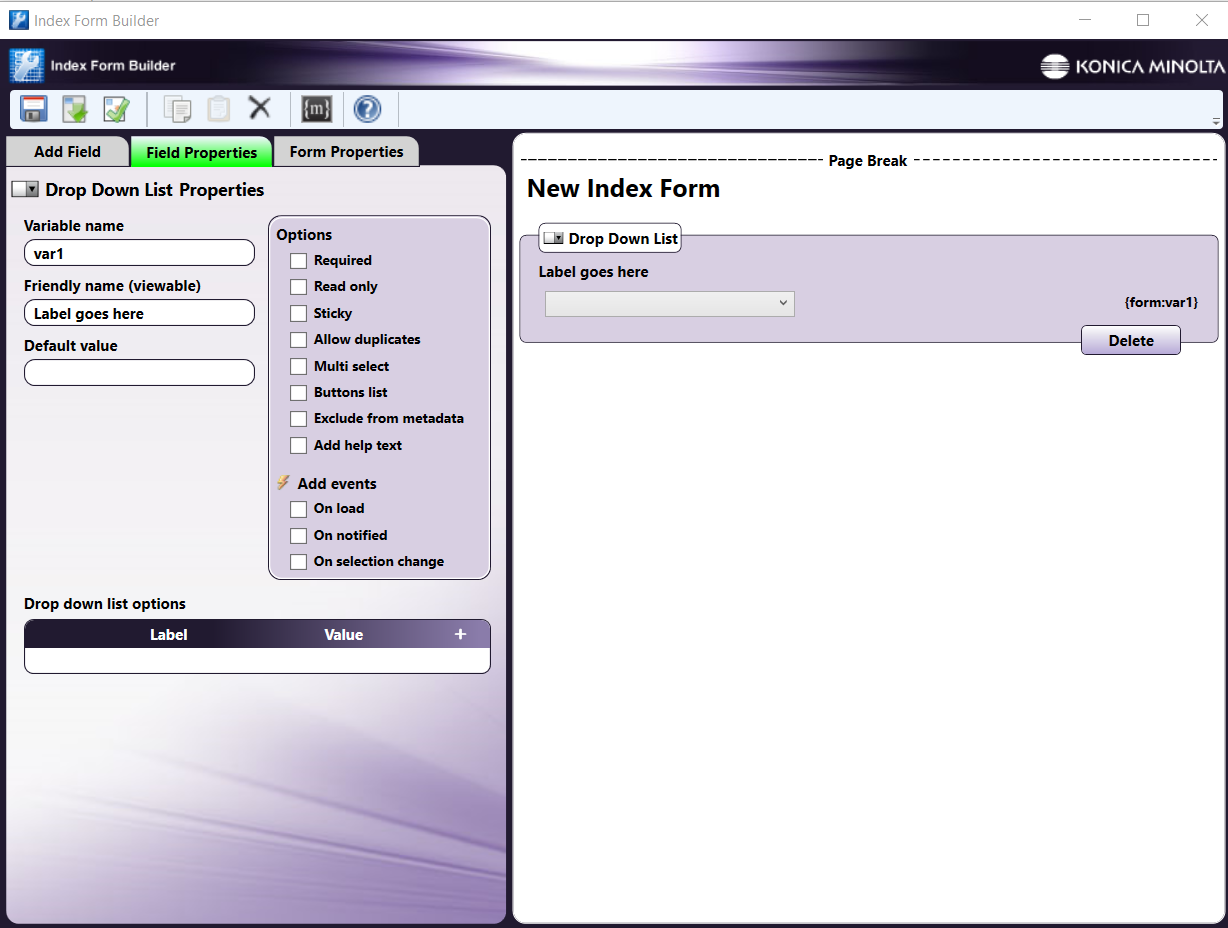
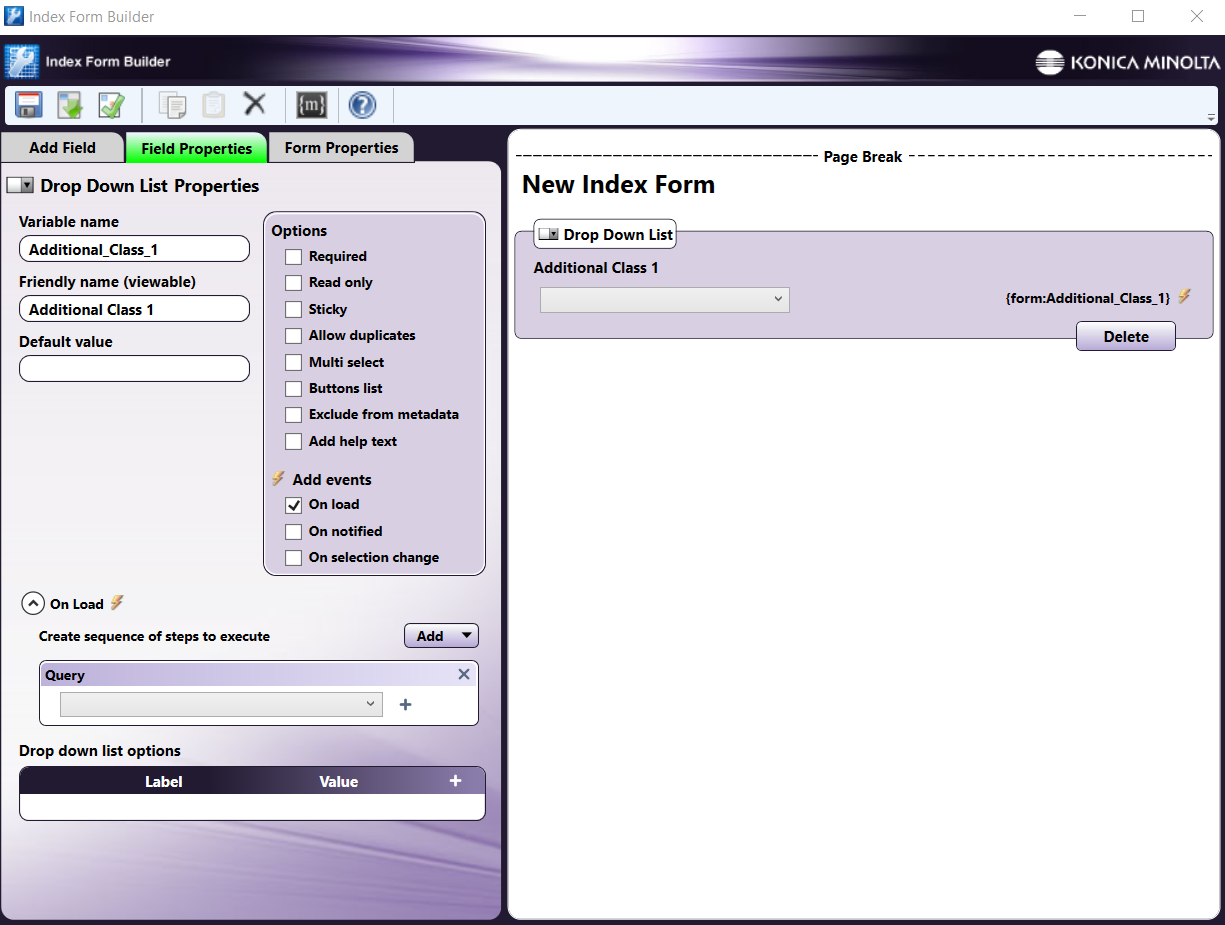
Click the Drop Down List to open its Field Properties, as in the following illustration:
-
Give the drop-down an appropriate Variable name and Friendly name. Click the checkbox next to On load under “Add events.” Then, click the Add drop-down menu and select Query, as in the following illustration:
-
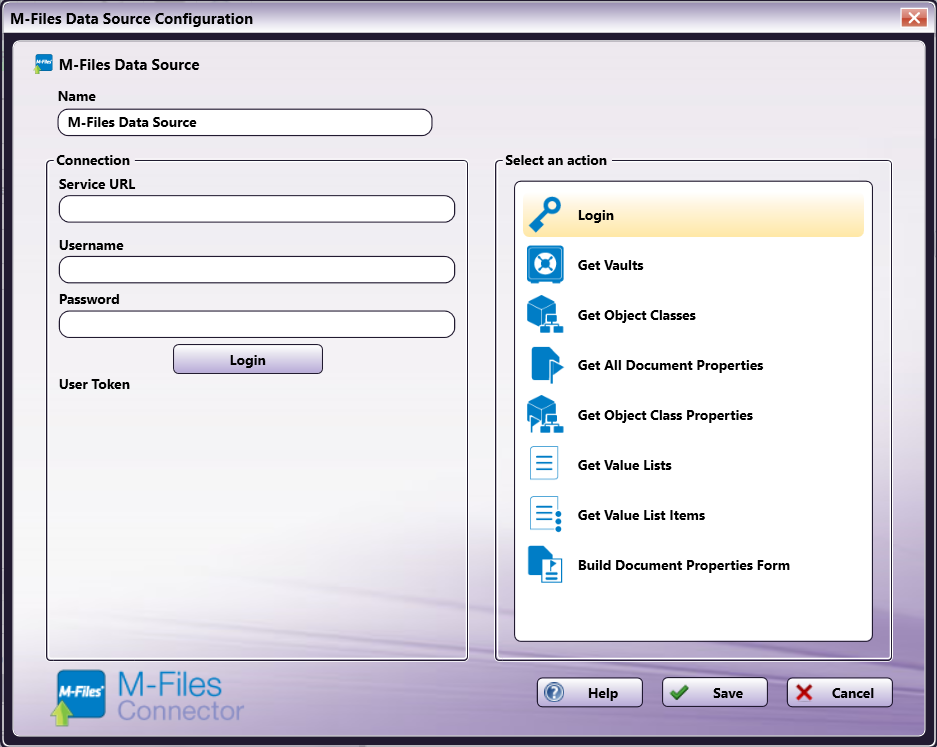
Click the + icon next to the Query drop-down (as shown in the previous illustration), and select M-Files Data Source. This will open the “M-Files Data Source Configuration” window, as in the following illustration:
-
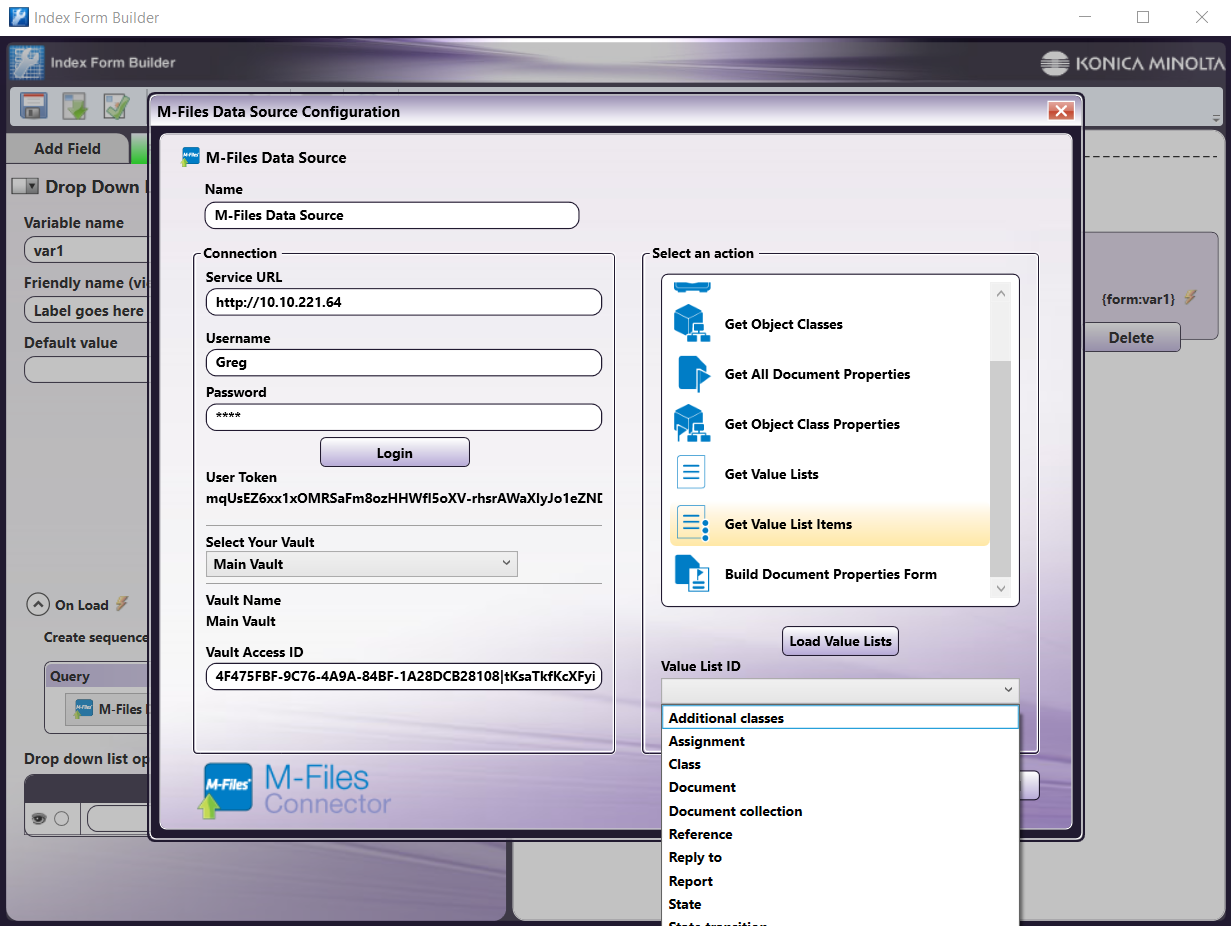
Enter the Service URL, Username, and Password, and click the Login button. This will generate a User Token. In the “Select an action” area, select Get Value List Items, as in the following illustration:

Note: Users may have to reselect the item when selecting an action.
-
Select your Vault from the “Select Your Vault” drop-down menu. Then, click Load Value Lists to populate the Value List ID. Select the Value List ID you wish to add, as in the following illustration:
-
Click Save to save and close the M-Files Data Source Configuration window.
Note: If you save the configuration and reopen the Query to edit it, you will have to login again.
-
In the Index Form Builder, click the Add drop-down again and select Set List. Do this a second time to add a second set list. Set the Targets to the Variable names of the two drop-downs, set the Label to [Name], and set the Value to [ID], as in the following illustration:

-
Validate and save the Index Form Builder.
-
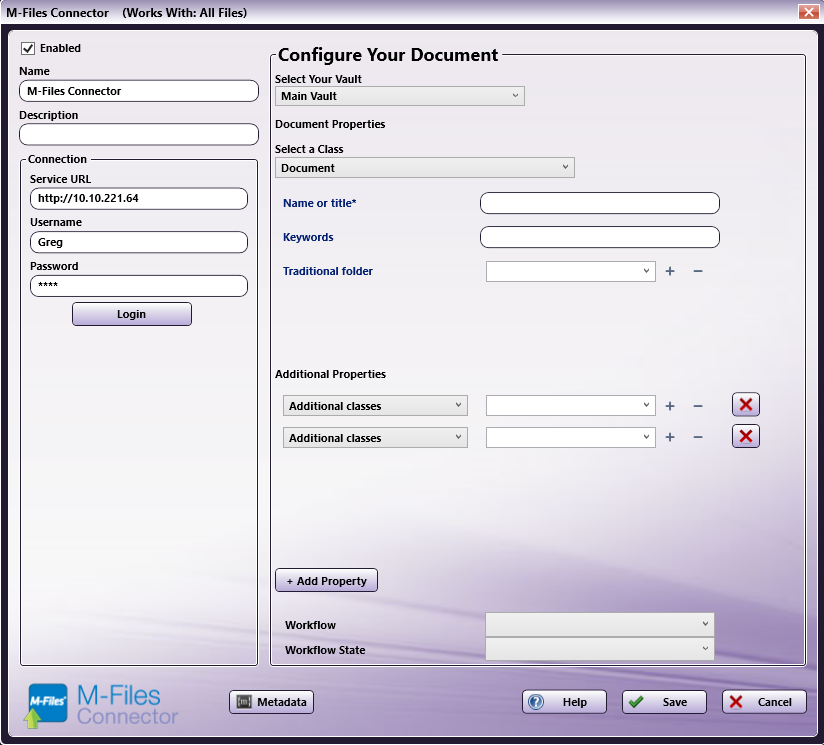
Double-click the M-Files Connector to open it.
-
Enter your login credentials and select the same vault you selected in step 12.
-
In the “Additional Properties” section, click the + Add Property button twice.
-
In the dropdown for each Additional Property, select “Additional Classes.”
-
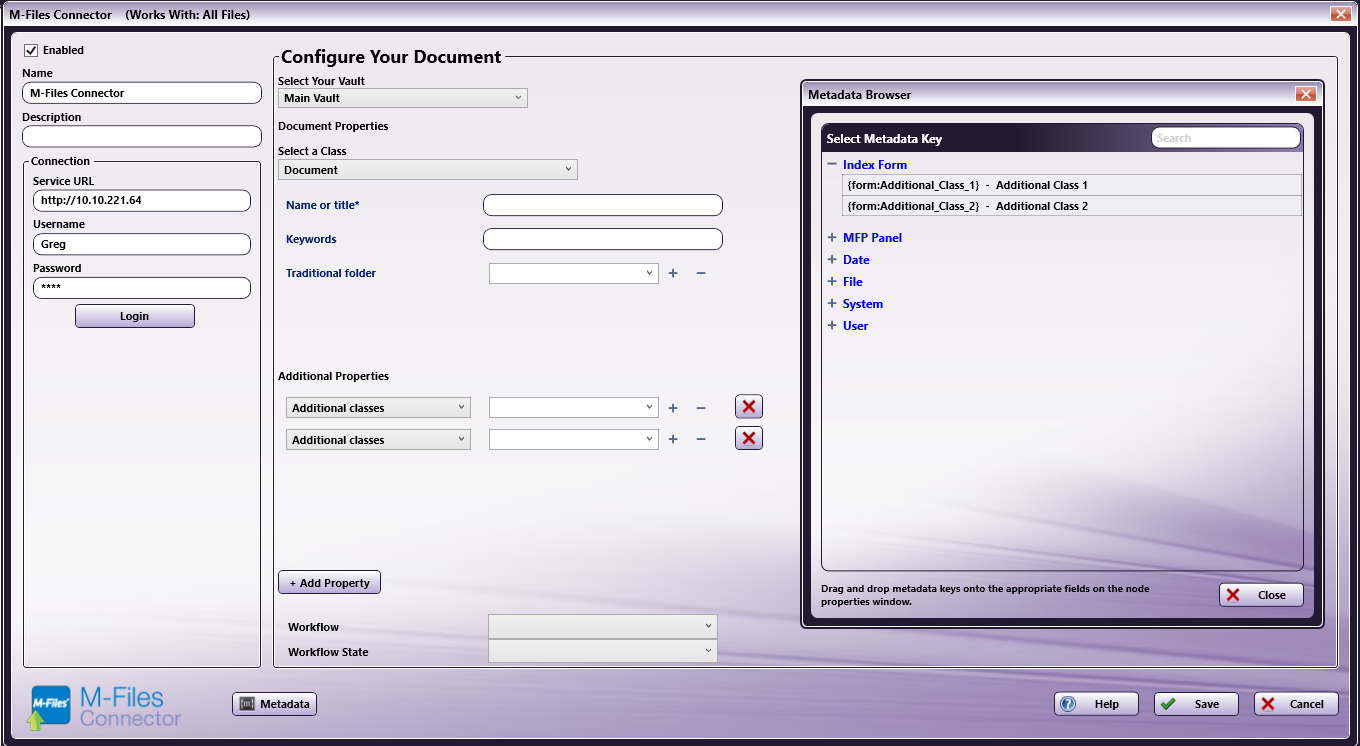
Click the Metadata button at the bottom of the window. This will open the Metadata Browser. Click Index Form and drag the first metadata variable to the empty space next to the first “Additional Classes” property in the M-Files Connector window. Drag the second metadata variable into the empty space next to the second “Additional Classes” property.
-
Save your changes, validate the workflow, save and exit the workflow.
-
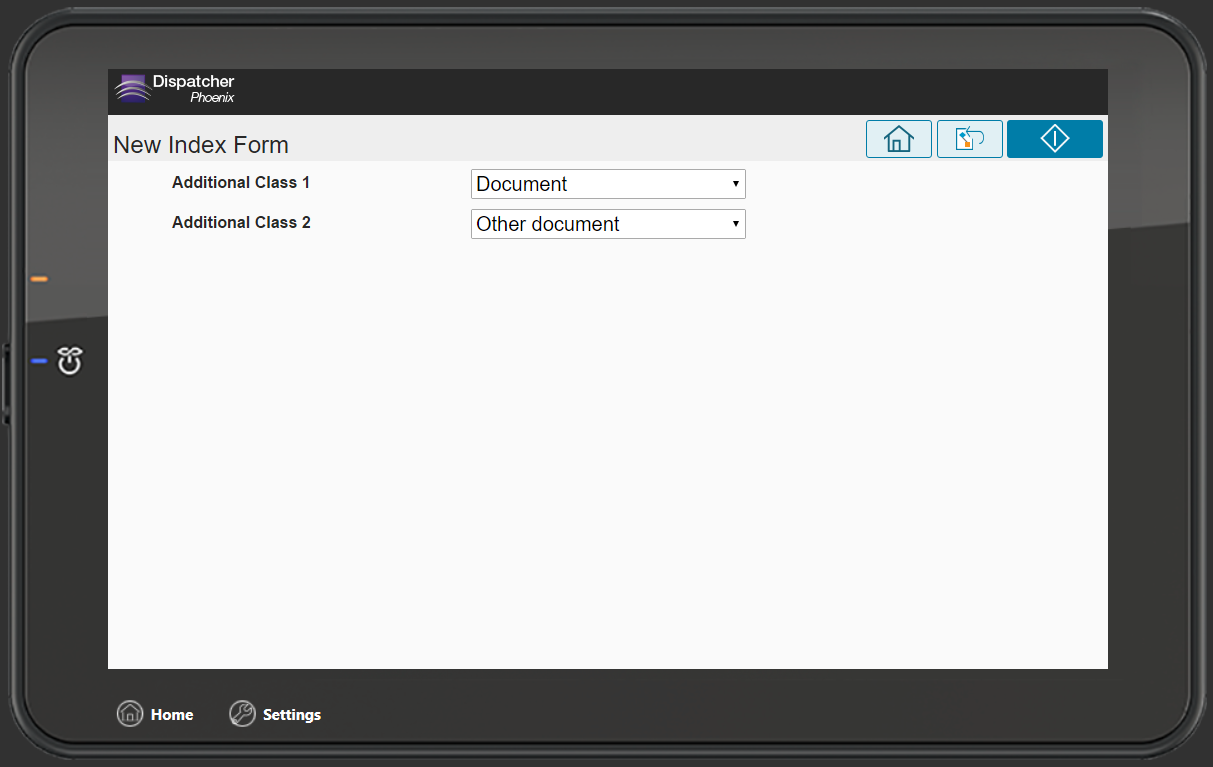
At the MFP panel, the user will be able to add up to two different Additional Classes from drop-down menus, as in the following illustration:
Notes:
-
The M-Files Connector also supports metadata from OCR nodes in all lookup fields.
-
When performing the lookup to create a dropdown list within M-Files using OCR metadata, the node will automatically trim leading and trailing whitespace from the metadata value and the property from the M-Files server, convert them both to lowercase, and compare the OCR metadata value to the M-Files property data to find the most accurate match.
-
If an appropriate property cannot be found in the M-Files server, either because one does not exist or because of spelling differences, then the workflow will log a warning and attempt to upload the document without that property. This may potentially generate an error if the field is marked as Required.
-
Since M-Files stores Properties based on ID numbers, it is possible that a Property Name that is numeric can have the same value as a different Property ID. In this case, the M-Files Connector will default to match the ID number and display the Property associated with that ID.
-
-
If there are multiple Properties with the same name, each will have a different ID associated with it. In this case, the M-Files Connector will default to using the data associated with the numerically first ID.
-
It may be useful to configure the Index Form in a similar manner to the User Account Indexing Index Form. However, it is important to not use that pre-built form as a basis, as the Additional Properties and other features are turned off for the pre-built index forms. The administrator setting up the workflow must start from a Blank Index Form.
-
If an administrator creates a new M-Files Vault or adjusts a user’s permissions, the changes may take up to 24 hours to appear in the M-Files Node or in the Index Form Builder. However, these changes will be reflected in the M-Files Node and in the Index Form Builder after an administrator restarts the M-Files web service within IIS.