Troubleshooting
Error Messages
This section lists some of the more common messages that might occur when using Dispatcher Phoenix (error messages listed alphabetically):
Add-In is not responding (unresponsive for %u seconds)
-
Description: The Dispatcher Phoenix application is unresponsive. This may be due to an underpowered system struggling to handle its total workload.
-
Solution: Close other applications that may be interfering with Dispatcher Phoenix.
App not installed
-
Description: This message can appear when setting up the Print to File node. Dispatcher Phoenix will report Microsoft Office or Adobe Acrobat as “not installed” if the application has not been run yet.
-
Solution: Run the newly installed application(s).
Are you sure you permanently want to delete the icon from favorites?
-
Description: You are attempting to remove a node from your “My Favorites” group.
-
Solution: Select the Yes button to close the message box and continue. To keep the node in your “My Favorites” group, select the No button.
Are you sure you want to remove selected MFP(s) from the node?
-
Description: You are attempting to remove an MFP from the SMTP In node. This message can appear when you are trying to remove a device that is listed in either the Available MFPs or Selected MFPs area of the window.
-
Solution: Select the Yes button to continue with the removal process. To keep the MFP as part of the SMTP In node, select the No button.
blox-xmpp-worker is terminating due to unresponsive Add-In
-
Description: The Dispatcher Phoenix application is unresponsive. This may be due to an underpowered system struggling to handle its total workload.
-
Solution: Close other applications that may be interfering with Dispatcher Phoenix.
Could not obtain exclusive lock on:
-
Description: You are trying to collect a file that may be in use by another application or process.
-
Solution: Close the application that has the file open. In addition, you can check the properties of the file, making sure that the file is not set to read-only (under Attributes).
Counter end value should be greater than the start value.
-
Description: On any of the Advanced Bates Stamp counters (Numeric, Alphabetic, or Roman Numeral), you have defined the counter as incremental; however, the specified Start Value is greater than the specified End Value.
-
Solution: In order for the counter to increment, the End Value must be greater than the Start Value. Select the OK button to close the message box; then redefine the End Value for the counter.
Counter start value should be greater than the end value.
-
Description: On any of the Advanced Bates Stamp counters (Numeric, Alphabetic, or Roman Numeral), you have defined the counter as decremental; however, the specified End Value is greater than the specified Start Value.
-
Solution: In order for the counter to decrement, the Start Value must be greater than the End Value. Select the OK button to close the message box; then redefine the Start Value for the counter.
Disk space usage has reached the specified threshold.
-
Description: The maximum usage threshold/hard disk space that was configured on the Options window has been reached.
-
Solution: If you receive a warning message about these threshold values being reached, you can do the following:
-
For memory warnings, free up memory by closing any other applications that are open or stopping a workflow that is taking a lot of memory (for example, an image processing workflow).
-
For hard disk space warnings, free up disk space by deleting temporary files, etc.
Additional warnings regarding threshold limits will not appear again until memory usage has gone below the specified threshold again.
-
Error reading URL
-
Description: This message can appear when the installation process requires some files that must be downloaded from the Internet and there is a problem with the Internet connection during the download process.
-
Solution: Confirm your Internet connection and try the installation process again. For your reference, the following packages are downloaded from the Internet if they cannot be obtained from the installation CD:
32-bit Platforms:
- Microsoft Visual C++ 2010 Redistributable Package (x86)
- Windows Installer 4.5 Redistributable
- Microsoft .NET Framework 4.8 (Standalone Installer)
64-bit Platforms:
- Microsoft Visual C++ 2010 Redistributable Package (x86)
- Microsoft Visual C++ 2010 Redistributable Package (x64)
- Windows Installer 4.5 Redistributable
- Microsoft .NET Framework 4.8 (Standalone Installer)
Failed to start the workflow. The workflow contains missing plug-in nodes.
-
Description: You are attempting to run a workflow that contains missing plug-in nodes. The message box lists the nodes that are missing. The workflow cannot be run until this issue is resolved.
-
Solution: Click the OK button to close the message box; then either install the missing nodes or remove them from the workflow before attempting to run the workflow again.
Failed to start the workflow. [Workflow did not pass the validation. You must edit the workflow and fix all validation issues before starting it again.]
-
Description: You are attempting to run a workflow that has not passed validation yet.
-
Solution: Select the OK button to close the message box; then, edit your workflow in the Workflow Builder to fix the validation issues before attempting to run the workflow again.
Failed to start the workflow. Workflow can’t be started. There is another workflow currently running with SMTP In node.
-
Description: The SMTP In node can only be in one activated workflow; however you are attempting to run another workflow that also has an SMTP In node. That workflow cannot be run.
-
Solution: Select the OK button to close the message box; then, edit your workflow in the Workflow Builder to remove the SMTP In node.
Failed to register the application on this device.
-
Description: You are attempting to register an MFP to use the MFP Panel node but the bEST Server option was not chosen on the “Select Components” window during installation.
-
Solution: You need to reinstall the application and make sure that bEST is selected.
Failed to unregister the application on this device.
-
Description: You are trying to unregister an MFP from a MFP Panel node and another user has already taken over the registration. When someone takes over the registration, the original user loses the ability to use the application on the MFP and also cannot unregister the device.
-
Solution: To change the status of the device to unregistered, select the Yes button.
If you believe that this message may be in error, due perhaps to the MFP being busy processing at that moment and unable to receive outside commands, select the No button and retry the registration.
Failed to unregister the application on this device. This device doesn’t have iOption installed or licensed that is required for registering a ‘Graphical User Interface.’
-
Description: You are trying to register an MFP for a MFP Panel node with a ‘Graphical User Interface’ Panel Appearance setting but the MFP does not have the i-Option installed or licensed.
-
Solution:
-
To automatically switch the Panel Appearance setting to ‘Native MFP User Interface’ and register the MFP, select the Yes button.
-
To return to the MFP Registration window without making any changes, select the No button.
-
Language file has been successfully imported.
-
Description: This message appears after you have added a new language via the Language Manager.
-
Solution: Select the OK button to close the message.
If this counter is locked, it can no longer be reset.
-
Description: This is a confirmation message that occurs when you attempt to lock a counter on the Advanced Bates Stamp node.
-
Solution: If you want to continue with the lock operation, select the Yes button. To cancel this operation, select the No button. Be aware that when you lock a counter, the counter cannot be reset and you will not be able to unlock the counter again.
License file update required.
-
Description: You are attempting to run the application but your license file must be updated first.
-
Solution: Because of the new plug-in node framework, your license file must be updated. Go to the License Manager window (available by choosing License ManageR from the Help pull-down menu on the main application screen). From there, you can choose to automatically or manually update your license file. If you choose to manually update your license file, you must first download it from the SEC web site.
Resetting this counter will move the current value back to the original starting value.
-
Description: This is a confirmation message that occurs when you attempt to reset a counter on the Advanced Bates Stamp node.
-
Solution: If you want to continue with the reset operation, select the Yes button. To cancel this operation, select the No button. Be aware that when you reset a counter, the current value will change back to the starting value that you originally specified.
The following MFP(s) are added to the MFP Panel node, but they are not currently registered.
-
Description: You cannot save MFP Panel node settings due to a validation error. An MFP that has been added for use with the MFP Panel node has been unregistered.
-
Solution: Do one of the following:
-
Remove the MFP from the Selected MFPs area of the MFP Panel node window, or
-
Launch the MFP Registration Tool to re-register the MFP, or
-
Disable the MFP Panel node by unchecking the Enabled box in the MFP Panel node window. This leaves the node unusable but allows for changes to be made elsewhere if necessary.
-
The workflow cannot be saved because it contains missing plug-in nodes.
-
Description: You are trying to save a workflow that contains missing plug-in nodes.
-
Solution: Install the missing nodes listed in the message or remove them entirely from the workflow so that the workflow can run correctly. You will not be able to save the workflow until this is done.
There are no updates available at this time.
-
Description: You have selected the Check for Updates option from the Help menu. You are currently running the latest version of the application. No updates could be found.
-
Solution: Click the OK button to close the message box.
There are no new license updates available for your software.
-
Description: On the License Manager, you have tried to update your license but the license that you specified does not include any updates to your current license.
-
Solution: Click the OK button to close the message box; then try updating your license with a different file.
The selected sample document is too small to load into the preview. Please try loading a different sample document.
-
Description: On the Advanced Bates Stamp node window, you are attempting to upload a sample document that is smaller than ½ inch by ½ inch. This is not supported.
-
Solution: Click the OK button to close the message box; then try uploading a larger sample document.
Unregistering this device will cause all workflows associated with this device to stop working.
-
Description: Using the MFP Registration Tool, you are attempting to unregister an MFP. This is a confirmation message.
-
Solution: Select the Yes button to unregister the MFP device.
Updates are available. Click on Continue to see the list of all available updates.
-
Description: You have selected the Check for Updates option from the Help menu. Updates are available to be installed. Once you click on the Continue button, the Add-In Manager will appear, allowing you to install updates.
-
Solution: Select the Continue button to launch the Add-In Manager.
Warning: Page X is too large. Max is set to YYYY x ZZZZ.
-
Description: You are attempting to process a page that is larger than the specified maximum pixel size. By default, nodes are set to 8400 x 8400 pixels (Width x Height).
-
Solution: Adjust the maximum pixel size in the node (Advanced Settings > Recognition). The maximum pixel size allowed is 32000 x 32000.
Warning! This workflow does not appear to have completed properly and contains incompletely processed files.
-
Description: You are attempting to run a workflow that had previously stopped due to a workflow failure or system error.
-
Solution: Do one of the following:
-
To resume running the workflow at the point where it originally stopped, select the Resume button, or
-
To delete all files that were being processed at the time the workflow stopped and start the workflow normally, select the Delete button.
-
WARNING: You have selected to close the Dispatcher Phoenix application interface while files are being processed in workflows that are not set to run as a service!
-
Description: You are closing the application when a non-service workflow is processing. A workflow can be marked as a “service” workflow on the Workflow Scheduler, which will allow the workflow to run as long as the PC is on (even if the application is not).
-
Solution: Do one of the following:
-
To stop all non-service workflows after all currently processing files have exited the workflow, select the Finish button.
-
To stop the workflow immediately and delete the files that are currently being processed, select the Kill button.
-
To pause all currently processing non-service workflows, select the Pause button.
-
To cancel this close operation and exit the message box, select the Cancel button.
-
WARNING: You have selected to stop a workflow that is currently processing files!
-
Description: You are attempting to stop a workflow that is currently processing files.
-
Solution: Do one of the following:
-
To stop the workflow only after the processed files have left the workflow, select the Finish button, or
-
To stop the workflow immediately, deleting any files that are being processed, select the Kill button, or
-
To cancel the stop operation and close the message box, select the Cancel button.
-
Would you like to uninstall all of Dispatcher Phoenix or just some Add-ins?
-
Description: You are attempting to uninstall the application using the Windows Control panel.
-
Solution: Do one of the following on the confirmation message box:
-
To remove the entire application, select the Yes button.
-
To remove specific components of the application, select the No button. You will return to the Add In Manager.
-
You are editing a workflow that contains missing plug-in nodes
-
Description: You are trying to edit a workflow that contains missing plug-in nodes. This message will appear before the Workflow Builder opens.
-
Solution: Install the missing nodes listed in the message or remove them entirely from the workflow so that the workflow can run correctly.
You are exporting a workflow that contains missing plug-in nodes.
-
Description: You are trying to export a workflow that contains missing plug-in nodes.
-
Solution: You can continue with the export operation but the workflow will not contain the missing plug-in nodes. Note that even if you install the missing nodes at a later date, their previously defined properties will no longer be available.
You are importing a workflow that contains missing plug-in nodes.
-
Description: You are trying to import a workflow that contains missing plug-in nodes.
-
Solution: You can continue with the import operation but the workflow will not contain the missing plug-in nodes. Note that even if you install the missing nodes at a later date, their previously defined properties will no longer be available.
You are pasting a workflow that contains missing plug-in nodes.
-
Description: You are trying to paste a workflow that contains missing plug-in nodes.
-
Solution: If you choose to continue with the paste operation, the missing node properties will not be included and the workflow may not run properly. Note that even if you install the missing nodes at a later date, their previously defined properties will no longer be available.
You are scheduling a workflow that contains missing plug-in nodes.
-
Description: You are trying to schedule a workflow that contains missing plug-in nodes.
-
Solution: You will not be able to schedule the workflow until the missing nodes are either installed or removed from the workflow. To continue with the scheduling operation, select the OK button on the message box; then reinstall or remove the missing nodes.
You are trying to cut/delete an element that exists multiple times on a page and/or on multiple pages.
-
Description: This message can appear when you have pasted a node using the Paste Original option and then tried to delete it.
-
Solution: Do one of the following:
-
Select the Delete button to delete the selected node.
-
Select the Delete All button to delete all instances of the node.
-
Select the Cancel button to exit the message box without taking any action.
-
Your additional input license has been successfully activated.
-
Description: This message appears after you have updated your license for additional inputs.
-
Solution: Close the message box by selecting the OK button.
Your license has been successfully updated. The application must be restarted before the newly licensed nodes are fully functional.
-
Description: This message appears after you have updated your license for a new node.
-
Solution: Close the message box and restart the application to access the full functionality of the newly licensed node. Once this message box is closed, the Add-In Manager will automatically launch to install the newly licensed nodes.
General
Issue: My workflow displays the following image instead of a node:

Solution: Your workflow contains a node that is currently uninstalled or unlicensed. You must either install/activate the 30-day demo node by double-clicking on the node, activate a license for the missing node, or remove the node from the workflow in order to edit or save the workflow.

Issue: My workflow displays a red broken puzzle piece on top of the node image, as in the following illustration:
Solution: You have imported a workflow that has an uninstalled/unlicensed node with a customized image. You must either install/activate the 30-day demo node by double-clicking on the node, activate a license for the missing node, or remove the node from the workflow in order to edit or save the workflow.
Issue: I received one of the following messages:
Failed to connect to workflow services…no connection could be made because the target machine actively refused
or
Please make sure that the workflow services are properly running on this system. Error: ConnectionRefused
Solution: These messages indicate that the Windows Service called “SEC Workflow Services” is not running.
You can try starting the SEC Workflow Services. From the Windows Control Panel, click on Administrative Tools > Services to access the Services window.
Or, there may be some issues with the ‘conopsd’ user (the SEC Workflow Services is set to run as ‘conospd’).
• First, verify that the ‘conopsd’ user is not locked by following these steps:
-
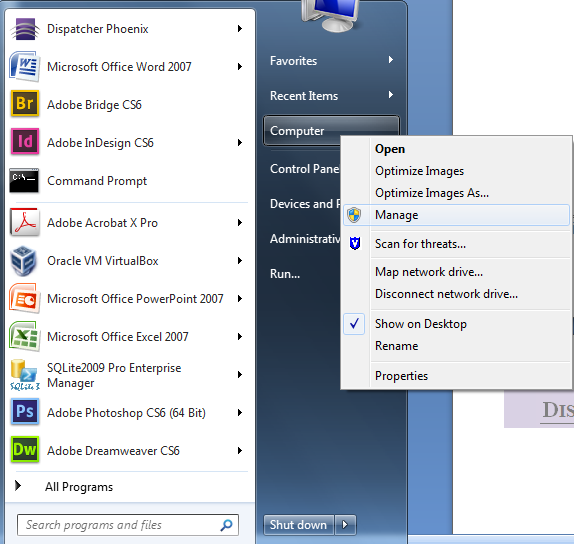
Click on the Windows Start button; then right click on Computer and select the Manage option.
-
When the Computer Management window opens, click on the Local Users and Groups item to expand it.
-
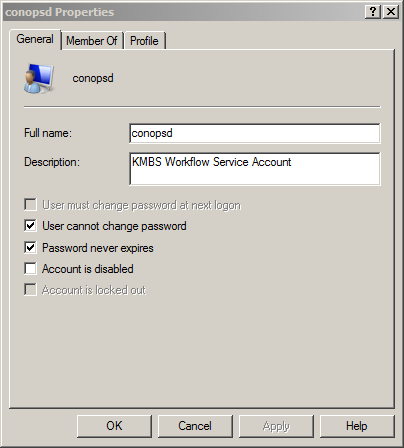
Click on Users; then right click on conopsd and select the Properties item.
-
On the conopsd Properties window, make sure that the Account is disabled and the Account is locked out options are left unchecked, as in the following illustration:
-
Verify that the ‘conopsd’ user (which the SEC Workflow Services is set to run as) is not locked.
• Another problem might be with mismatched passwords. The SEC Workflow Services is set to run as the “.\conopsd” user. For this to happen, Windows needs to have stored the correct password for the conopsd user. If that password has changed, SEC Workflow Services running as that user must be updated as well. If there are pending updates to the Workflow Services, it would help to ensure that the conopsd user’s password matches what is on file for the service. Follow these steps:
-
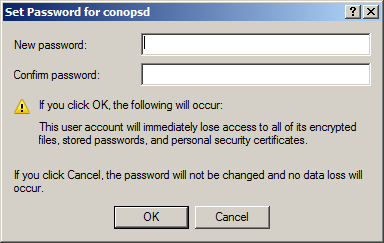
On the Computer Management window, click on Users; then right-click on conopsd and select the Set Password option.
-
Click Proceed on the warning message that appears; then enter and confirm a new password in the Set Password for conopsd window, as in the following illustration.
-
Go back to the Computer Management window and click on the Services and Applications item.
-
Click on Services; then right-click on SEC Workflow Services.
-
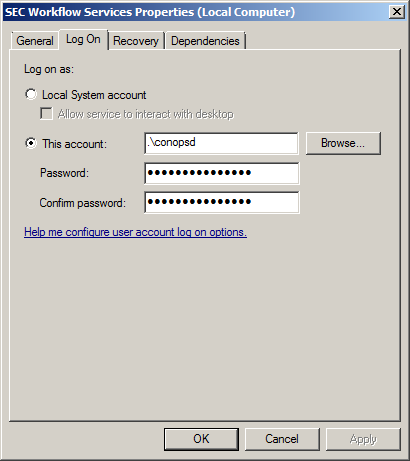
Select the Properties option and then click on the Log On tab.
-
Enter and confirm the new password for SEC Workflow Services that matches the password that you just created for conopsd, as in the following illustration:
Installation/Registration
Issue: During installation, the following message appears:
Some features of this node may not work correctly without Microsoft.NET Framework 4.8 or greater. You should install the framework from Windows Update or download it from the Microsoft web site.
Solution: The specified framework is necessary to ensure that all features of a particular node work correctly. Update your system by downloading Microsoft.NET Framework 4.8 or greater from Windows Update or the Microsoft web site (www.microsoft.com).
Issue: Installation error 1935 occurs.
Solution: This error occurs when certain third-party dependencies cannot be found. Dispatcher Phoenix runs the installers of the following third-party dependencies:
• Windows Installer 4.5 Redistributable
• Windows Management Framework Core package (Windows PowerShell 2.0)
• Microsoft .NET Framework Version 2.0 Redistributable Package
• Microsoft .NET Framework 3.0 Redistributable
• Microsoft .NET Framework 4.8 (Standalone Installer)
• Microsoft Visual C++ 2005 Redistributable Package
• Microsoft Visual C++ 2008 Redistributable Package
• Microsoft Visual C++ 2010 Redistributable Package
If there is a problem with any of these packages, please contact Microsoft for more troubleshooting information.
Issue: When registering the product, I receive the following error message:
Registration Failed! Cannot register the product because the purchase code has no licenses remaining.
Solution: This error may occur because you are trying to register using a purchase code that has a deactivated license. You should do the following:
-
Select the OK button on the message window to close the message.
-
Select the Back button to return to the main Register Dispatcher Phoenix window.
-
Select the License Transfer button on the bottom of the window.
-
You will need your Deactivated Unlock Code and Purchase Code to activate your license transfer.
Issue: When installing the application on a system that also has the Corporate Announcements application installed on it, I receive the following error message:
Setup has detected Microsoft PowerShell 1.0 on this system, but Dispatcher Phoenix requires PowerShell 2.0 or greater. Please uninstall Microsoft PowerShell 1.0 and then try running this installer again.
Solution: Instructions for Windows 8 and above: To properly uninstall PowerShell 1.0 from your system, do the following:
-
Open Programs and Features by clicking the Start button, clicking Control Panel, clicking Programs, and then clicking Programs and Features.
-
Open the Installed Updates screen by clicking View installed updates.
-
Find installed updates with the following Knowledge Base article number: KB968930
-
You should see:
- “Windows PowerShell 1.0 …. (KB968930)”
- “Windows Management Framework Core (KB968930)”
-
Uninstall both updates.
-
Reboot the system.
-
Start the installation process again.
Login
Issue: I’m trying to log into Dispatcher Phoenix and it keeps denying me access when my password is blank.
Solution: For users with blank passwords, by default Windows only allows authentication from the Welcome screen. To allow other applications like Dispatcher Phoenix to act on your behalf when you have a blank password, you must change your computer’s security policy for blank passwords. This can be done by editing the Local Security Policies on your computer.
For Windows 10
• Go to Start > Control Panel > System and Security > Administrative Tools.
• Double-click the Local Security Policy application.
• Navigate to Security Settings > Local Policies > Security Options.
• Locate the policy named: “Accounts: Limit local account use of blank passwords to console logon only”.
• Disable this policy for Dispatcher Phoenix to support user accounts with blank passwords.
Issue: My Windows User Profile does not have a password and I cannot connect to Workflow Services. I’m receiving an authentication error.
Solution: You must update a security policy on the computer to allow for blank passwords for non-console logon. Do the following:
- Click on the Windows Start button and search for secpol.msc.
- Launch the secpol.msc program.
- On the Local Security Policy window, click on the Local Policies item underneath Security Settings (left-hand side).
- Click on Security Options.
- Right-click the ‘Accounts: Limit local account use of blank passwords to console logon only’ in the Policy list; then select Properties.
- Click the Disabled radio button; then select the Apply button.
Running Workflows
Issue: When running workflows, I receive a “Failed to start the workflow (In-Out)” error message, as shown in the following illustration:
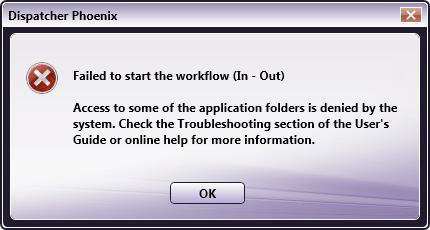
Solution: The Workflow Engine cannot access the following directory that is used to store workflows (per user):
%appdata%\Konica Minolta\Dispatcher Pro Phoenix Edition\data
The current user will have read/write access to this folder by default. You should change the permissions of this directory to allow, at a minimum, read access to the ‘conopsd’ user profile
Issue: My scheduled workflows are no longer running correctly after changing the time zone settings on my PC.
Solution: Make sure that you reboot your system after changing the time zone settings to ensure that the Workflow Scheduler will work correctly.
Firewall / Device Connection
Issue: I cannot connect to a network drive/printer/FTP server/send email.
Solution: Third-party firewall applications, including some anti-virus software, may block ports that are used by Dispatcher Phoenix nodes. If a device fails to connect or mail fails to send, check the workflow log for a message similar to the following:
“[Warning][SMTP user@mail.com]Connection failed to SMTP server mail.com:25”
For reference, the default access ports are listed below. Note that many of these ports may be set manually by an administrator, so the values may differ from this list.
- MFP Panel: 50808
- MFP Panel (SSL): 50809
- FTP: 21
- FTP (passive mode): (Server-defined)
- KMBS MFP: 59158
- KMBS MFP (SSL): 59159
- Printer - LPR: 515
- Printer - RAW: 9100
- SMB/CIFS (Windows shares): (Numerous)
- SMTP: 25
To allow the device to function properly, please consult your firewall application documentation to either stop blocking the affected port or to allow access by the workflow engine process, “blox-erl.exe.”
Inputs
Issue: I have scanned documents as emails for use in my workflow but the emails were not received by the SMTP In node.
Solution: Check to see if your MFP is configured to send email over TLS (encrypted). The SMTP Service does not currently support the TLS option.
Processes
Issue: The number of pages in merged files differs from file to file.
Solution: The number of files does not necessarily equal number of pages. Files containing multiple pages will cause some merged files to contain more pages than others. To ensure equal number of pages, it is recommended to run a Split process on files prior to merging.
Issue: What image formats are supported for image processing?
Solution: Dispatcher Phoenix uses Windows Imaging Components (WIC) and, therefore, supports all image formats supported by WIC. These namely include .bmp, .gif, .jpg, .png and .tif.
WIC can support additional image formats through image codecs. As a result, Dispatcher Phoenix can potentially support additional formats. It should be noted that any additional image formats will likely not have been tested, so results may vary from that of the default image formats.
Issue: The Print to File node does not work.
Solution: Make sure that your system has the latest Windows updates and Adobe Acrobat updates installed.
Issue: My workflow’s activity log lists a “[Print to File] File type not supported” message.
Solution: Files that do not include a file extension will not be processed by the Print to File node. If a previous Rename process either positioned the file extension anywhere other than at the end of the file name or removed the extension altogether, the file will not be processed by Print to File.
Make sure that all files being processed by the Print to File node include a file extension at the end of the file name.
Issue: When converting an image using the Convert to Office node, the output file appears with a file type of “Office Open XML Document” in Windows Explorer.
Solution: If the Microsoft Office application that you are trying to convert to is not currently installed on your system, output files may appear with a different file format, such as XML Document.
Issue: I cannot view color TIFF files generated by my workflow using Microsoft Office Document Imaging.
Solution: You will not be able to use Microsoft Office Document Imaging to view color TIFF generated by the following nodes: Advanced Bates Stamp, Annotate, Deskew, Despeckle, Mirror Image, Negative Image, Split, Watermark, and Merge. It is recommended that you use another application, such as Windows Photo Viewer or Paint, to view the generated file.
Issue: I am experiencing intermittent delays when cycling through pages of my sample document in the Preview area of the Advanced OCR, Barcode Processing, or 2D Barcode Processing nodes.
Solution: Make sure that your sample document is not being loaded from a network share.
Issue: The Print to File node failed to process every other PDF file when using Adobe Reader, Version 11.
Solution: Uncheck the option for “Enable Protected Mode at startup” in Adobe Reader’s Preferences (Edit > Preferences > Security (Enhanced)).
Issue: A warning error is logged when running my workflow, similar to the following:
There are more objects in this XRef table than specified in the size key of the trailer directory!
Solution: No action is required. The PDF Support Library is reporting a perceived error about the format of the PDF document. Files are still processed correctly.
Issue: Merge is not working for multiple pages scanned from the MFP as TIFFs.
Solution: The application is working as designed. Multiple-page documents scanned as TIFF from the MFP will result in one file. If you scan 5 pages as a TIFF and then scan another 3 pages as a TIFF, two jobs will be produced (each scan is considered a different job). Merge is only designed to support merging files in the same job.
When scanning multiple page documents from the MFP as JPEGs, one file for each page is produced in one job (JPEGs do not support saving multiple pages into one file).
Outputs
Issue: When using the Box Connector and WebDAV Connector, I am receiving error messages that have error codes in them. What is the purpose of those error codes?
Solution: Those codes are service-generated and can be useful when communicating with either Box or the WebDAV vendor during trouble-shooting.
Issue: When using the Box Connector, I receive a “Failed to login. Authentication Failed” error message.
Solution: This message appears after you have entered invalid credentials more than once in a short period of time. Do the following:
-
Log into your Box.com account on a Web Browser.
-
If you are required to enter reCAPTCHA information, try changing your password.
-
If the reCAPTCHA test still appears after resetting your password, contact Box Customer Support to have them remove the CAPTCHA flag from your account.
Issue: When using the SharePoint Connector, I receive an “Already checked-out” warning message.
Solution: This message appears for one of the following reasons: • The file may already be checked out. Make sure that the file is not already checked out. • The destination URL does not match the SharePoint site. If trying to communicate with SharePoint under an unregistered IP address or host name, you should talk to your SharePoint administrator to update your settings or server to support the way you’re trying to connect.
Printing from Workflow Builder
Issue: The Workflow Builder does not print my workflow at the saved paper size.
Solution: Printing on anything other than the default print driver paper size requires a manual selection by the user. To print on different size paper, select the desired paper size when the print driver settings are launched at time of printing. Workflow Builder will automatically scale the image to this new size.
Sample Workflows
Issue: The sample workflows that come with the application may be out-of-date.
Solution: To import sample workflows into your Workflow List, follow these steps:
-
Delete the existing sample workflows.
-
Select the Import Sample Workflow option from the Tools drop-down menu.
-
On the Import window that appears, double-click on the sample workflow that you are interested in, or select the All Samples.wfxp file to import all sample workflows into the Workflow List area.
-
On the Import Wizard window that appears, select the Import button; the workflow(s) will automatically be loaded in the correct folder in the Workflow List.
For the latest sample workflows, please check our Online Samples library (accessed by clicking on the icon ( ) on the main application screen’s tool bar).
MFP Panel Node and MFP Registration
Issue: My workflow no longer works on the MFP panel.
Solution: This issue could derive from a number of issues:
-
Your MFP may have been unregistered. Use the MFP Registration Tool to re-register the MFP.
-
Your MFP application may have been taken over by another user. This could occur if the other user used the same name for the application which appears on the MFP panel and chose to take over your registration rather than rename their application. Use the MFP Registration Tool to change the status of your MFP to unregistered. Then re-register your application using a different name.
-
You may have exceeded the number of active inputs licensed for your installation of Dispatcher Phoenix. While the visual appearance of a workflow may show a single input, MFP Panel nodes can have multiple MFPs allocated within them. Each one of these MFPs counts as one input against the license count. Try removing excess MFPs from within the MFP Panel node to correct this inequality. You can also purchase additional Dispatcher Phoenix licenses to increase your available active inputs.
Issue: When trying to access my workflow, the following message appears even after enabling the “Don’t show this message again” option:
“This page is protected. Information will be encrypted for sending and receiving.”
Solution: To keep the message from reappearing, do one of the following:
• Install firmware on the MFP that supports OpenAPI 3.7. Once installed, registering the application on the machine will register the SSL certificate for the bEST server, at which point you will no longer be prompted for the certificate.
• Using the MFP control panel’s web browser, visit another site with SSL and enable the “Don’t show this message again” option on the similar message that will appear.
Issue: I received the following message:
Failed to Register the Application on this device - Failed to get device details.
Solution: The MFP’s Open API Settings may be disabled. Do the following to correct this:
- On the MFP’s control panel, log in as Administrator.
- Select Network.
- Select OpenAPI.
- Scroll down and ensure that Access is enabled.
Issue: I received the following pop-up message: “Do you want to accept the cookie?”
Solution: To permanently disable this message, do the following:
- Press the Application Menu key to display the Application Menu.
- Touch Web Browser on the Application Menu.
- Touch the Menu button on the toolbar.
- Touch the Settings tab.
- Touch the Cookies option.
- Touch accept; then touch OK.
- Close out of Settings.
Issue: I’m using domain authentication for the bEST Server. When trying to log into Dispatcher Phoenix at the MFP, the following message appears: “No workflows found.”
Solution: You may have entered the wrong domain name in Dispatcher Phoenix, or you may have changed domains. Check to make sure that the correct domain name is specified for user authentication in Dispatcher Phoenix by doing the following:
- Launch the MFP Registration Tool (Tools > MFP Registration Tool).
- Select the MFP from the list; then click on the Edit MFP button.
- Select the Authentication tab.
- Make sure that the third option is selected and the Windows Domain field contains the correct domain name.
Issue: I receive the following message about Certificate Security Credentials when accessing my Dispatcher Phoenix workflow on the MFP:
Certificate Security credentials could not be verified. Do you want to continue?
If I do not quickly touch the Yes button, I cannot access my workflows.
Solution: To prevent this message from appearing, you should turn off SSL for OpenAPI on the MFP. Do the following:
- Go the MFP’s web page; then log into the MFP as Administrator.
- Select the Network tab/button.
- Click the OpenAPI Setting option on the left-hand side of the screen
- On the OpenAPI page, select the Non-SSL Only option from the Use SSL/TLS drop-down list.
Issue: The KMBS bEST Server Service does not automatically start on my system after start up.
Solution: This can happen if the bEST service did not start quickly enough for Windows to see that it started successfully. To resolve this issue, you can adjust the bEST service’s startup profile by doing the following:
-
Open Windows Services.
-
Find KMBS bEST server in the list of services; right-click on this item and select Properties.
The KMBS bEST server Properties window opens.
- Choose Automatic (Delayed Start) from the Startup type drop-down list; then select the OK button.
This will start the bEST server service shortly after the computer starts, allowing the service access to sufficient resources to start up normally.
Issue: The following error is displayed when trying to access Dispatcher Phoenix on the MFP after a firmware update:
Configuration file for this device does not exist. Please register the application again.
Solution: To resolve this issue, do the following:
-
Double-check the bEST Server Host Name / IP Address (accessed by clicking on the Defaults button on the MFP Registration Tool).
-
Check to see if there is an IP address conflict on the local network.
-
Check to see if there is a MAC address conflict on the local network.
MFP Simulator
Issue: When launching the Interactive MFP Simulator from Dispatcher Phoenix, the following error appears:
Solution: This error occurs when the bEST Services have stopped running. Do the following:
- Open Windows Services.
- Scroll down the list until you find and select KMBS bEST Server.
- Start this service.
SHA-1/SHA-256 Certificates
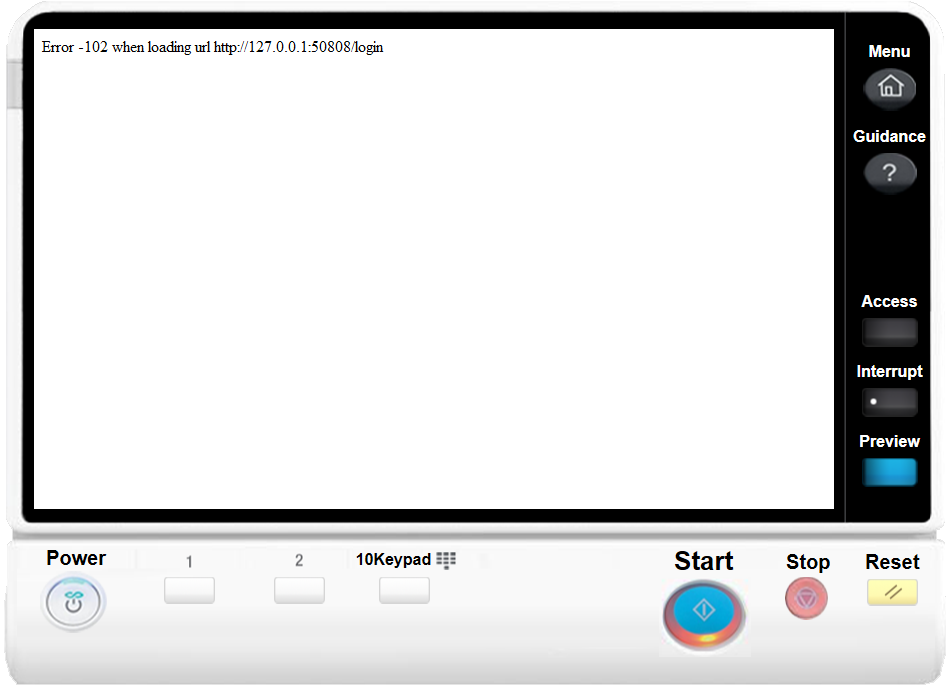
Issue: An error message either at the MFP or within the MFP Panel node appears due to communication failure between the two devices, or you receive an error on the MFP panel about failing to connect to the workflow.
Solution:
Check to see if the MFP is using a SHA-1 Certificate. SHA-1 Certificates are no longer supported in a Windows environment, so the SHA-1 Certificate for bEST-Server will need to be converted to SHA-256. If this is the case, then follow the steps below to manually update the SHA-1 Certificate to SHA-256:
Perform the following procedure to update the SSL Certificate that bEST is using from SHA-1 to SHA-256:
-
Unregister all MFPs using the MFP Registration Tool.
-
Launch a Windows Command Prompt as Administrator (Run as Administrator).
-
Stop the bEST Server by entering the following command:
net stop tuscon -
Update SSL Certificate by following these steps:
a. Enter the Following command:
cd "\Program Files\Konica Minolta\tuscon"To remove this error message, the bEST Server version 3.9.3, includes a utility program called “peoria.exe” that will generate a SHA-256 certificate for the bEST Server:
b. Enter the Following command:
peoria.exe -r -sha256This utility program (peoria.exe) will generate a SHA-256 Certificate for the bEST Server.
-
When done, re-start the bEST-Server by entering the following command:
net start tuscon -
Re-register all devices using the MFP Registration Tool.
This only updates the certificate for the server running on Windows. To update the certificate on Konica Minolta devices with a SHA-256 certificate, please consult the related user manuals. If you are still unable to make this work, contact your authorized Konica Minolta technician to help upgrade the certificate to SHA-256.
Activity Logs
Issue: I cannot open an edited log viewer file.
Solution: If you have the Windows’ option of Hide Extensions for known file types enabled, it will be necessary to select a program before the file can be opened if you have edited the file name of the exported log. Once this option has been disabled, the file can be automatically opened even after the file name has been edited.
Using Dispatcher Phoenix With Virtual Machines
A Virtual Machine that is not on the same network as the MFP can still use Dispatcher Phoenix. To use Dispatcher Phoenix with an MFP in a NAT (Network Address Translation) environment with a Virtual Machine, in this case VirtualBox, follow these steps:
Note: Before beginning, make sure you have the latest version of Dispatcher Phoenix installed.
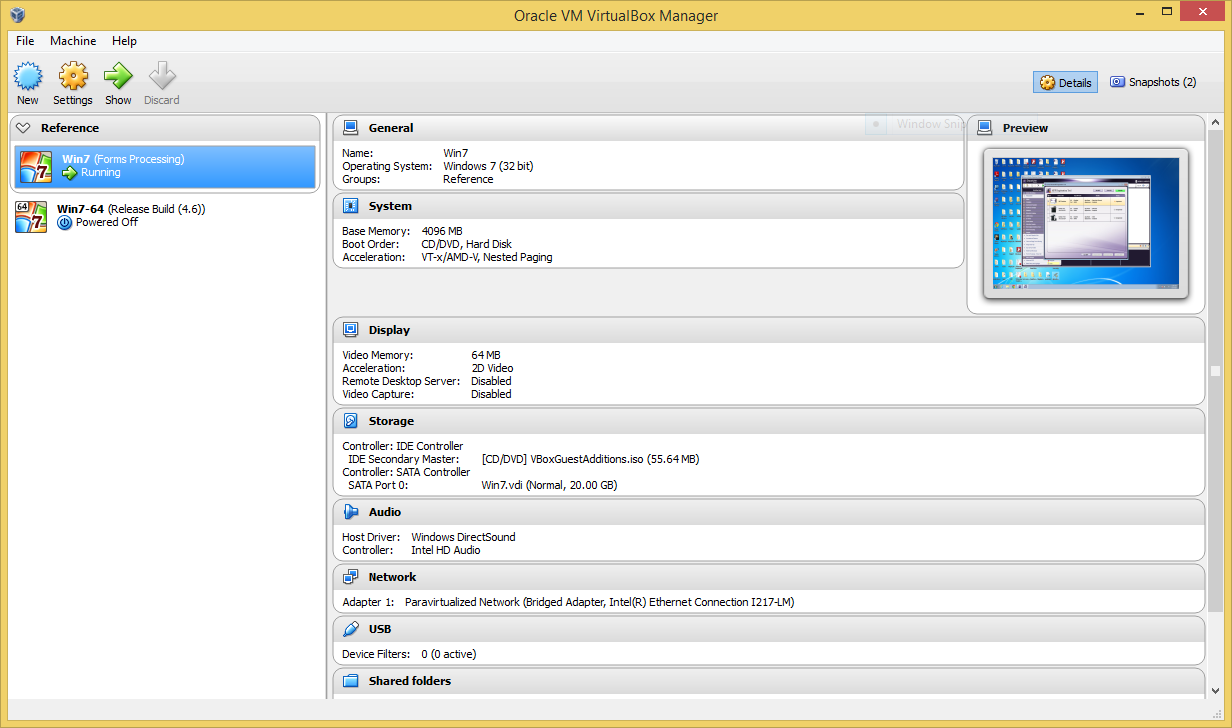
-
Start the VirtualBox Manager. See the following illustration for an example:
-
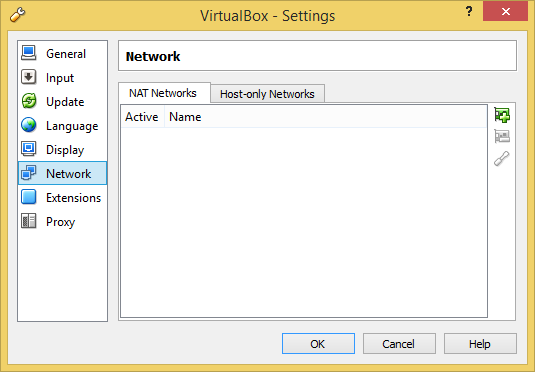
On the VirtualBox Manager window, select the Preferences… option from the File menu.
-
On the VirtualBox-Settings window, choose Network from the left hand side of the window, as in the following illustration:
-
Click on the Add button to add a new NAT Network entry to the list.
-
Edit the new NAT Network by doing ONE of the following:
-
Double click on the entry in the list.
-
Select the entry; then click on the Edit button.
-
-
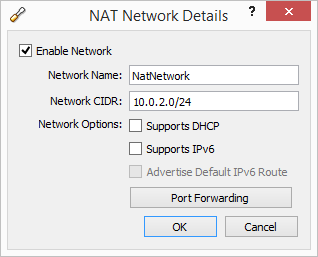
On the NAT Network Details window, make sure the fields have the following settings:
-
Network Name – NatNetwork
-
Network CIDR: - 10.0.2.0/24
-
Supports DHCP – Disabled
-
Supports IPv6 – Disabled
See the following illustration for an example of what the window should look like:
-
-
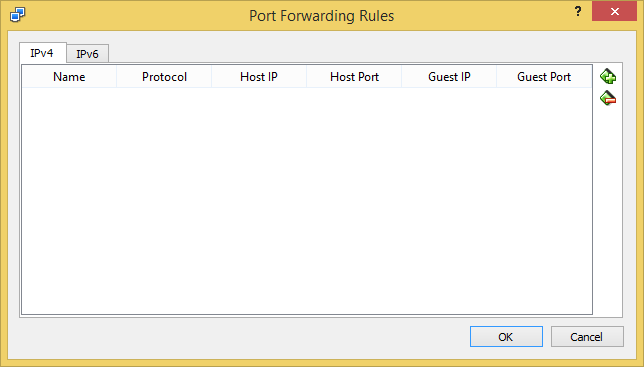
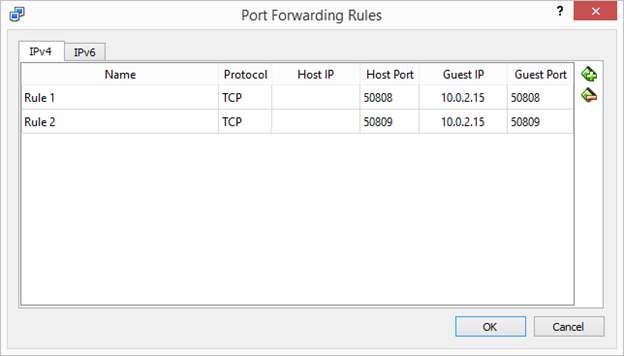
When you are done, select the Port Forwarding button. The following window will appear:
-
Click on the Insert New Rule button two times to create two new entries as follows:
-
The Host Port and Guest Port for Rule 1 must be 50808.
-
The Host Port and Guest Port for Rule 2 must be 50809.
-
The Guest IP address can be whatever you choose; however, make sure you remember it since you will need it when setting up the Guest Machine.
See the following illustration for an example:
-
-
Select the OK button on all active windows.
-
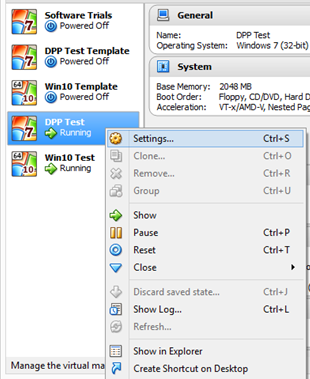
Right-click on the guest machine listed in the VirtualBox Manager; then choose the Settings option. See the following illustration for an example:
-
On the Settings window, select Network. See the following illustration for an example:
-
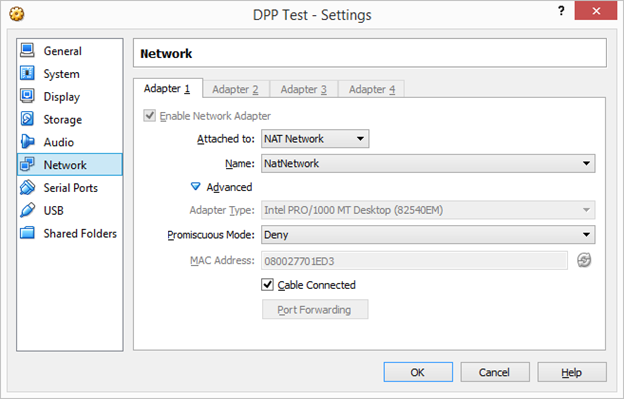
On the Network tab, do the following:
-
Select the NAT Network option from the Attached to: drop-down list.
-
Make sure the Name entry matches the one you created.
-
Select the OK button to save your settings.
-
-
Start up the Guest Machine.
-
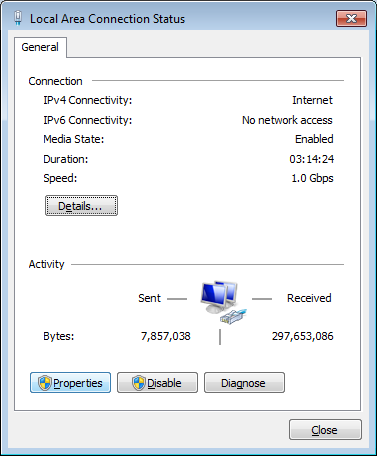
Right-click on the Network Icon in the System Tray; then select the Open Network and Sharing Center option.

-
In the Network and Sharing Center, click on the Local Area Connection link. The Local Area Connection Status window will appear, as in the following illustration:
-
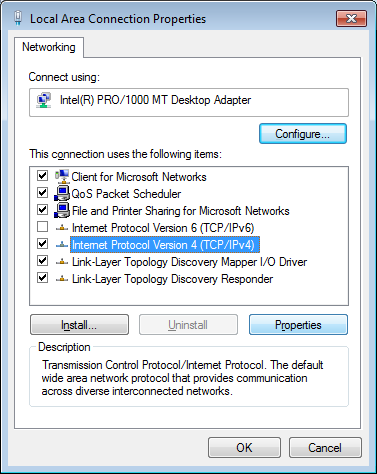
On the Local Area Connection status window, select the Properties button. The Local Area Connection Properties window will appear.
-
Click on the Internet Protocol Version 4 (TCP/IPv4) entry; then select the Properties button, as in the following illustration:
-
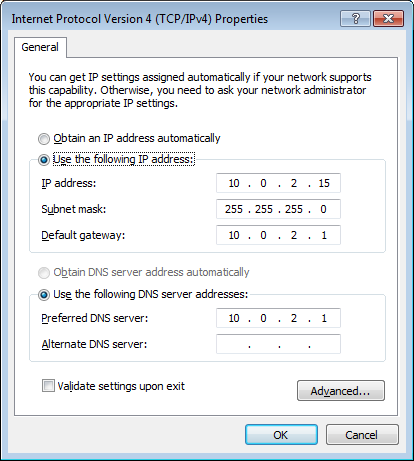
On the Internet Protocol Version 4 (TCP/IPv4) Properties window, do the following:
-
Select the Use the following IP address radio button.
-
In the IP address field, enter the IP address that you specified in step #8.
-
In the Default gateway field, enter the first three digits of the IP address with a last number of 1.
-
In the Preferred DNS server, enter the first three digits of the IP address with a last number of 1.
See the following illustration for an example:
-
-
Select the OK button on all active windows to save settings.
-
Make sure the adapter connects successfully.
-
Launch Dispatcher Phoenix and open the MFP Explorer Tool.
-
On the MFP Explorer Tool, select the Defaults button.
-
On the Defaults Settings window, make sure that the value in the Server Host Name / IP Address field is the externally visible IP address of the NAT Server.
-
Press Ctrl+Shift+D to display the Internal IP Address field, as in the following illustration:
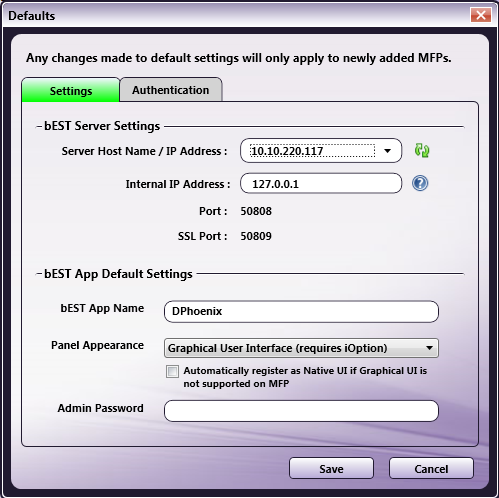
-
Make sure the Internal IP Address is set to 127.0.0.1.
-
Select the Save button to save your changes.
-
The Auto-Discovery tool will not find any printers. Select the Add MFP button to add MFPs manually by IP address.
Production Print
Issue: Cannot continue with the workflow after reloading paper after a misfeed on a Production Print machine
Solution: If a misfeed happens, you must select the “Open and close ADF paper tray” option and perform that action. There is a warning that is displayed on the MFP indicating this. If you navigate away from the error message, the warning can be found under the “Copy” tab.