Merge

Use the Merge node to combine two or more files into one or more output files. You can group, sort, and merge selected forms, and then output to TIFF/PDF files.
For example, the Merge node allows for the following sample workflow:
- Automatically capture scanned documents from any Konica Minolta MFP, virtual printer queue, or other files via a Dispatcher Phoenix workflow.
- Parse the files based on sequential file name or document metadata and convert the files to a single merged file.
- Route merged files to one or more processing operations, including but not limited to:
- Route processed documents to one or more distribution nodes, including but not limited to:
Note: Workflows that use the Merge node require a collection node that can collect files as a group. In the collection node, be sure to check the box at the Process files as a group field (some nodes name this field Process as group). If you leave that box blank, the Merge process cannot merge the files. The following collection nodes can collect files as as group:
Using the Merge Node
The Merge node supports the following file formats:
- HD Photo
- TIFF
- JPG
- GIF
- PNG
- BMP
- PDF (but does not support merging encrypted PDF files)
The Merge node executes operations in the following order:
- Groups files
- Sorts the files in the groups
- Merges the files in the sorted groups
Merge node workflows generate a name for the output file. It consists of the following:
- The name of the first file in the group, minus its extension (.JPG, .PNG, etc.).
- An incremental counter number appended to that filename. The number increments automatically for each group of successfully merged files (e.g., report-1.tiff, somereport-2.tiff, etc.).
File size may change after the merge operation and the number of files does not necessarily equal the number of pages.
Files containing multiple pages cause some merged files to contain more pages than others. To ensure an equal number of pages, we recommend you run a Split process on files prior to merging.
The Merge node can combine document-level and page-level metadata from incoming files. In this way, you can use metadata for processing/routing files in the workflow (e.g., renaming files, annotating files, etc.).
Additional merge options are available, including the ability to set the upper limit for merging according to the processing limit of the next node in the workflow.
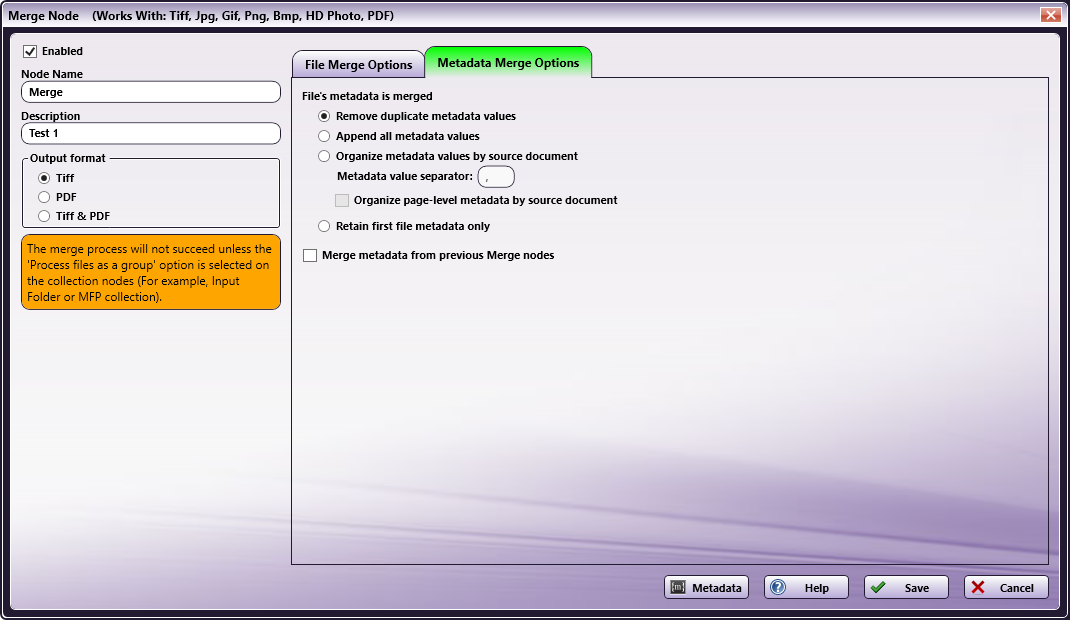
Configuring the Merge Node
To open the Merge node window, drag-drop a Merge node onto the workflow area and double-click on it. The Merge node window appears, containing the following tabs:
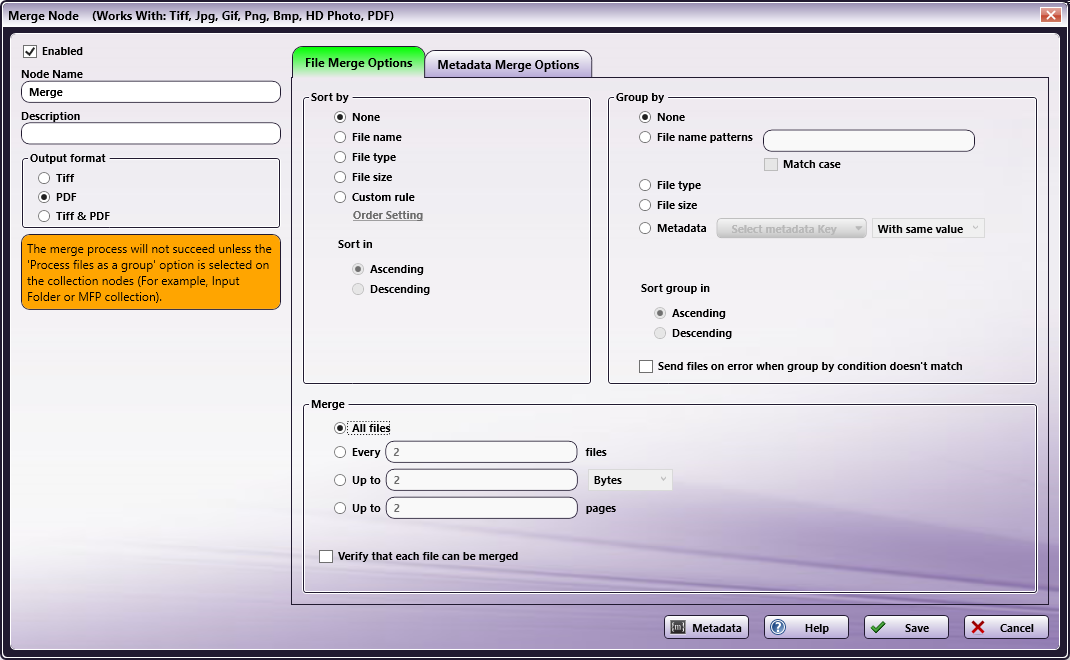
To the left of the tabs, the following fields appear:
-
Enabled - To include this Merge node in the workflow, check the box at this field. Otherwise, the workflow ignores this node and documents pass through as if the node was not present. Note that disabled nodes do not check for logic or error conditions.
-
Node Name - Enter a meaningful name for this Merge node.
-
Description - Enter a description for this Merge node.
-
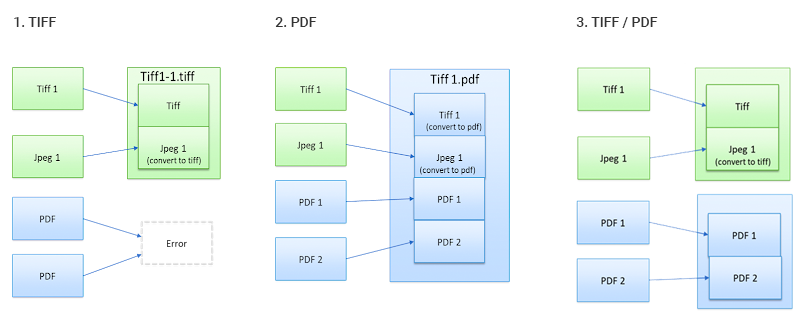
Output format - Select the format for the outputted merge documents. You have the following options:
- TIFF - Merge multiple static image files into single TIFF files. This format does not support PDF files. PDF files are sent to the Error Path.
- PDF - Output supported file types to a PDF.
- TIFF and PDF - Output supported file types to TIFF and/or PDF. Static images are outputted as a merged TIFF file. PDF files are outputted as a merged PDF file.
See the following diagrams for illustrations of the output formats:
The following buttons appear on the bottom of the Merge node window:
- Help - Click to access Online Help.
- Save - Click to keep the Merge definition.
- Cancel - Click to exit the window without saving any changes.
File Merge Options Tab
Use this tab to specify your preferences for sorting, grouping, and merging the files collected by your workflow.
Sort by
Use this panel to set the order by which to merge the files collected by the previous input/processing node in the workflow. Note that before sorting, the Merge first applies any grouping configurations you specify. You have the following configuration options:
- None - Do not sort documents.
- File Name - Sort documents by file name.
- File type - Sort documents by file type or extension.
- File size - Sort documents by file size.
- Custom rules - Control the merge order using metadata. Configure the order on the Sort by custom rules screen. See the Custom Rules section below for further information.
- Sort in - If you choose to sort by one of the file attribute fields above, this field activates and you have the following options:
- Ascending - Sort the files so the lowest values are at the top of the list.
- Descending - Sort the files so the highest values are at the top of the list.
Custom Rules
To configure the merge order using metadata, select Custom rule in the Sort by panel, then click on Order Setting. The Sort by custom rules window appears.
Use the Sort by custom rules window to create a table of rules to determine the merge order. To add a rule, click on the + button on the right of the Header bar.

Once the rule appears in the table, you have the following configuration options:
- Metadata Key - Click on the drop-down to access the Metadata Browser window, from which you can select a metadata key.
- Sort by - Specify the sort order. You have the following options:
- Ascending - Sort the files so the lowest metadata values are at the top (special [#, $, etc.] -> numeric [0-9] -> alphabetic [A-Z]). If the same metadata key exists in multiple files, the original records order establishes the order.
- Descending - Sort the files so the highest metadata values are at the top (alphabetic [Z-A] -> numeric [9-0] -> (special [$, #, etc.]). If the same metadata key exists in multiple files, the original records order establishes the order.
- Custom rule - Configure a custom rule string to determine the sort order. When you select this option, the Custom rule field activates where you can specify a rule consisting of one or more comma-separated values (CSV). Ordering compares the string to the metadata value. Any unmatched metadata is ordered to the end.
- Move Up/Down - Change the custom rule sorting order using the Up arrow and Down arrow buttons.
- + - Use the + and X buttons in this column to add or remove a rule, respectively. The + button on the Header bar inserts a new rule at the top of the list.

Note: When working with multiple rules, once the first custom rule executes, the second custom rule then runs on each individual group of files created by the first rule, the third rule runs on files created by the second rule, and so on. For example, if Rule 1 sorts files by file extension and Rule 2 sorts by file name, Rule 2 will run on each group of files that have the same file extension, not the entire group of files.
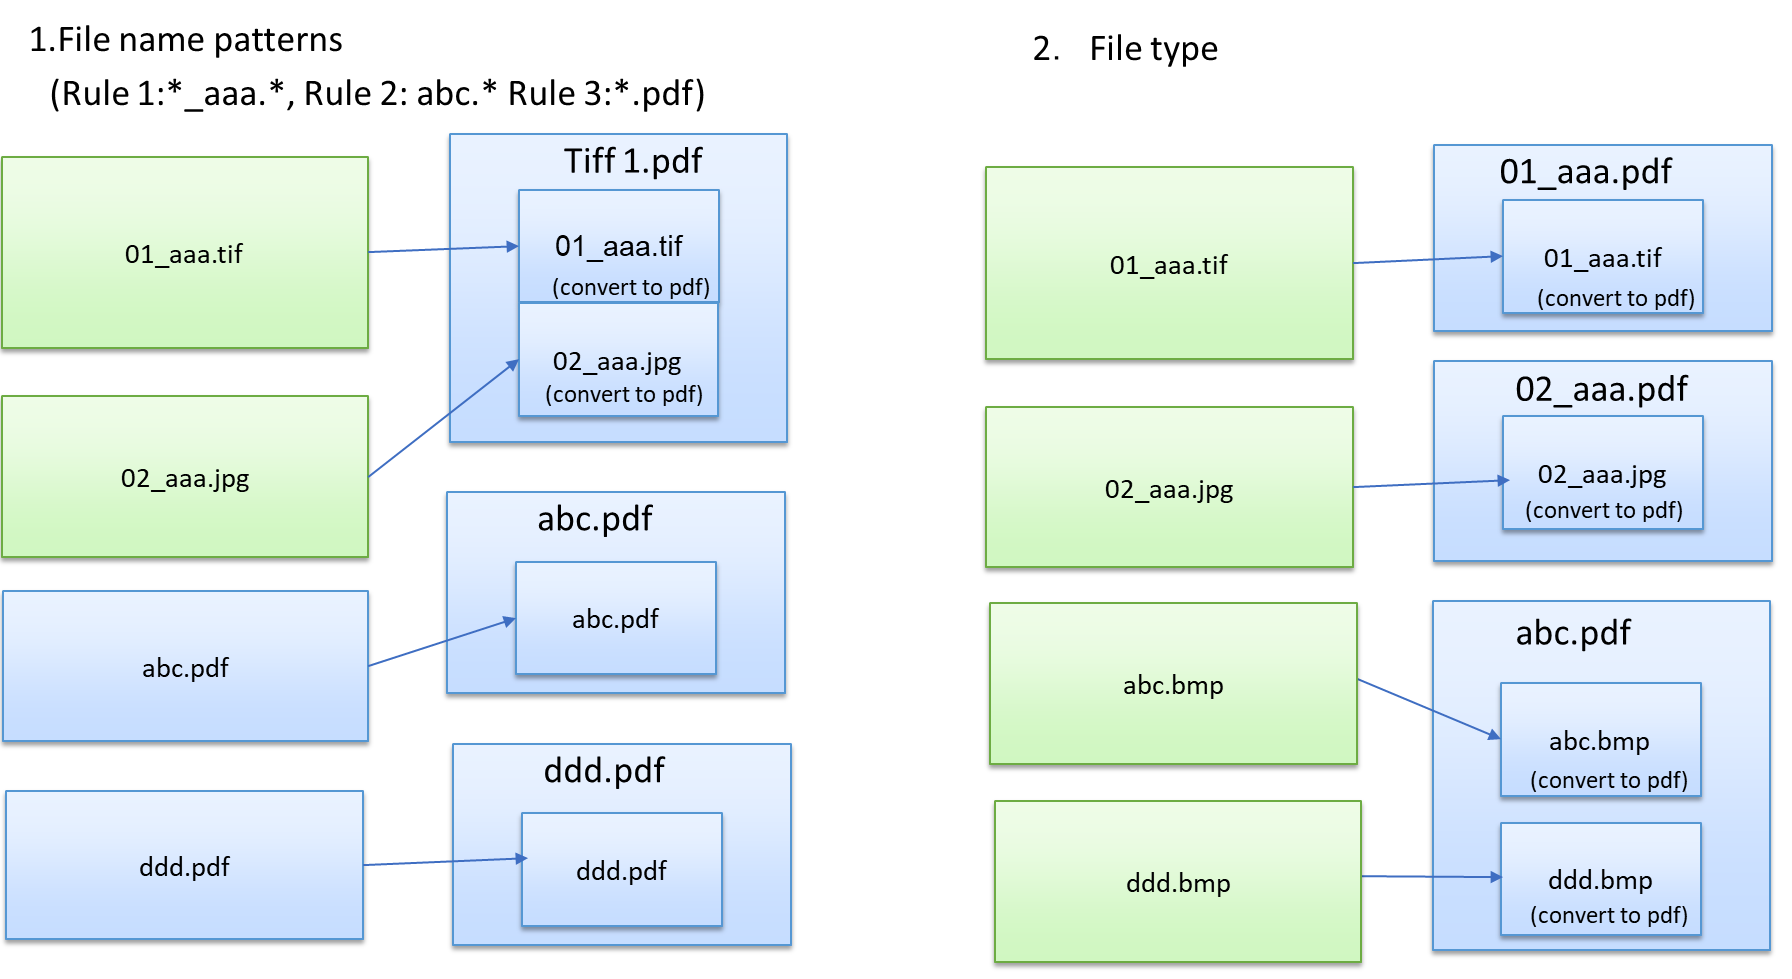
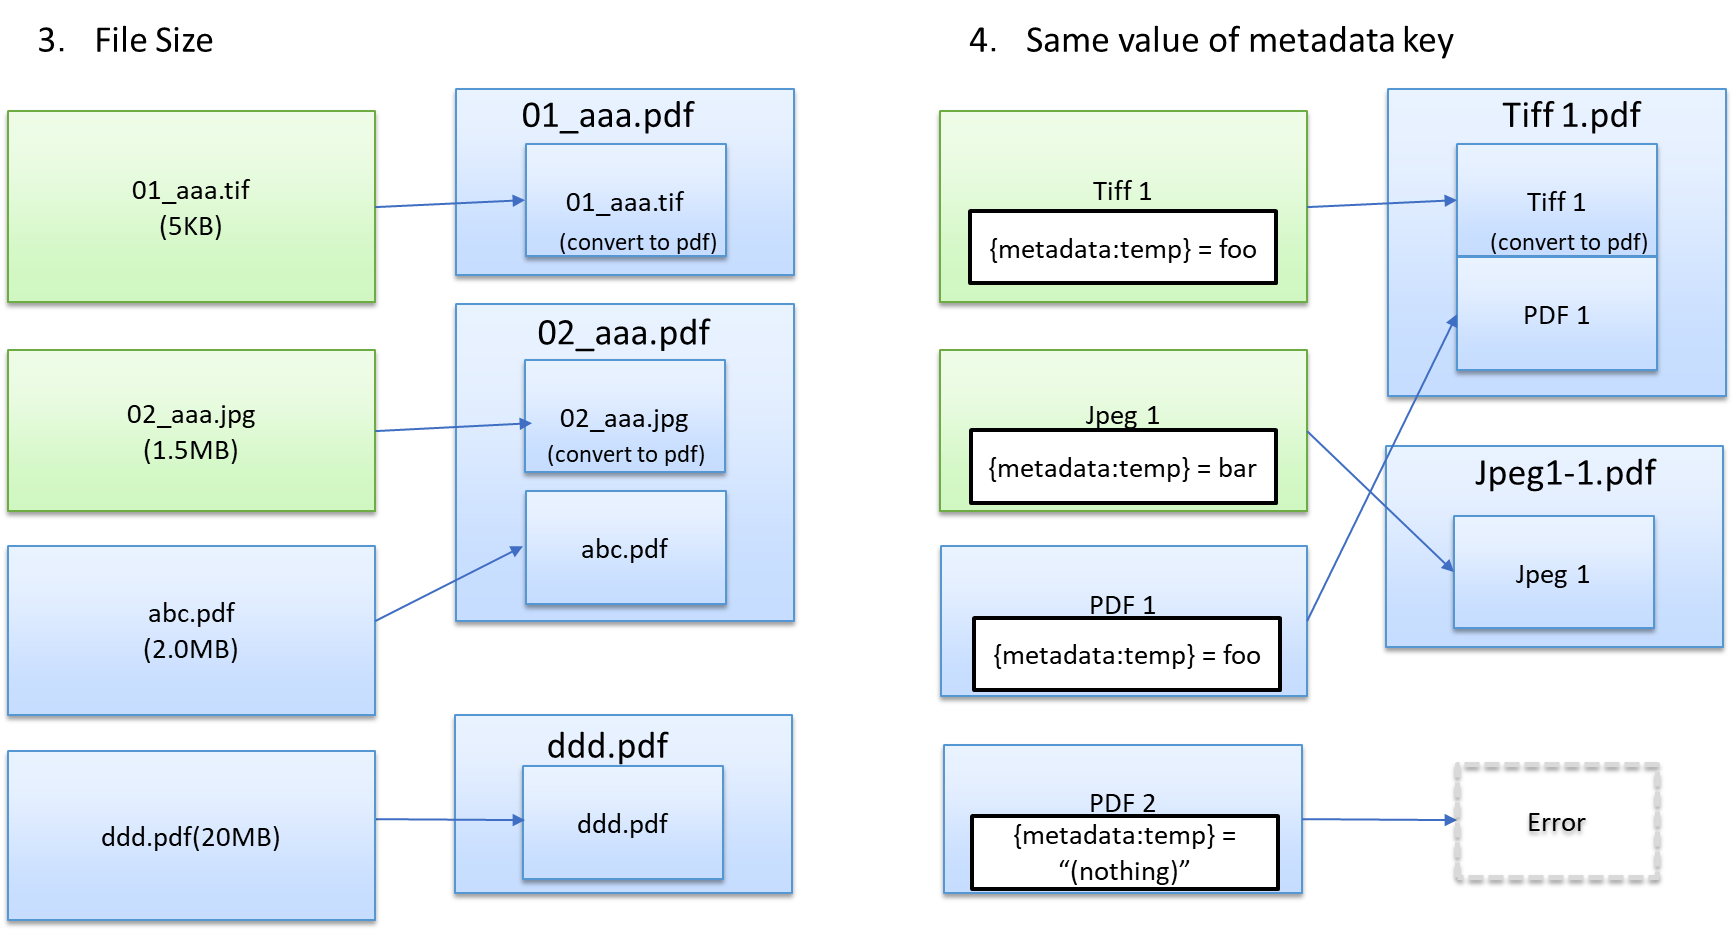
Group By
Use this panel to specify criteria to separate the collected files into groups prior to merging. For each group created by your configuration, the node creates a separate output file containing the merged files. Files that do not match the criteria are placed in a “not match” group.
You have the following configuration options:
-
None - Process documents as a single group.
-
File name patterns - Group files using naming rules. If you select this option, the associated field activates and you can enter one or more comma-separated values (CSV) to identify your groups, for example the following:
-
*_book.png
-
*.jpeg
- Match case - If you select the File name patterns option, this field activates. To require your CSV values to match the upper and/or lower case letters of the file names before adding them to the group, check the box. Otherwise, leave the box blank.
-
-
File type - Group files by file extension.
-
File size - Group files using the original file size:
- Tiny (less than 100 KB)
- Medium (from 100 KB to 1 MB)
- Large (from 1 MB to 16 MB)
- Huge (over 16 MB)
-
Metadata - Group files by metadata values using the metadata’s key value (document & page level). For example, you can choose to group by all invoices from the same company (requires OCR). If a document has multiple same metadata key values, this option uses the first one found.
If you select this option, the Select Metadata Key button activates. Click on this button to access the Metadata Browser window where you can select a metadata key to establish your group criteria. Files that do not include the specified metadata are placed at the end of the sorted files list.
After you select a metadata key, click on the drop-down to the right and select a condition. Several of the conditions require you enter a condition string defining your search criteria. You can select any of the following conditions:
- With same value - Group by the same metadata key’s value.
- Is - Group by matching specified condition strings to the metadata values.
- Contains - Group by the metadata value containing a specified condition string.
- Regular expression - Group by matching the metadata value with a regular expression.
- Exist - Group files if the metadata key exists.
- Has value - Group files if the specified metadata key has any value.
- Isn’t - Group by not matching specified condition strings to the metadata values.
- Does not contain - Group files by the metadata key’s value not containing a specified condition string.
- Does not have value - Group files if the metadata key does not have any value.
- Does not exist - Group files if the metadata key does not exist.
-
Sort group in - If you choose a Group by option, this field activates and you can specify an order in which to sort the groups (not the files in the groups). Options are:
- Ascending - Sort the groups so the lowest values are at the top.
- Descending - Sort the groups so the highest values are at the top.
-
Send files on error when group by condition doesn’t match - To send files out on error if documents don’t match the grouping rules, check the box at this field. Otherwise, leave the box blank.
See the following diagrams for illustrations of the grouping options:
Condition Strings
When grouping files by metadata, several conditions require you enter a condition string in the associated field to define your search criteria. You can enter one or more comma-separated values into the field. If the search finds multiple matches in a file’s metadata key value, it groups the file based on the first match found.
For example, assume you want to group your collected files based on whether they contain the metadata values “ab,abc,abcd”. Take the following steps:
- Select the metadata key containing the values you want to search for.
- Select “Contains” as your condition.
- Enter a condition string of “ab,abc,abcd”.
This configuration groups together all files containing the first metadata value (ab), even if they also contain instances of “abc” and/or “abcd”. With all files containing the first metadata value (ab) having been grouped together, the node now groups together all files containing the next metadata value (abc), even if they also contain instances of “abcd”. This process continues until all metadata values have been examined.
Merge
Use this panel to specify your preferences for merging. You have the following options:
-
All Files - Merge all files.
-
Every x files - Specify how many single files to merge into a merged file before moving on to another output file. You can merge up to 100,000 files into a single merged file.
-
Up to x bytes - Specify the maximum file size for single files being merged into a merged file. The maximum file size for the merged file is 4 GB. Note that this option may decrease performance as it creates a temporary file which is a converted output format for estimating merged file size.
-
Up to x pages - Specify how many pages to merge from the single files into a larger file. You can merge up to 100,000 pages into a single merged file.
-
Verify that each file can be merged - To verify a document can be merged before attempting to merge it, check the box at this field. If you choose this option, files that cannot be merged (for example, encrypted PDF files) are ignored by the merge file counting process. To always attempt to merge each document, leave the box blank. If you choose this option, files that cannot be merged are still counted by the merge process.
For example, assume you are set to merge every two files. If you check the box and the second file cannot be merged, the second file will be skipped and third file will merge with the first file. If you leave the box blank, the second file will be counted even though it cannot be merged and the third file will be added to the next sequential merge file.
Metadata Merge Options Tab
Use this tab to specify your preferences for merging metadata from collected files.
Use the following fields to configure how to handle existing metadata upon merge.
-
Remove duplicate metadata values - Remove any document-level metadata keys that have the same values. For example, you can select this if you are interested only in unique values associated with a specific metadata key. Click here for an example.
-
Append all metadata values - Merge all metadata keys that match between documents and keep all values. Click here for an example.
-
Organize metadata values by source document - Combine metadata keys containing multiple values in each document, separated by a user-specified separator symbol. The default separator is a comma. The files list in the same order they were merged, per the merge:input.fullname metadata key. For example, you can select this option if the workflow needs to tie the source of a metadata value to its value in the merged document. Click here for an example.
- Organize page-level metadata by source document - Index the page-level metadata in the same way as the document-level metadata, preserving the indexing from the merge:input metadata lists. If you do not select this option, page-level metadata is merged into the resulting document as-is. Page-level metadata does not conflict with a merged document in the way that a document-level metadata can.
-
Retain first file metadata only - Copy the metadata for the merged file from the first file and discard metadata from all other files. This setting ignores not only the Merge node’s metadata, but also the previous node’s metadata. Click here for an example.
-
Merge metadata from previous Merge nodes - When multiple Merge nodes occur in a workflow, select this option to carry over and update the following data :
- merge:input.fullname – The full file names (name and extension) from the previous merge operation are preserved and the file names from this merge operation are appended in the order they were merged.
- merge:input.name – The file names (extension not included) from the previous merge operation are preserved and the file names from this merge operation are appended in the order they were merged.
- merge:input.ext – The file extensions from the previous merge operation are preserved and the file extensions from this merge operation are appended in the order they were merged.
- merge:input.size – The file sizes from the previous merge operation are preserved and the file sizes from this merge operation are appended in the order they were merged.
- merge:total – The total number of merged files is updated with the previous number of merged files added to the new number of merged files.
Note: If you do not select this option and multiple merge nodes occur in a workflow, metadata generated from the previous Merge node (e.g., all metadata starting with merge:) are removed and not carried over.
Merge Node Metadata
The following metadata is created by the Merge node:
| Metadata | Description |
|---|---|
| merge:input.fullname: | The names and extensions of the files that were merged to create the output document. The file names appear in the order in which they were merged. This metadata key can be used to determine the origin of metadata information when the Organize metadata values by source document option is selected. |
| merge:input.name: | The names (excluding file extension) of the files that were merged to create the output document. The file names appear in the order in which they were merged. This metadata key can be used to determine the origin of metadata information when the Organize metadata values by source document option is selected. |
| merge:input.ext: | The file extensions of the files that were merged to create the output document. The merge:input.fullname and merge:input.name metadata can be used to determine the original document that the extension is associated with. |
| merge:input.size: | The file size of the files that were merged to create the output document. The merge:input.fullname and merge:input.name metadata can be used to determine the original document that the size is associated with. |
| merge:input.from: | The page numbers in the merged document of the first page of each merged file. merge:input.fullname and merge:input.name metadata can be used to determine the original document that the page number is associated with. |
| merge:input.to: | The page numbers in the merged document of the last page of each merged file. Page numbers are inclusive. The merge:input.fullname and merge:input.name metadata can be used to determine the original document that the page number is associated with. |
| merge:total.pages: | The total number of pages that were merged. |
| merge:total.files: | The total number of files that were merged. |
| merge:id: | The unique identifier of the merge operation. |
Merge Node Metadata Examples
The examples in this section are based on the following sample workflow:
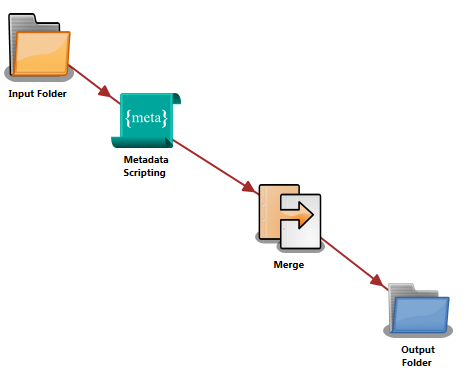
In this workflow:
-
The Input Folder collects two or more images.
-
The Metadata Scripting node adds:
- A single document-level metadata value to each image using the {t:doc} metadata key.
- Page-level metadata to each page of each image using the {t:page} metadata key.
-
The Merge node merges these two documents and their metadata together.
-
The Output Folder distributes the newly merged document in a folder.
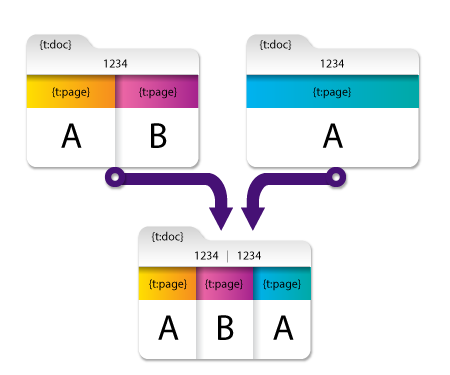
Remove Duplicate Metadata Values Example
This section provides an example of the effects of the Remove Duplicate Metadata Values field. If you select this option, then when documents are merged, document-level and page-level metadata are merged while redundant values for metadata keys are removed by default.
Example 1:

In this example, the first document contains the following metadata:
- Document-level metadata: {t:doc} with a value of ‘1234’.
- Page-level metadata:
- On first page: {t:page} with a value of ‘A
- On second page: {t:page} with a value of ‘B’
The second document contains the following metadata:
- Document-level metadata: {t:doc} with a value of ‘5678’.
- Page-level metadata on its (only) page: {t:page} with a value of ‘C’
Although both of these documents contain the same metadata key ({t:doc}), their values are unique and are carried over into the resulting merged documents. ({t:doc} now contains two values: ‘1234’ and ‘5678’). Their page-level metadata is also merged.
Example 2

In this example, the first and second document have a document-level metadata key ({t:doc}) with the SAME value (‘1234’). With the Remove duplicate metadata values option enabled, the redundant value for {t:doc} is removed from the merged document, resulting in a single value of ‘1234.’
Note: The page-level metadata of {t:page} is not removed even though the first document’s first page and the second document’s first page have the same metadata key and value (‘A’). This is because the values are on different pages and are, therefore, not considered redundant.
Append All Metadata Values Example
This section provides an example of the effects of the Append all metadata values field. Select this option if you are interested in all values associated with a specific metadata key (e.g., counting the number of occurrences of a particular metadata value).
In this example, both of the values of the {t:doc} metadata key are retained and the resulting merged document has two values for {t:doc}: ‘1234’ and ‘1234’.
Organize Metadata Values by Source Document Example
This section provides an example of the effects of the Organize metadata values by source document field. This option handles metadata differently than the other options, as in the following illustration:
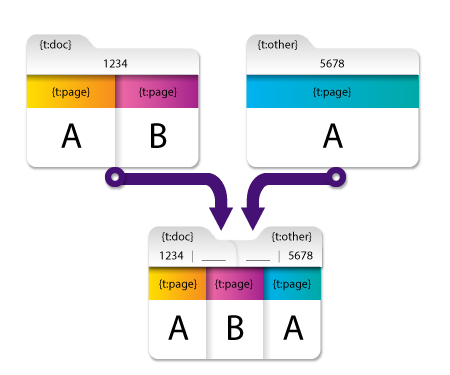
In the above example, document-level metadata is padded with blanks. This is because document-level metadata in Dispatcher Phoenix is accessed using the following format:
\ : \ (e.g., {t:doc})
which is short for the following format:
\ : \ [0] [value index]
This format is also used for page-level metadata, for example, in the above illustration:
- For page 1 of the merged document, “A” can be accessed using {t:page [1] [1]}
- For page 2 of the merged document, “B” can be accessed using {t:page [2] [1]}
- For page 3 of the merged document, “A” can be accessed using {t:page [3] [1]}
In the resulting merged document in the above example:
- {t:doc[0] [1]} contains the value from the first document and contains a blank in {t:doc[0] [2]} because the second document did not contain that key.
- {t:other[0] [1]} is blank because the first document did not contain a value for this key but {t:other [0] [2]} contains the value from the second document.
This allows the origin of a particular metadata value to be identified by cross referencing the index of the value with the index of the document name.
If you select the Organize page-level metadata by source document option, the result is as follows:

Now, the resulting merged document has page-level metadata blanks that indicate the document from which the metadata originated:
- {t:page[1] [1]} and {t:page [2] [1]} contain the values “A” and “B” since they originated from the first document.
- {t:page[3] [2]} contains the value “A” since it originated from the second document.
With these options, document-level and page-level metadata can be mapped with its source.
Retain First File Metadata Only Example
This example illustrates the effects of the Retain first file metatdata only field.
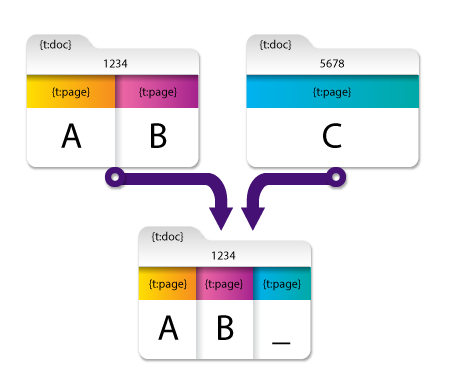
In this example, the two files to be merged each have their own metadata:
- document-level (denoted by numbers “1234” & “5678” in the diagram)
- page-level (A, B, and C in the diagram)
With the Retain first file metatdata only field selected, the two files merge but only the metadata from the first file are retained (“1234” & “A, B”) while the metadata from the second file (“5678” & “C”) are stripped out.
Aggregating Metadata
When there are multiple metadata values for a single key in a single document, the values are combined together into a single index and separated (by the user-specified separator that was defined during node configuration). See the following illustration for an example:

In the first document, {t:doc} contains three values, and in the second document, {t:doc} contains two values. In the resulting merged document, the {t:doc[0] [1]} Metadata Key contains the value ‘1234,5678,90’ and {t:doc[0] [2]} contains the value ‘5,9.’