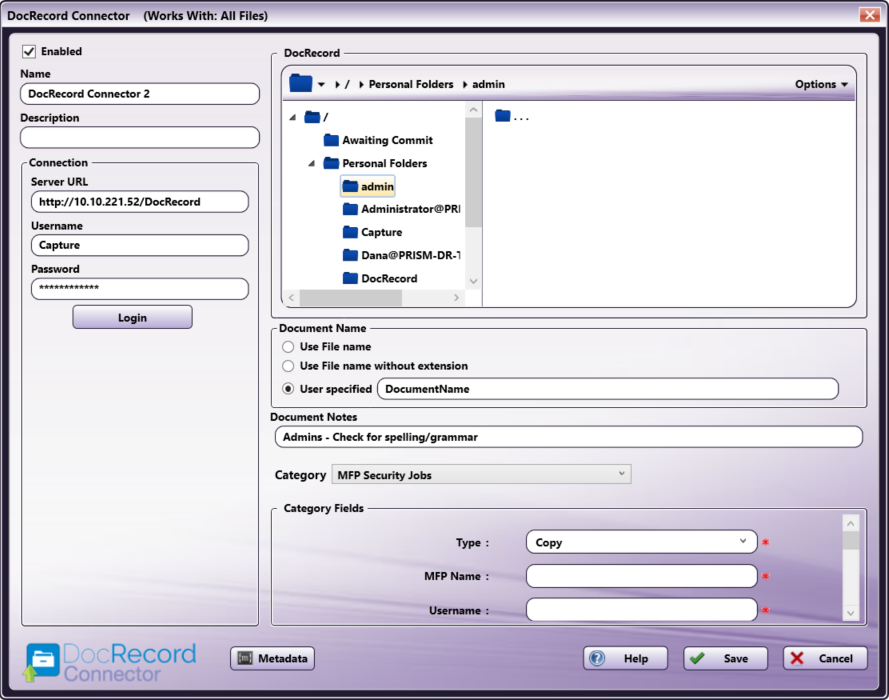
DocRecord Connector
![]()
The DocRecord Connector node allows you to distribute documents to DocRecord, a popular ECM service. Documents can be sent to DocRecord via an automated workflow, or you can log into DocRecord directly at the MFP panel.
Note: To use the DocRecord Connector, you must have a DocRecord account.
To open the DocRecord Connector Node properties window, add an output node for DocRecord to your workflow and double-click on it.
-
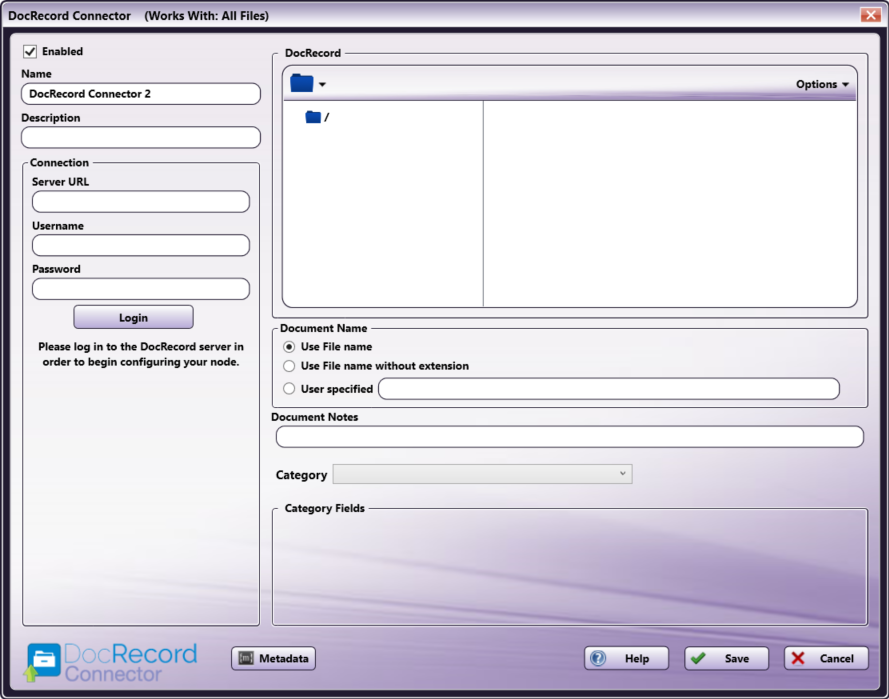
Enabled - To enable this node in the current workflow, ensure the Enabled box is checked. By default, nodes are enabled upon creation. If you disable the node, the workflow will ignore it. While the workflow will still validate, documents will not be output and may be lost. Note that a disabled node does not check for logic or error conditions.
-
Node Name - The node name defaults to this field. This name appears in the workflow below the node icon. Use this field to specify a meaningful name for the node that indicates its use in the workflow.
-
Node Description - Enter an optional description for this node. A description can help you remember the purpose of the node in the workflow or distinguish nodes from each other. If the description is long, you can hover the mouse over the field to read its entire contents.
Connecting to DocRecord
To begin, you must first connect to the DocRecord Server. In the Connection area, do the following:
-
In the Server URL field, enter the URL address of your DocRecord Server.
-
Enter your DocRecord Server user credentials in the Username and Password fields.
-
When you are done, select the Login button to connect to your DocRecord Server.
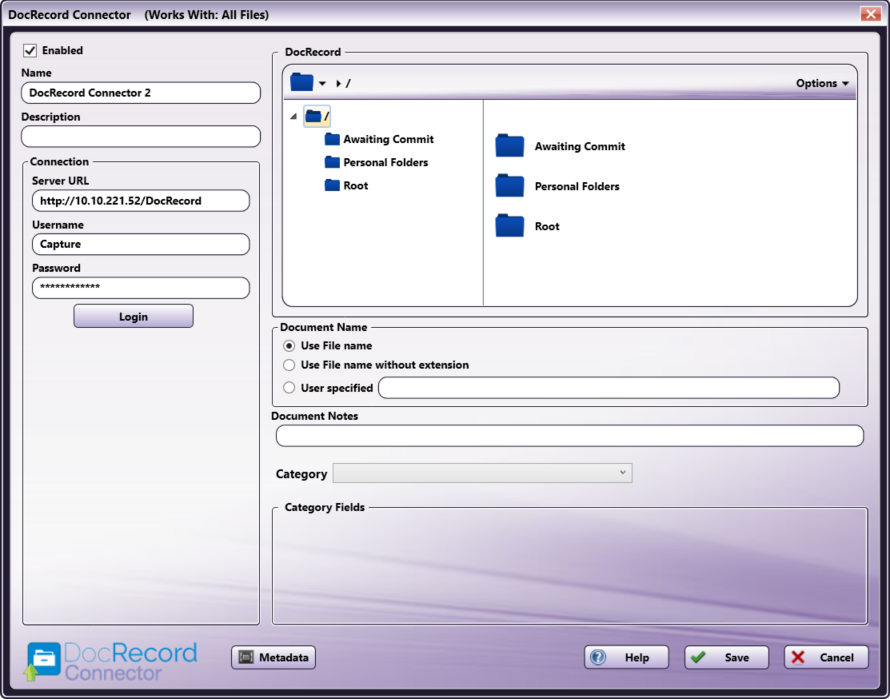
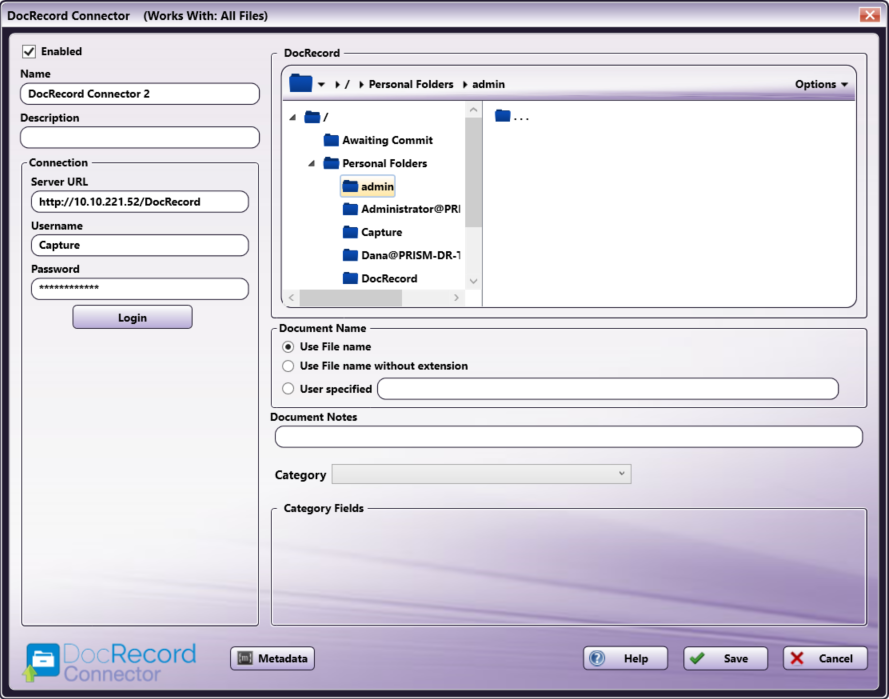
Selecting A Folder
Once connected, the right hand side of the DocRecord node properties window displays a tree-view of your DocRecord folders that allows you to browse through your DocRecord folders and select a folder for your documents. The DocRecord Connector features tree-view that can be hidden or shown (shown by default) by accessing the Options dropdown menu.
Sending Documents To A New Folder
You can also choose to create a new folder in DocRecord to send documents to. Do one of the following:
-
Select the Create New folder option from the Options drop-down menu.
-
Use the keyboard shortcut of Ctrl + Shift + N to create a new folder.
For both methods, a Create New Folder window appears. Enter the name for the new folder in the Name field; then select the Create button. The newly created folder will now appear.
Note: DocRecord adds a unique number to any folder with the same name as a previously-created folder. For example, if you create a folder named “Invoices” and there is already a folder named “Invoices” in that folder, DocRecord will rename the new folder to “Invoices1”, assuming that folder name is not itself a duplicate.
Document Name
The Document Name area allows the user to specify that parameters of document naming within the DocRecord Connector. Options include
-
Use File name - The document uploaded to DocRecord will have the same name as the document coming in to the node. This includes the file extension.
-
Use File name without extension - The document uploaded to DocRecord will have the same name as the document coming in to the node, but does not include the file extension.
-
User specified - You can enter a specific document name to associate with the document as it is uploaded to DocRecord.
Notes:
-
This field supports metadata.
-
DocRecord allows the creation of multiple documents with the same name.
-
File Name Restrictions
The following restrictions apply to file names:
- Non-printable characters cannot be included in a file name (tabs, newlines, etc.)
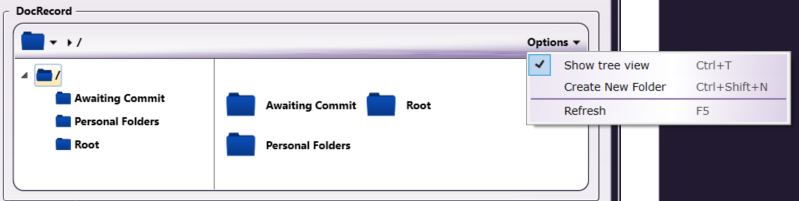
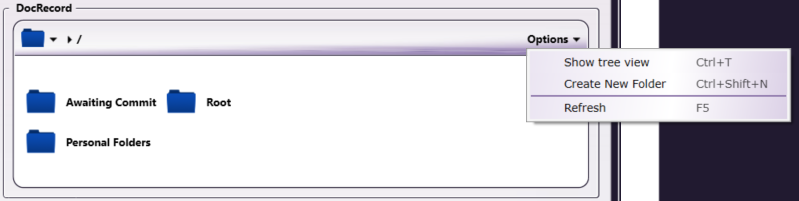
View Options
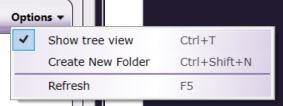
You can adjust the default view of your DocRecord folders in the node properties window by using the Options button on the top right hand side of the window. Do the following:
-
Click on the Options button. The following drop-down menu will appear:
-
To turn off the default view, uncheck the Show tree view option.
See the following illustrations for comparison on the different folder views available:
Tree View ON
Tree View OFF
 |
| -
To refresh the current view with the most up-to-date folders/files, select the Refresh option.
Document Notes
Documents can have notes associated with them in DocRecord. Use this field to add Document Notes.
Note: This field supports metadata.
Category
Documents can have Categories associated with them in DocRecord. To add Categories, do the following:
-
Select a Category from the Category dropdown. This dropdown populates with the Categories associated with the Folder selected above.
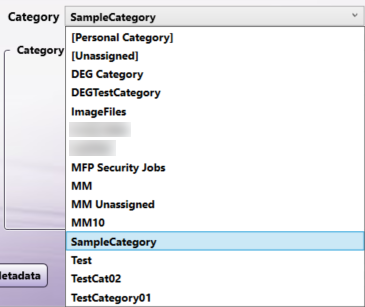
-
After selecting a Category, the Category Fields area populates with the associated fields. Enter any information in the Category Fields area that you would like associated with the document.
Notes:
-
Required category fields are marked with a red asterisk.
-
The DocRecord Connector does not support Table category fields. These fields will not appear as options.
-
Category Fields support metadata.
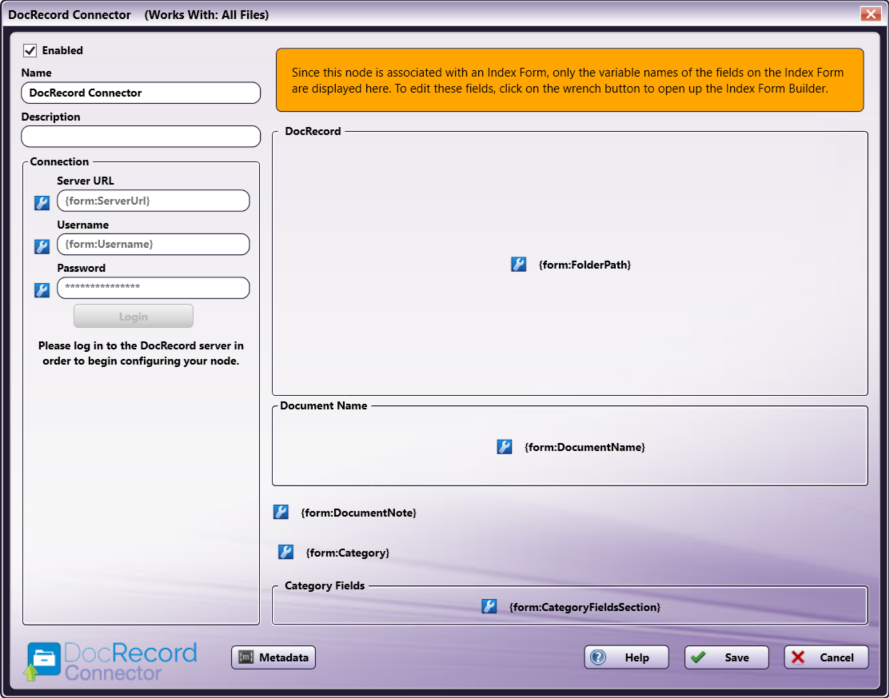
Using with Index Form
When using the DocRecord Connector node on an Index Form, the DocRecord Connector node properties window will be automatically populated with the variable names of the fields on the Index Form. Although you cannot edit the fields on this window, you can click on the wrench tool button to go to that section or field in the Index Form Builder. See the following illustration:
Creating A DocRecord Server Index Form
When the workflow is configured with an Index Form, you will be prompted to log into your DocRecord account at the MFP before you begin scanning and sending. To create an Index Form that allows you to customize your DocRecord Connector node at the MFP, do the following:
-
Make sure that your workflow includes a DocRecord Connector node.
-
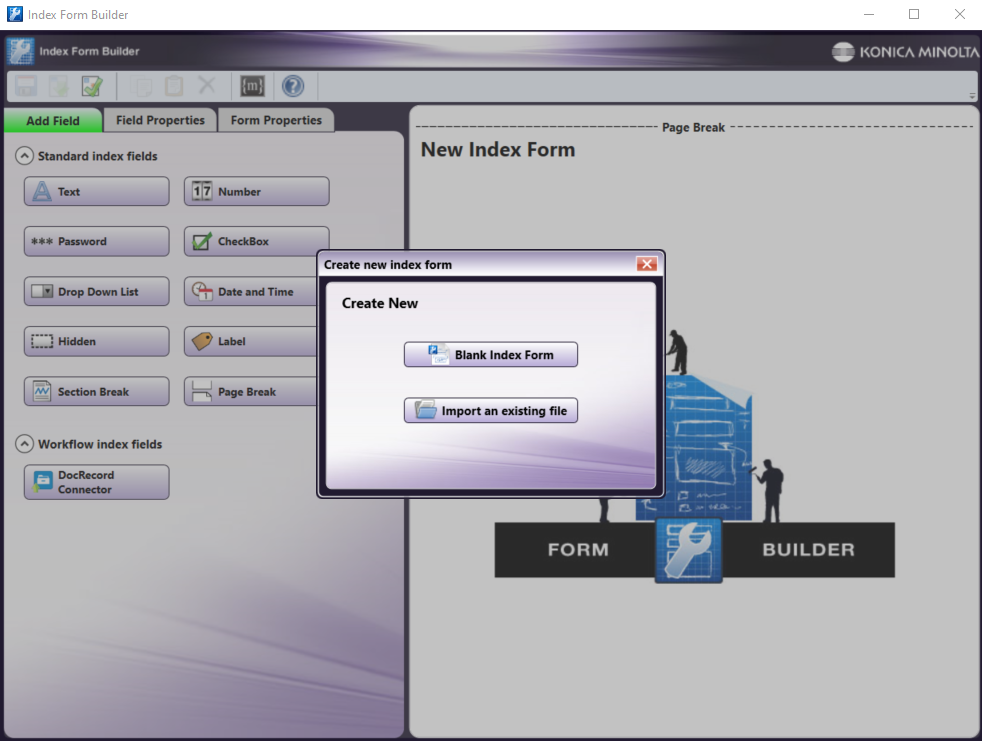
Click on the Forms dropdown in the toolbar and select Create New Index Form to open the Index Form Builder, as in the following illustration:
-
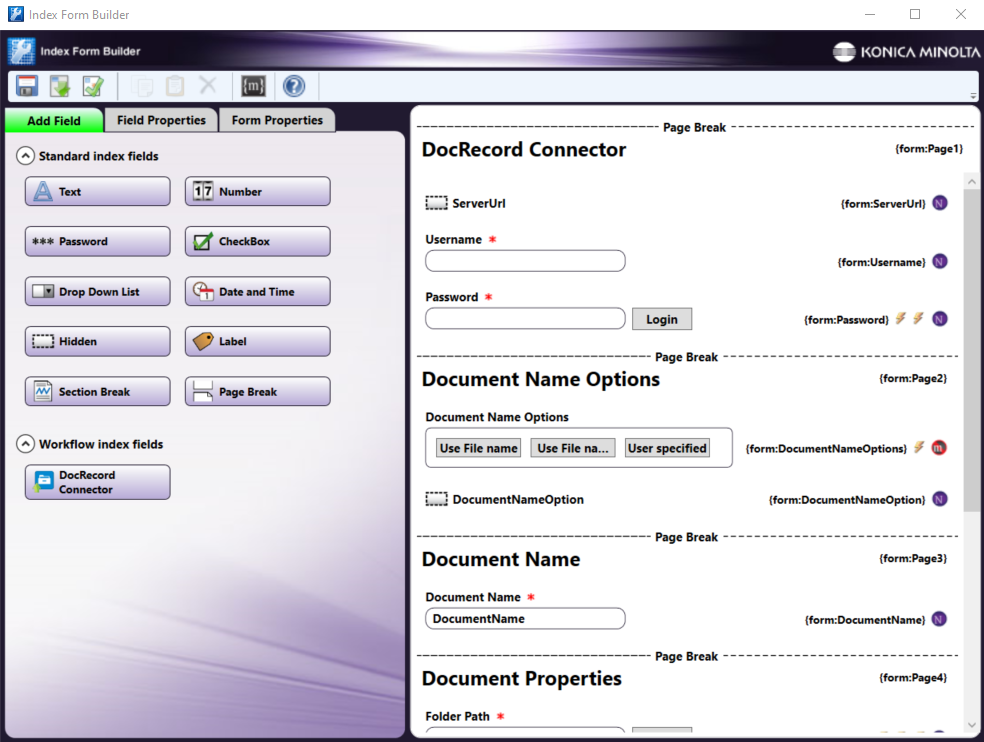
Select the Blank Index Form option in the pop-up. Then, drag the DocRecord Connector icon to the Index Form Builder working area. Several fields will populate, as in the following illustration:
-
Select the ServerURL component and enter the server URL for the DocRecord installation in the Default value field.
-
Enter any additional information, such as Username, Password, Document Name, etc.
-
Validate, Save, and close the Index Form Builder.
-
Attach the Index Form to a node that supports Index Forms, such as the MFP Panel node, Web Capture node, or Release2Me node.
DocRecord Index Form On MFP
When the DocRecord Connector is configured with an Index Form, the user will be able to enter their account credentials, browse through folders, and add any necessary additional information. To use the DocRecord Connector at the MFP Panel, do the following:
-
At the MFP, open the workflow containing the DocRecord Connector and the node associated with the Index Form that you have already configured. The DocRecord Connector will appear, as in the following illustration:

-
If you have preconfigured the DocRecord Connector with a Username and Password, they will appear automatically. If not, enter them now and select Login.
-
Select the Document Name Option, as in the following illustration:

If you select the User specified option, you will have the opportunity to enter the Document Name on the next screen.
-
Browse for the DocRecord folder you would like to save to, enter any Document Notes, and select an option from the Select Category dropdown menu, as in the following illustration:

Note: The MFP screen updates immediately after selecting a Category. If you need to edit the Category, you can navigate back to this Index Form page with the arrows at the top of the MFP screen.
-
Enter any information needed in the Category Fields, as in the following illustration:
