Barcode Processing
Barcode Processing is an optional node that recognizes and extracts information from barcodes on scanned documents and is used to automate the process of splitting, renaming, annotating, stamping, indexing, or routing documents based on the barcodes that are contained in the documents. With this process node, zones are created to capture barcode metadata information. The minimum length of a valid barcode is three digits. This node works with the following file types:
- TIFF
- JPG
- PNG
- BMP
- XPS - OmniPage only
Notes:
- When extracting barcode metadata from PDF files, the PDF must be a PDF Searchable or PDF Image Only file type, and optimized for quality.
- This node includes the ZXing barcode engine. The OmniPage OCR Engine is available as a separate add-on.
Using the Barcode Processing Node
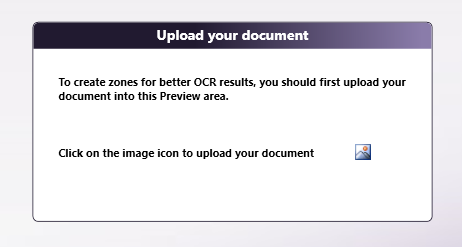
To open the Barcode Processing Node window, add a process node for Barcode Processing and double-click on it. First, upload a document for which to create zones. Follow the instructions on the screen, as in the following illustration:
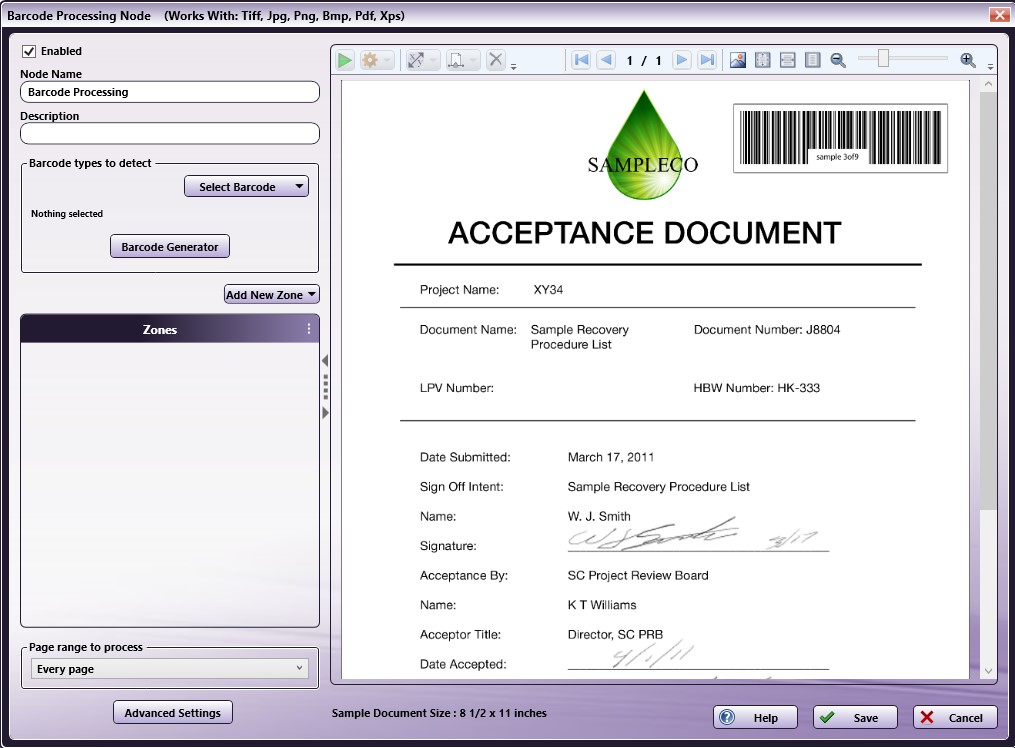
On the Barcode Processing window, you can fully define and customize zones for your barcode processing.
Click for more information on any of the following:
Using the Barcode Processing Window
On the Barcode Processing window, you can fully define and customize zones for your barcode processing. When setting up this window, you have the following options:
- Enabled - To enable this node in the current workflow, check this box. If you leave the box blank, the workflow ignores the node and documents will pass through as if the node was not present. Note that a disabled node does not check for logic or error conditions.
- Node Name - The node name defaults into this field. This name appears in the workflow below the node icon. Use this field to specify a meaningful name for the node that indicates its use in the workflow.
- Description - Enter an optional description for this node. If the workflow contains multiple processes, a description can help to distinguish multiple processes from each other. If the description is long, you can hover the mouse over the field to read its entire contents.
Buttons
- Advanced Settings - To access the Advanced Settings for the barcode engine you have selected, click this button. Advanced Settings for OmniPage are detailed here. Advanced Settings for ZXing are detailed here.
- Help - To access Dispatcher Phoenix Online Help, click this button.
- Save - To preserve your node definition and exit the window, click this button.
- Cancel - To exit the window without saving any changes, click this button.
Note: To save this node, you must create at least one zone.
To configure the Barcode Processing node properties window, you must do the following:
-
Choose the types of barcodes to detect.
-
Define zones manually.
-
Specify a page range.
Barcode Engine
The Barcode Processing node supports two barcode engines: OmniPage and ZXing. If multiple barcode engines are licensed and installed in Dispatcher Phoenix, a dropdown menu appears from which you can select the engine you want to use. If only one engine is available on your system, the name of the engine displays at this field.
Note: If you change to a different barcode engine, all configuration settings except the Enabled checkbox and Node Name are discarded and set back to the default settings.
Barcode Types to Detect
To specify the types of barcodes to detect in incoming documents, click on the Select Barcode button. A drop-down palette will appear that lists all the recognized barcodes. Mark the checkboxes next to the barcodes that you want the application to detect.
| Barcode Type | ZXing | OmniPage |
|---|---|---|
| All Barcodes | Yes | No |
| Code 39 | Yes | Yes |
| Code 39 with check digit control and transmission | No | Yes |
| Code 39 with start-stop characters transmission | No | Yes |
| Code 39 full ASCII mode | No | Yes |
| Code 93 | Yes | Yes |
| Code 128 | Yes | Yes* |
| Code 128 with check digit transmission | No | Yes* |
| GS1-128 (also known as UCC Code 128) | No | Yes* |
| UPC-A | Yes | Yes |
| UPC-E (6-digit) | Yes | Yes |
| Codabar | Yes | Yes |
| Codabar without start-stop characters transmission | No | Yes |
| EAN 8/13 | Yes | Yes |
| EAN/UPC with 2 and 5-digit supplement | No | Yes |
| ITF/ITF (Interleaved 2 of 5) | Yes | Yes |
| ITF with check digit control and transmission | No | Yes |
| Postnet Code | No | Yes |
| DataBar | Yes | No |
| DataBar Extended | Yes | No |
*You can select only one of these options at a time when using the OmniPage engine (UCC Code 128, Code 128, and Code 128 with check digit transmission).
Note: If Code 128 with check digit transmission is selected, any detected Code 128 barcode will be reported with the check digit. The check digit, used to check for an error in scanning, becomes the last digit of the barcode. Dispatcher Phoenix’s Barcode Generator only produces Code 128 barcodes without the check digit so you will have to select the Code 128 option for any Code 128 barcodes generated by the Barcode Generator.
Once you have selected a barcode type, it will be listed in the Barcode Types to Detect area on the node properties window.
Tool Bar
The toolbar at the top of the window allows you to further define the zone as well as customize the view of the node properties window.
When using the drop-down palettes on the tool bar, pressing the Enter key or clicking anywhere outside of the palette will apply those changes to the zone.
| Tool Bar Icons | Description |
|---|---|
 |
Run Zone Test Icon - Click to test the zones that you have defined. |
 |
Zone Test Configuration Icon - Click to change the seconds allotted for the time without communication before a timeout occurs. Note that this is disabled for the ZXing engine. |
| Zone Coordinates Icon - Click to define specific coordinates for the zone. You can change the size of the zone by entering values (in pixels) in the Width and Height fields. You can also move the position of the zone by entering values (in pixels) in the Left and Top fields. | |
Zone Page Range Icon. Use this drop-down palette to specify the pages to which to apply the zone. Options are:
|
|
| Delete icon - Click to delete a selected zone. | |
| Pages icons - Click on the arrows to navigate through multiple pages of the sample document (if available). | |
| Sample Document icon - Click to find and upload another sample document to use in the Preview area. | |
 |
Actual Size icon - Click to revert the preview sample document to its original size. |
| Fit to Width icon - Click to stretch the sample document to fit the width of the Preview area. | |
| Whole Page icon - Click to fit the sample document completely in the Preview area. | |
| Zoom controls - Use either the magnifying glass icons or the sliding bar to zoom in and out of the Preview area. |
Uploading a Sample Document
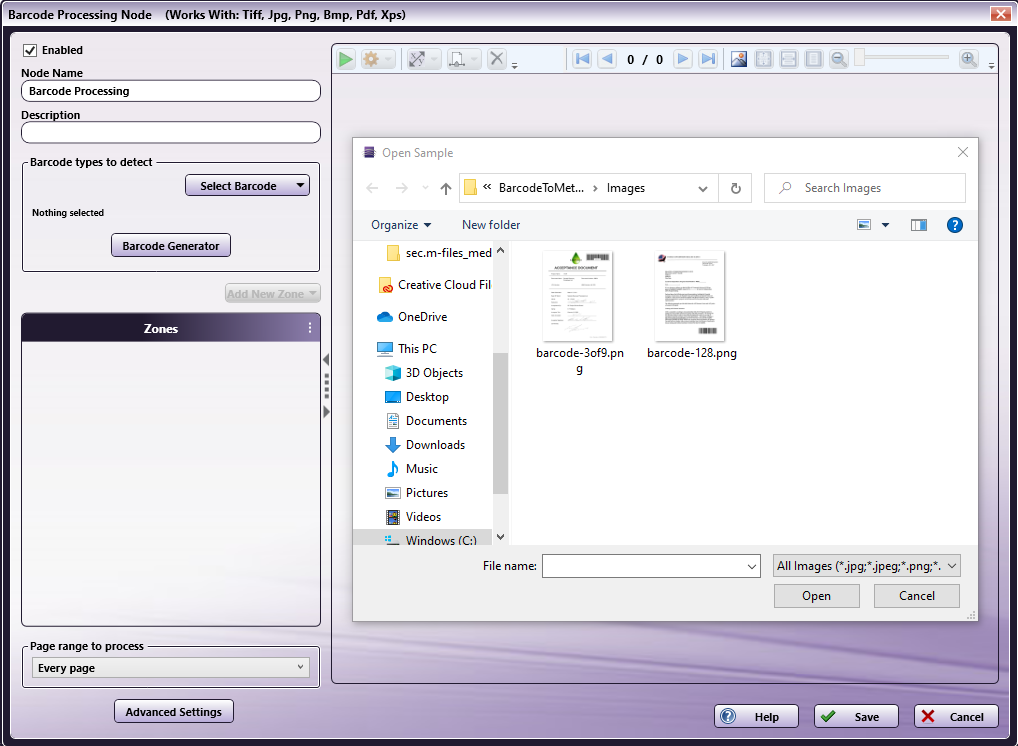
Clicking on the Upload icon on the tool bar allows you to upload your own sample document on which you can create your zones. When you click on the Upload icon, an “Open Sample” browse folder appears from which you can choose the appropriate document, as in the following illustration:
Creating a Zone
Zones are borders that define certain areas of the page for the OCR engine and can be created either manually or automatically. For precise control over how documents are handled, you can manually create zones by doing the following:
-
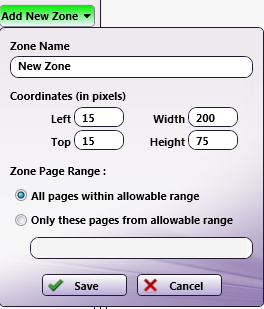
Add New Zone - Click this button to display a drop-down palette, as in the following illustration:
-
On the Add New Zone drop-down palette, do the following:
-
Zone Name - Enter an identifying name for the zone.
-
Left and Top - Enter a value (in pixels) to position the zone from the left and top of the document.
-
Width - Enter a value (in pixels) to define an appropriate width for the zone.
-
Height - Enter a value (in pixels) to define an appropriate height for the zone.
-
Zone Page Range - Specify the pages to which the zone will be applied. Options include:
-
All pages within allowable range - Select this radio button to apply zones to all pages within the specified range. This means that a zone configured on the first page of a document will automatically be applied to the rest of the pages in the document (if the specified page range to process is Every Page).
-
Only these pages from allowable range - Select this radio button to apply the zones to only a specific range of pages within the allowable range. Enter the page range in the field provided. For example, for a five-page document, any of the following are acceptable entries:
- 1-3
- 1,2,5
- 1&4
- 1-3,5
- 1-3, 5
-
-
-
Save - Click this button to preserve your settings and exit the window. The zone will appear in the specified location on the Preview area.
-
Cancel - Select this button to exit the drop-down palette without saving any changes.
Zone List
This area displays all the defined zones for the node. In this area, you can do the following:
To access additional options for zones, open the “Context Menu” menu by clicking the ![]() icon at the upper right of the Zones List area, as shown below:
icon at the upper right of the Zones List area, as shown below:

Clicking the three dots in the Zones area will open up context menu that allows you to:
| Menu Option | Menu Action | Keyboard Shortcut |
|---|---|---|
| Show / Hide all zones | Toggle the visibility of all zones on the Canvas and display a “hidden” icon |
F6 |
| Delete all zones | Delete all zones from the Zone Editor / Canvas. | Ctrl+Shift+Del |
Clicking the three dots next to a zone will open a menu, as in the following illustration:

| Menu Option | Menu Action | Keyboard Shortcut |
|---|---|---|
| Show / Hide zone | See next table | See next table |
| Delete | Delete a single zone from the Zone Editor / Canvas. | Del |
| Rename | Rename a zone from a right click context menu. | F2 |
| Test this zone | Run and test a single zone, to help users test and debug individual zones. | F5 |
There is a second menu for Show / Hide Zone with more options:

| Menu Option | Menu Action | Keyboard Shortcut |
|---|---|---|
| Show / Hide all zones | Toggle the visibility of all zones on the Canvas and display a “hidden” icon |
F6 |
| Show / Hide this zone | Toggle the visibility of a zone on the Canvas. | F7 |
| Hide all zones but this | Hide all zones on the Canvas except the selected zone. | F9 |
The node also supports additional actions:
| Menu Option | Menu Action | Keyboard Shortcut |
|---|---|---|
| Test selected zones | Run and test more than one selected zones, to help users test and debug multiple selected zones at a time. | F5 |
| Delete selected zones | Delete selected zones from the Zone Editor / Canvas. | Del |
Note: You can also access the Show / Hide, Delete, Rename, Test this zone options by right-clicking a zone in the Preview area and selecting an option from the menu that appears.
Preview Area
The Preview area displays a sample document on which the defined zones appear. Using the Preview area, you can do the following:
-
Resize a zone’s bounding box by selecting the bounding box and dragging the appropriate handles until the box is the desired size.
-
Reposition a zone by clicking on the bounding box and then dragging the box to its desired position.
-
Select multiple zones in a rectangular area by dragging a marquee over the zones that you want to select using your mouse. To do this, you must start from any white space. Alternatively, you can select multiple stamps by selecting one stamp, holding down the Shift key, and selecting another.
-
Delete a zone by selecting it and pressing the Delete key on the keyboard. A confirmation message will appear.
-
Upload a different sample document by clicking on the Upload icon on the tool bar and selecting another document. If you have defined any zones for the original document, a pop-up window appears after you select the new document and you must choose whether to preserve or abandon the zones.
Note: The Preview function does not support XPS files; XPS files process as expected when the workflow is running.
Testing Zones
Once a zone has been created and a barcode type has been selected, you can test the zone using the Test All Zones icon on the toolbar. This returns information about the zone including the following:
- Zone name
- Barcode type within the zone
- Result of the barcode
You can copy the value of any zone with a detected barcode value by right clicking it and selecting copy.
When using the Test feature, you can test individual zones or multiple zones, either by selecting a zone, right clicking a zone and selecting Test this Zone or by selecting multiple zones, right clicking, and selecting Test selected zones or clicking the Test All Zones button on the toolbar. Multiple zones can be selected two ways:
- Click and drag the mouse to highlight multiple zones at once
- Use CTRL+Click to select multiple zones
See the illustration below:
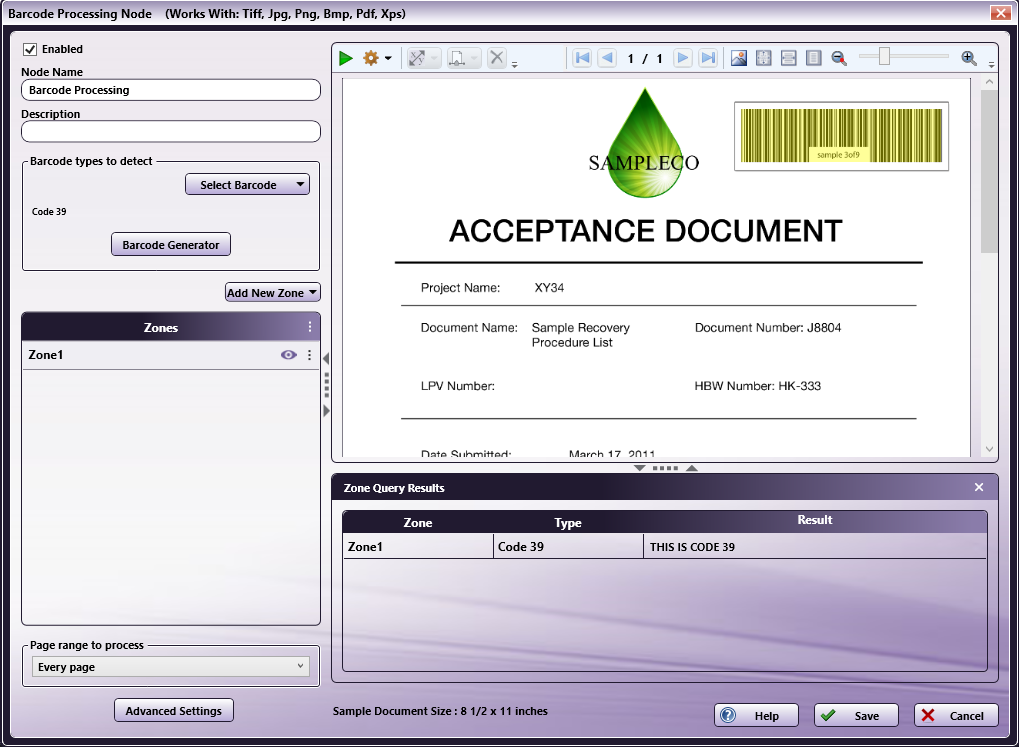
There are two ways to copy the value of a tested zone:
- You can right click on the zone and select Copy barcode Value.
- You can right click on the zone result in the zone results query section and select Copy.
| Menu Option | Menu Action | Keyboard Shortcut |
|---|---|---|
| Copy zone value to the Windows Clipboard | Copy the detected zone value to the Windows clipboard. You can access this command from the right click context menu on the zone result. | Ctrl+c |
Notes:
- You can see the value of a tested zone by hovering the mouse over the zone.
- You can adjust the size of the preview section and the zone results query section by clicking and dragging the edges of the area.
Specifying Page Ranges to Process
The Page Range Process area allows you to specify which pages to process during barcode zone processing. Options include:
-
Every page - Process every page.
-
Every even page - Process even pages.
-
Every odd page - Process odd pages.
-
First page - Process the first page only.
-
Last page - Process the last page only.
-
Define your own page range - Process a custom page range. Once you choose this option, an empty field will appear to enter the page range. Do the following:
-
Specify a page range by using commas and/or dash signs counting from the start of the document. For example, enter 1, 2, 5-7 to process pages 1, 2, 5, 6, and 7.
-
Specify a specific stamping sequence within a range of pages by using parentheses. For example, enter 1-10(3) to process every third page from pages 1 to 10.
-
Specify the last page by using ‘end.’ For example, enter end(-5) - end to process pages 15-20 of a 20-page document.
Other examples include:
-
To process pages 1, 2, 5,6,7, and 19 of a 20-page document, enter: 1,2,5-7, end(-1).
-
To process pages 10-15 of a 20-page document, enter: 10-end(-5).
-
To process every other page from pages 10-15 of a 20-page document, enter: 10-end(-5)(2).
-
To process pages 15-20 of a 25-page document, enter: end(-10)-end(-5).
-
To process pages 10-20 of a 20-page document, enter: end(-10)-end.
-
Note: If you specify a page range that does not correspond to the number of pages in the incoming document (e.g., processing pages 10-20 for a three-page document), then the file will go out on error.
Barcode Metadata
Once a barcode zone has been defined, it can be referenced by other nodes in the workflow.
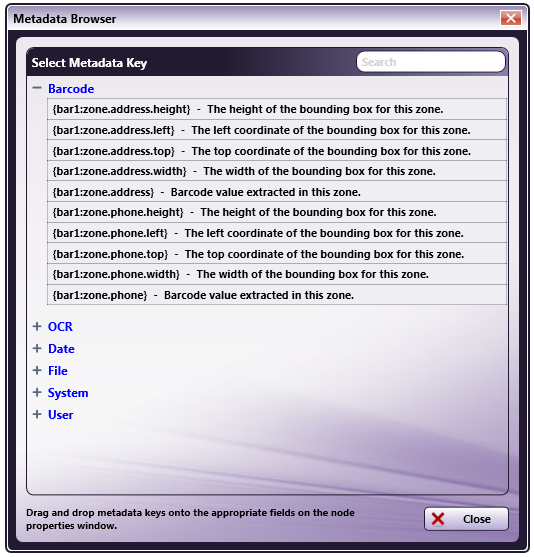
The syntax for barcode zone referencing is {bar1:zone.nameofzone.[<page>]}, which will provide the value extracted in this zone.
The syntax for where the OCR application found any values in the zone is {bar1:zone.nameofzone.[zonecoordinate]}, where [zonecoordinate] is either top, left, width, or height, as defined in pixels.
You can also use the Metadata Browser window to choose the barcode zone variable, as in the following illustration:
