Workflow Services Manager
The Workflow Services Manager allows you to do the following:
-
Manage Workflow Services.
-
Configure LDAP support for CAC/PIV authentication.
This application can be accessed from the Windows Start Menu (All Programs > Konica Minolta). You can also perform a Windows search on “Workflow Services Manager” to find this application.
The Workflow Services Manager includes tabs containing the following key features:
Windows Authentication
On this tab, administrators can manage the KMBS Windows Authentication Service.
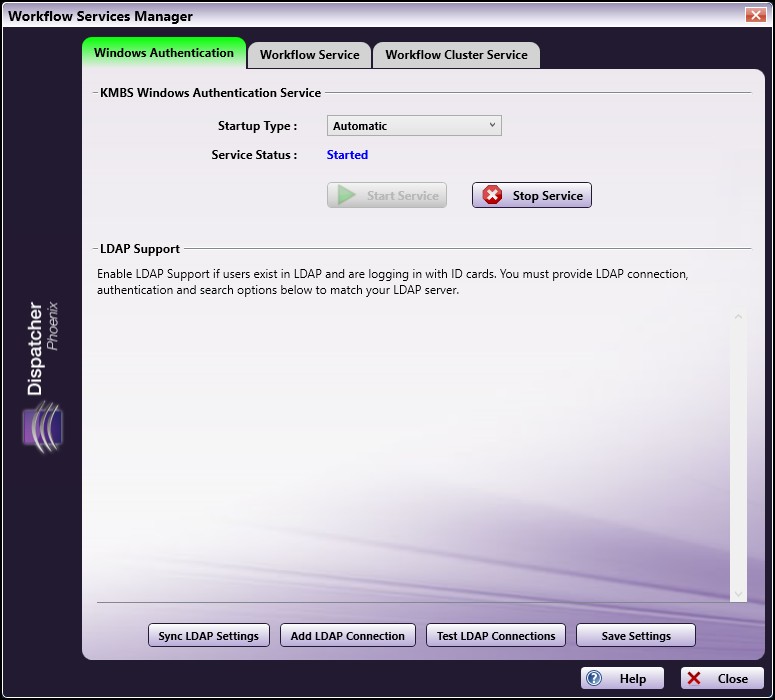
The following options are available:
KMBS Windows Authentication Service
-
Startup Type - Use the drop-down list to specify how/when to start the KMBS Windows Authentication Service. Options are:
- Automatic (Delayed Start) - The service starts shortly after all other services designated as Automatic have been started (typically 1-2 minutes after the system boots).
- Automatic - The service starts when the system first starts.
- Manual - In order to start the service, the user must the Start Service button on this window every time the PC starts.
- Disabled - The user is prevented from starting the service at any point.
-
Start Service - To activate the service, click this button.
-
Stop Service - To stop the service, click this button.
LDAP Support
At the bottom of the Workflows Authentication tab are three buttons, which allow you to add and configure LDAP (Lightweight Directory Access Protocol) connections for the Workflow Services Manager. LDAP is a standard for user authentication and storage of user profile data. Dispatcher Phoenix must connect to LDAP to perform read-only queries to determine user attributes (for scanning to home directories {user:home} and email addresses {user:email}, etc.) Configuration options include:
- Sync LDAP Settings - To synchronize LDAP settings, click this button.
- Add LDAP Connection - To add an LDAP configuration, click this button. A new LDAP connection area appears below any previous ones. When there are multiple LDAP connection areas present, each also gets an X button to delete the connection. Dispatcher Phoenix can support up to 10 LDAP connections, at which point this button will no longer be clickable.
- Test LDAP Connection - To test the search setting, click this button.
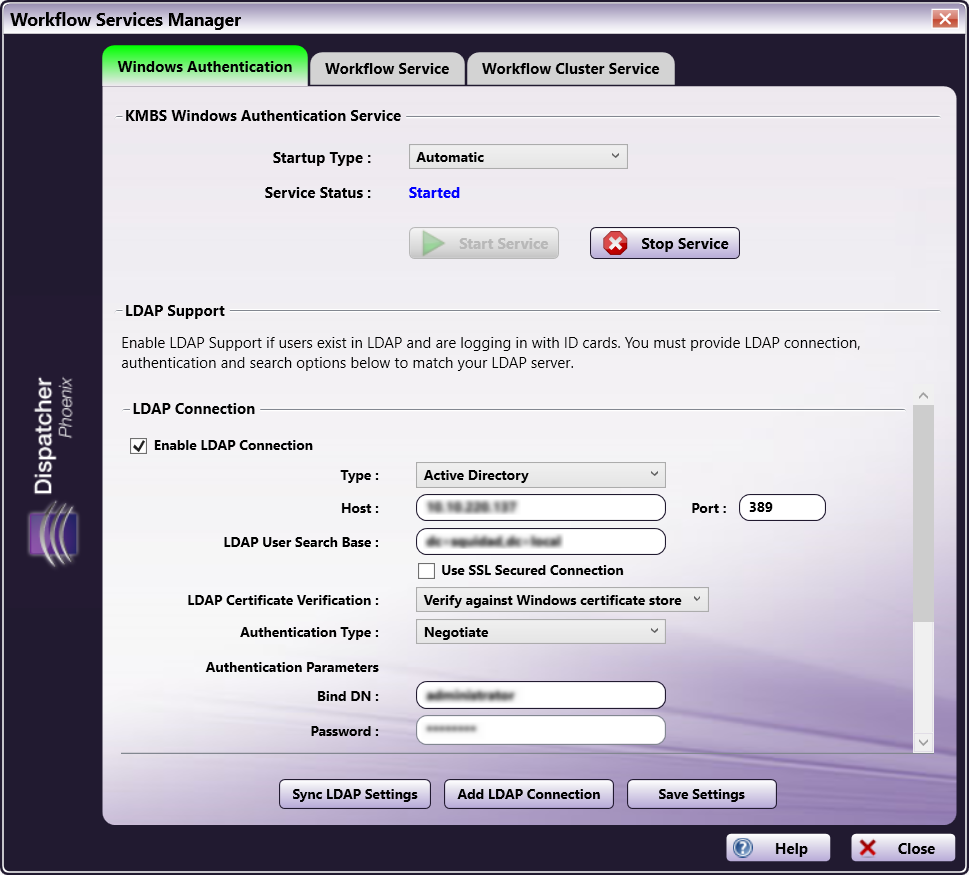
To add an LDAP connection, select the Add LDAP Connection button.
Notes:
-
LDAP changes do not take effect until the KMBS Windows Authentication Service is stopped and started again.
-
When a user first logs into Dispatcher Phoenix at the MFP, Active Directory and LDAP information is cached until the user logs out of Dispatcher Phoenix (by exiting the app on the MFP). The next time the user logs in, LDAP information will be obtained again from the Active Directory and/or LDAP.
LDAP Connection
- Type - Specify the connection type. You have the following options:
- Active Directory
- Novell Directory Services
- OpenLDAP
- Host - Enter the name of the server where the server is hosted.
- Port - Enter the server port.
- LDAP User Search Base - Enter your search starting point in the LDAP server tree structure.
- Use SSL Secured Connection - To require the LDAP server to make an SSL-encrypted connection, select this box.
- LDAP Certificate Verification - If you check the box at the Use SSL Secured Connection field, use this field to specify your method of LDAP server certificate verification.
Authentication Parameters
- Bind DN - Enter the user on the external server permitted to search the LDAP directory within the defined search base. Note that the {user}@{domain} variables will be replaced with information coming from the MFP and are necessary to perform the search.
- Password - Enter the bind password.
LDAP Search Options
- Filter - Enables you to define a search criterion to identify entries in a search requests. For example, (objectClass=person) is used for retrieving sub-sets of users across your LDAP directory.
- Default Search - Configure the search attributes.
- Fallback Search - Enter additional search strings.
Buttons
- Enable LDAP Connection - After entering the required information, select this button to enable the LDAP connection.
- Remove LDAP Connection - Deletes the associated LDAP connection.
- Expand/Collapse - Clicking this button allows you to see the configuration options for LDAP or collapse them to only display vital information.
Once you have entered all the required information, select the Save Settings button. If you add more than one LDAP connection, they appear in a list, as in the following illustration:
Multiple LDAP connections can be reordered by dragging and dropping the six dots icon on the right-hand side of the entry.
Workflow Service
On this tab, administrators can manage the SEC Workflow Services.
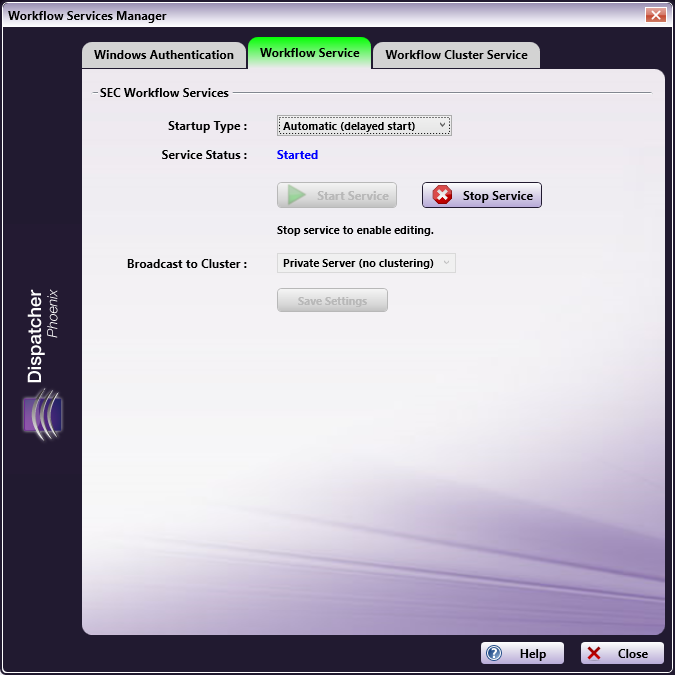
You have the following options:
-
From the Startup Type pull-down list, specify how/when the SEC Workflow Services should start. Options are:
-
Automatic (Delayed Start) - The service starts shortly after all other services designated as Automatic have been started (typically 1-2 minutes after the system boots).
-
Automatic - The service starts when the system first starts.
-
Manual - In order to start the service, the user must the Start Service button on this window every time the PC starts.
-
Disabled - The user is prevented from starting the service at any point.
-
-
Activate the service by selecting the Start Service button.
-
Stop the service by selecting the Stop Service button.
-
Select whether or not to Broadcast to Cluster. This setting enables your server to be public so that they are accessible for cluster set up.
Workflow Cluster Service
On this tab, an administrator can manage the KMBS Workflow XMPP Cluster Service, one of the main workflow services that IT administrators can configure to run as an NT Service virtual account for CAC/PIV authentication and other security purposes.
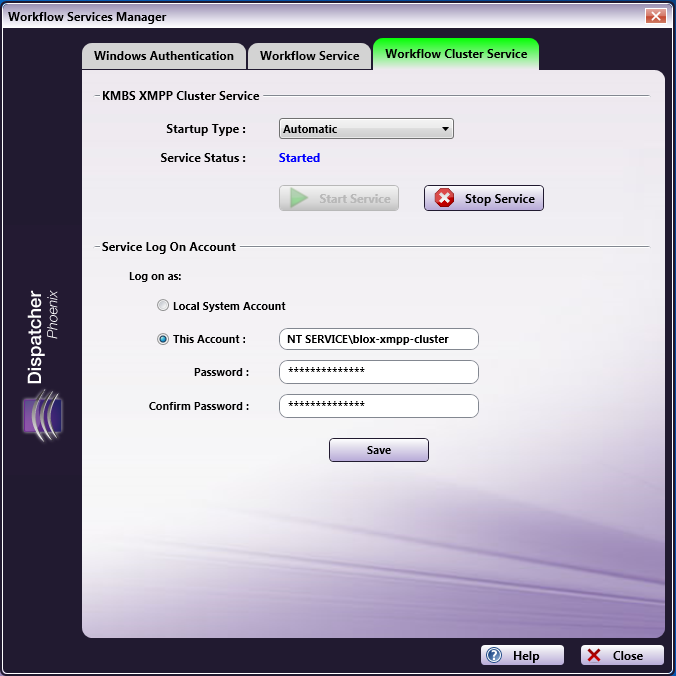
Virtual accounts are “managed local accounts” that provide the following features to simplify service administration:
-
No password management is required.
-
The ability to access network destinations (e.g., network shares, home folders, etc.) with a computer identity in a domain environment.
Do the following:
-
From the Startup Type pull-down list, specify how/when the XMPP Cluster Service s should start. Options are:
-
Automatic (Delayed Start) - The service starts shortly after all other services designated as Automatic have been started (typically 1-2 minutes after the system boots).
-
Automatic - The service starts when the system first starts.
-
Manual - In order to start the service, the user must the Start Service button on this window every time the PC starts.
-
Disabled - The user is prevented from starting the service at any point.
-
-
Activate the service by selecting the Start Service button.
-
Stop the service by selecting the Stop Service button.
-
Modify the Log on type of the service:
-
Select the Local System Account radio button if you do not want to run on a domain.
-
Select the This Account radio button and specify the NT virtual service account and password to have full permissions to write to the domain server.
-
Note: Service Log On Account changes do not take effect until the Workflow Cluster Service is stopped and started again.
Important! Dispatcher Phoenix does not support updating the Workflow Cluster Service credentials to a Microsoft Entra ID, even if Dispatcher Phoenix is configured to use a Microsoft Entra environment.
Scan To Home with LDAP Lookup using Windows NT Service Logon
To configure a “Scan to Home” workflow with LDAP lookup using Windows NT Service Logon, do the following:
These instructions assume that a Windows NT Virtual Service account with access and full permissions to all users’ home and profile paths has already been created and that the computer is joined to a domain.
-
Launch the Workflow Services Manager application.
-
On the Workflow Cluster Service tab, change the Service Log On information to use the Windows NT Virtual Service account.
-
Select the Stop Service button; then select the Start Service button.
-
On the Windows Authentication tab, check the Enable LDAP Lookup button.
-
Enter LDAP configuration details in the provided fields.
-
Select the Save Settings button.
-
Select the Stop Service button; then select the Start Service button.
-
In the Dispatcher Phoenix main application, open the MFP Registration Tool. Edit the MFP that you want to use; then select the Authentication tab.
-
Choose the single sign on option in the Authentication tab, as in the following illustration:

-
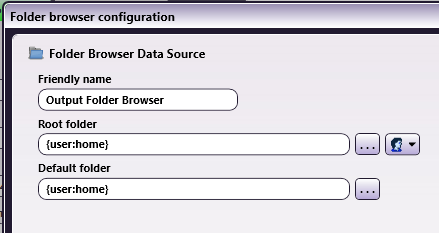
When setting up the Index Form in your workflow for folder browsing, use the {user:home} variable, as in the following illustration:
-
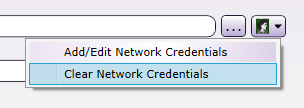
Network credentials are not necessary. Clear any network credentials by clicking on the Network Credentials icon; then selecting the Clear Network Credentials option, as in the following illustration:
-
On the Dispatcher Phoenix main application screen, ensure that the workflow is shared.
-
At the MFP, log in with your domain user account.
Important: Adding multiple domains to the Workflow Service Manager allows for:
- Authentication at the MFP for users across multiple domains as long as the MFP is configured to use Active Directory and users are registered on the device. This configuration works with card readers.
- Release2Me users using the same domain that Dispatcher Phoenix is installed on can share print jobs to users on any configured domains.
- Workflow Sharing across multiple domains as long as the primary user is logged into Dispatcher Phoenix Web on the same domain as Dispatcher Phoenix.
- LDAP datasource lookup across multiple domains using an Index Form.