Job Ticket Generator: XML

Note: This node works with PDF files (version 1.3 or later).
Use the Job Ticket Generator: XML Node to create or update an XML file with the corresponding metadata values of Dispatcher by using a Mapping Table file. If the file path exists, the existing XML file is updated with the corresponding metadata. If the XML file path doesn’t exist in the metadata, Job Ticket Generator: XML Node will create a new XML file, and then update it with the corresponding metadata values
Using the Job Ticket Generator: XML Node
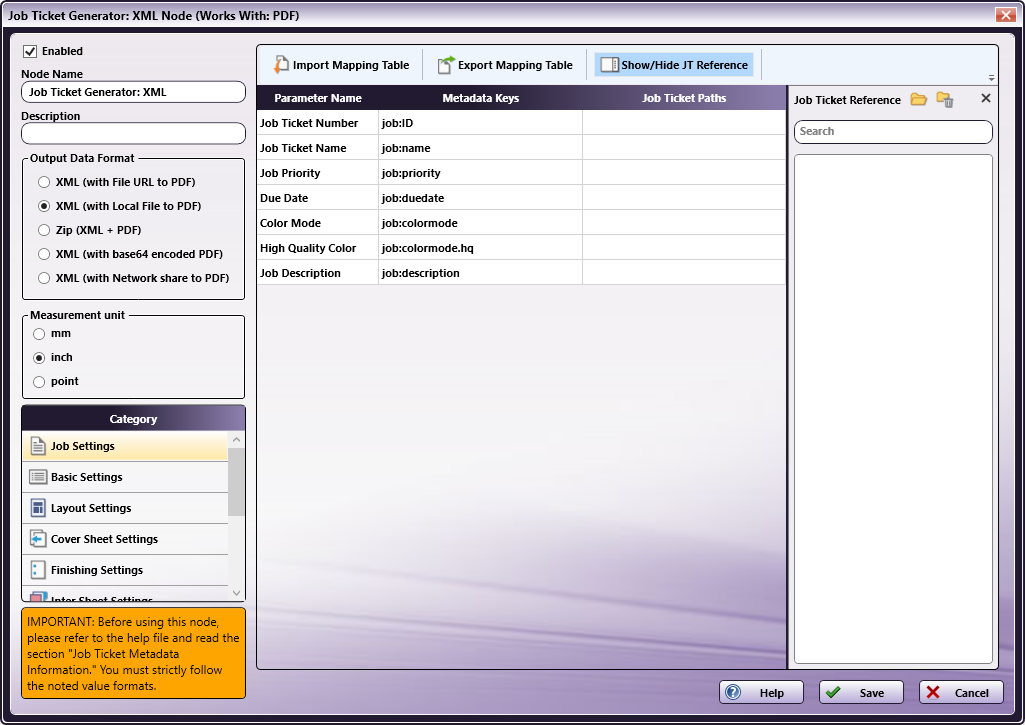
Add the Job Ticket Generator: XML Node to the workflow by dragging the node’s icon onto the Workflow Builder canvas, and then double-clicking on the icon to open the Job Ticket Generator: XML Node:
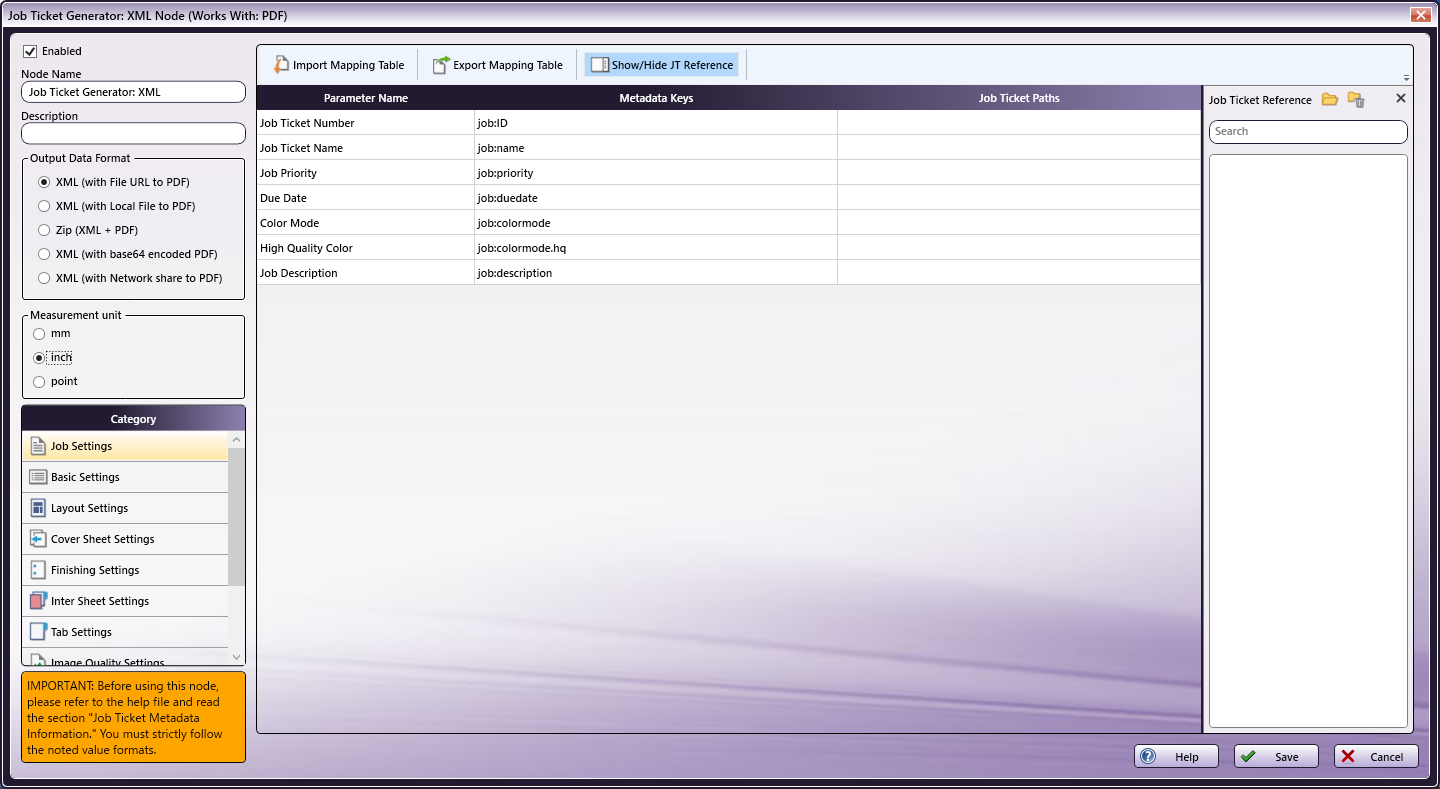
Use this window to create or import a mapping table by using a dependent UI component mapping table editor.
-
Select the Enabled checkbox so that the process will run. When unchecked, this process is ignored. Documents pass through as if the node were not present (i.e., continue along the default or positive path). Note that a disabled node will not check for logic or error conditions.
-
In the Node Name field, enter a meaningful name for the Job Ticket Parser: XML Node.
-
In the Description field, enter a description for the Job Ticket Parser: XML Node. This is not required, but can be helpful with multiple collection points. If the description is long, hover the mouse over the field to read its entire contents.
-
In the Measurement Unit panel, select a measurement unit radio button. Three types of measurement units are available: mm, inch, and point.
-
Click the Save button to save the changes. If Cancel is selected and the window is closed, the changes are not saved.
-
Click the Help button to access online help.
Output Data Format
In the Output Data Format area, select the node output format:
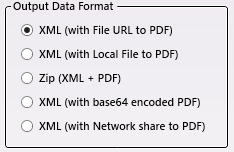
The following options are supported:
-
XML (with File URL to PDF): A local PDF’s URL is included in the generated job ticket’s XML file.
-
XML (with Local File to PDF): A local PDF file path is included in the generated job ticket’s XML file.
-
ZIP (XML+PDF): The node generates an XML and a PDF file.
-
XML (with base 64 encoded PDF): The output is base64 encoded PDF data in an XML file.
-
XML (with Network share to PDF): Network shared PDF file path is included in the generated job ticket’s XML file.
Measurement Unit
Use this option to specify measurement unit.
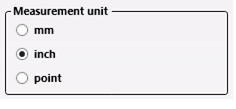
There are three options:
-
mm
-
inch
-
point
Note: By default, inch displays for all English locale systems. All other locales default to mm. Regardless of the default value, the user may change to any of the available three values.
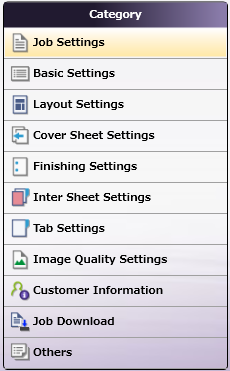
Category Panel
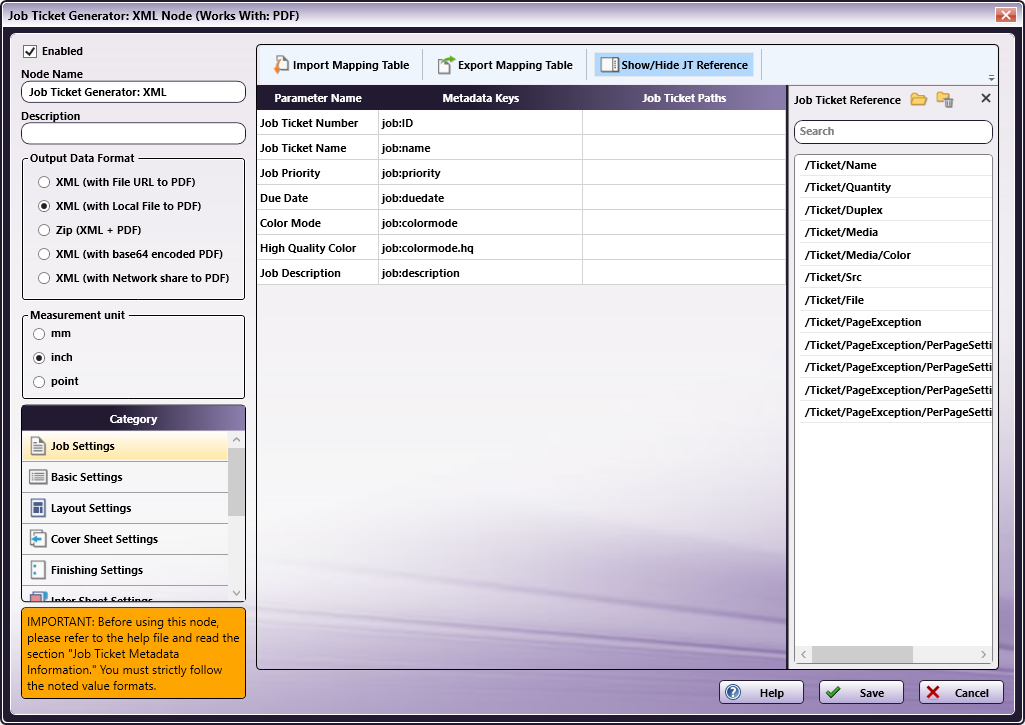
There are eleven job ticket parameter Categories (all noted in the image below). To display the setting values of a Category, click one of the eleven options:
-
Job Settings: Select this option to edit the job ticket parameters of the following values: Job Ticket Number, Job Ticket Name, Job Priority, Due Date, Color Mode, High Quality Color, or Job Description.
-
Basic Settings: Select Basic Settings to edit the job ticket parameter of Copies, Collate, Offset, Offset Copies, Offset Pages, Paper Catalog ID, Paper Name, Paper Source, Paper Weight, Paper Type, Paper Color, Paper User Color, Use Perforated Paper, Paper Size, Paper Unit, or Orientation.
-
Layout Settings: Select this option to edit the job ticket parameters of the following values: Imposition, or Printing Type.
-
Cover Sheet Settings: Select this option to edit the job ticket parameters of the following values: Front Cover, Front Cover Paper Name, Back Cover, or Back Cover Paper Name.
-
Finishing Settings: Select Finishing Settings to edit the job ticket parameter of Binding Position, Saddle Stitch, Trim, Staple, Punch, Folding, Perfect Binding, Perfect Binding Mode, Perfect Binding Tray, Perfect Binding Duplex, Perfect Binding Spine, Perfect Binding Cover Size, Perfect Binding Cover Weight, Ring Binding, Ring Binding Front Cover, or Ring Binding Back Cover.
-
Inter Sheet Settings: Select Inter Sheet Settings to edit the job ticket parameter of PPS Print Type, PPS Binding, PPS Paper Catalog ID, PPS Paper Name, PPS Paper Source, PPS Paper Type, PPS, PPS Paper Size, PPS Paper Weight, PPS Paper Color, PPS Paper User Color, PPS Use Perforated Paper, PPS Paper Tab Type, PPS Number of Inserts, PPS Staple, PPS Punch Setting, PPS Punch, or PPS Finish Stapling.
-
Tab Settings: Select Tab Paper Size, Tab Paper Weight, Tab Text, Tab Sheet Page Number, File Order, or Number of Tabs.
-
Image Quality Settings: Select this option to edit the job ticket parameters of the following value: Resolution.
-
Customer Information: Select this option to edit the job ticket parameters of the following values: Comment URL, Customer’s First Name, Customer’s Last Name, Customer’s Address 1, Customer’s Address 2, Customer’s City, Customer’s State, Customer’s Zip Code, Customer’s Country, Customer’s Company, Customer’s Phone, Customer’s Fax, Customer’s Email, or Job Created By.
-
Job Download: Select this option to specify which Print File Option will be used to retrieve a print file: Retrieve from Local Path, Download from URL, Retrieve Encoded base64 from Job Ticket or Retrieve from Network share.
-
Others: Select this option to if a job contains a custom job ticket parameter that cannot be found in any of categories. Add a new field for this option using the Others Category.
Tool Bar
The Tool Bar only appears when the Inter Sheet Settings and the Others Category options are selected. The example below displays when the Others Category option is selected. The Inter Sheet Settings Tool Bar varies from this example. All available Tool Bar options are noted below:

-
Add New: Use this option to add a new entry parameter and define its conversion rule. This is only available in the Others category.
-
Delete: Use this option to delete a parameter entry. This is only available in the Others category.
-
Add New Per Page Settings: Use this option to add another set of Per Page Settings. This is only available in the Inter Sheet Settings category.
-
Delete Per Page Settings: Use this option to delete a Per Page settings entry. This is only available in the Inter Sheet Settings category.
-
Import Mapping Table: Click to open a file dialog then select a mapping table xml file to import.
-
Export Mapping Table: Use this function to save any configuration changes applied to the external mapping table’s xml file.
-
Show/Hide JT Reference: Use this option to show or hide the Job Ticket Reference Panel.
Mapping Table Panel
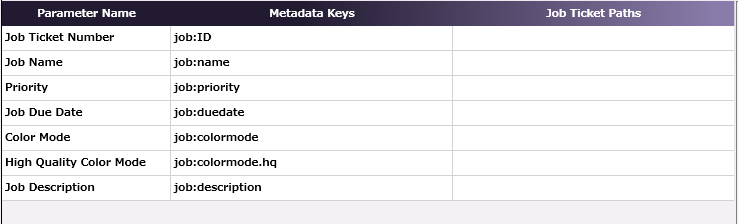
In this panel user defines the mapping values between the job ticket parameters and the Dispatcher Metadata. It consists of three columns.
-
Parameter Name: This column notes user-friendly names for the job ticket parameters.
-
Metadata Key: This column notes the Dispatcher Metadata Keys for each parameter name.
-
Job Ticket Paths: This column is initially blank. In it, enter the XML Path that corresponds to each job ticket parameter.
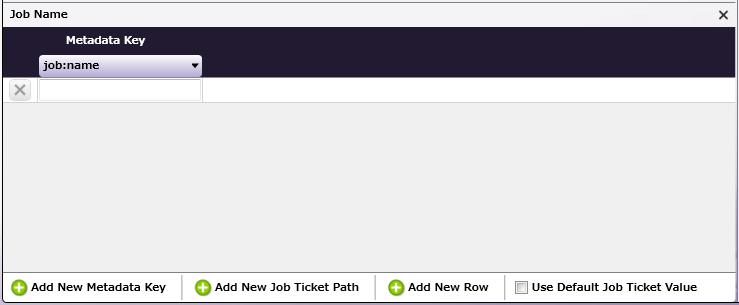
Value Map Panel
Click on the table above to display the Metadata Key panel. Use this panel to define the conversion rules between the Metadata and Job Ticket values. Enter the values into the table. Metadata Key(s) and Job Ticket Path(s) are listed in a header. Entries may be added or deleted, as required.
-
Add New Metadata Key: Click this button to add a new Metadata Key.
-
Add New Job Ticket Path: Click this button to add a new Job Ticket Path.
-
Add New Row: Click this button to add a new value map Row.
-
Use default Job Ticket Value: If this is enabled, values in the Job Ticket remain with their corresponding Metadata Keys and are saved without any conversion being applied.
Note: The check box is only available in the case of 1-to-1 mapping. In all other conditions, this option is grayed out and cannot be enabled.
Job Ticket Reference Panel
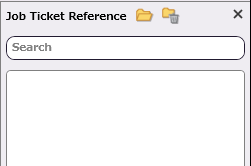
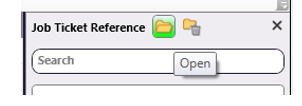
To open a sample job ticket file, click the Open button ( ). Once a job ticket is selected, all possible XML Paths are listed in the table. Drag-and-drop items in the list to the desired Job Ticket Paths column in the Mapping Table Panel.
Click the Clear button ( ) to clean up the list.
Basic Operations of Mapping Table
Job Ticket File
The Job Ticket Generator: XML Node is used to convert metadata to an XML job ticket file.
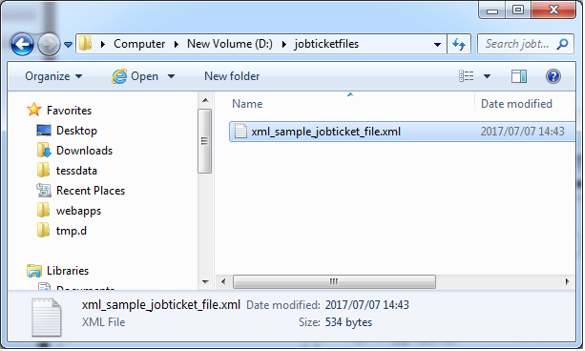
Note: Once the Job Ticket Generator: XML Node has been added to Dispatcher Phoenix via the add-in manager, sample job ticket files are available for viewing. Use the path below to locate them:
\Program Files\Common Files\Konica Minolta\Phoenix\Resources\JobTicketGeneratorXMLNode
The sample job ticket noted above contains all possible job ticket parameters. The sample job ticket can be modified so it contains the parameters required to support a file. A job ticket file can also be generated using an external, third-party application. This job ticket file may then be used as a sample file.
The Job Ticket Generator: XML Node defines job ticket parameters using Document- and Per Page Set-tings-level values. For the discussion that follows, a sample job ticket is modified with simple Document-and Per Page Settings-level values. This sample job ticket is used for the discussion that follows:
<Ticket>
	<Name>Sample XML Job</Name>
 	<Quantity>5</Quantity>
	<Duplex>On</Duplex>
	<Media>
		<Color>Yellow</Color>
	</Media>
	<Src>C:\Temp\Testfile.pdf</Src>
	<File>file</File>
	<PageException>
		<PerPageSetting>
	        <PageRange>1-5</PageRange>
	        <Media>
	        	<PaperName>A4</PaperName>
	        </Media>
	    </PerPageSetting>
	</PageException>
</Ticket>
Configure the Mapping Table Using the Job Ticket File
-
Using a text editor, copy the sample XML file above.
-
The Source Path <Src> element noted in the sample job ticket (as explained in the example above), needs to be changed so that the path is valid.
-
Save the file locally as xml_sample_jobticket_file.xml.
-
Double-click on the Job Ticket Generator: XML node. The settings screen opens:

-
In the left panel, set the following values:
-
Enabled checkbox: the checkbox so that the process will run.
-
Node Name: Assign a name value to the node in the text field.
-
Output Data format: Select the XML (with Local File to PDF) radio button.
-
Measurement unit: Select a radio button.
Note: If the metadata value_ {job:paper.unit} _is included in the input Job Ticket, that value will overwrite any value selected in the Measurement Unit field.
-
-
In the Job Ticket Reference Panel (far-right), locate the Open icon:
-
Click the icon and on the screen that opens, navigate to and select the file saved in Step 3 above (xml_sample_jobticket_file.xml).
-
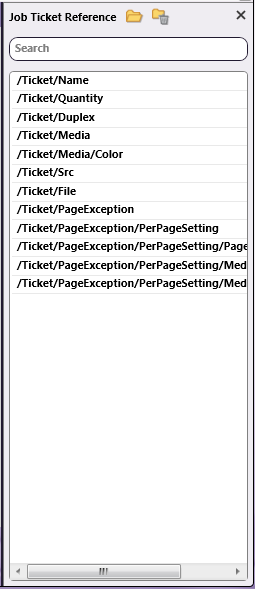
When the file opens, its contents (or XPaths) display in the Job Ticket Reference panel, as noted in the following image:
Mapping XPaths
Once the XPath values are available, they need to be mapped to the Parameter Name/Metadata Key values in the main panel. Do this by clicking on a value in the Job Ticket Reference panel, and then dragging the value to the corresponding Job Ticket Paths cell in the main panel.
The Category panel is available to the left and contains several options. Click a category option. The Parameter Name/Metadata Key values it contains display in the main panel.
Mapping Basic Parameter Name/Metadata Keys Values
-
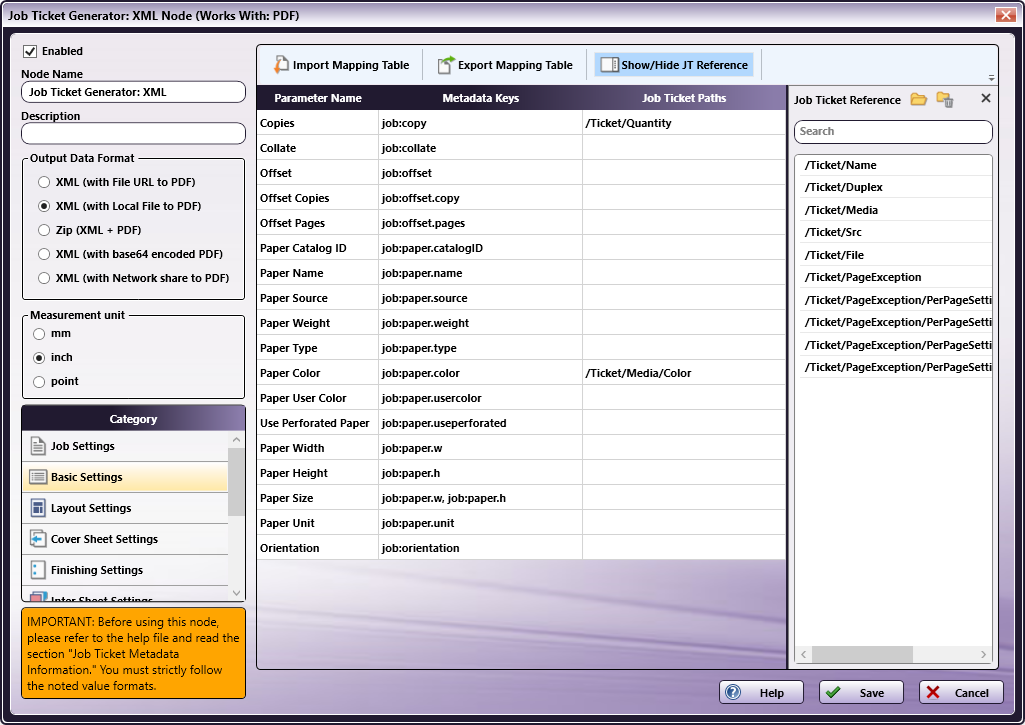
In the Category panel, click the Basic Settings option. The Parameter Name, Metadata Keys, and Job Ticket Paths columns display in the main panel:
-
Values from the Job Ticket Reference panel need to be moved to the Job Tickets Paths column, to the open cell that corresponds to the value’s Parameter Name.
-
Drag-and-drop /Ticket/Quantity to the Job Ticket Paths cell of the Copies row. Drag-and-drop /Ticket/Media/Color to the Job Ticket Paths cell of the Paper Color row.
-
The values that were dragged-and-dropped are removed from the Job Ticket Reference panel:
-
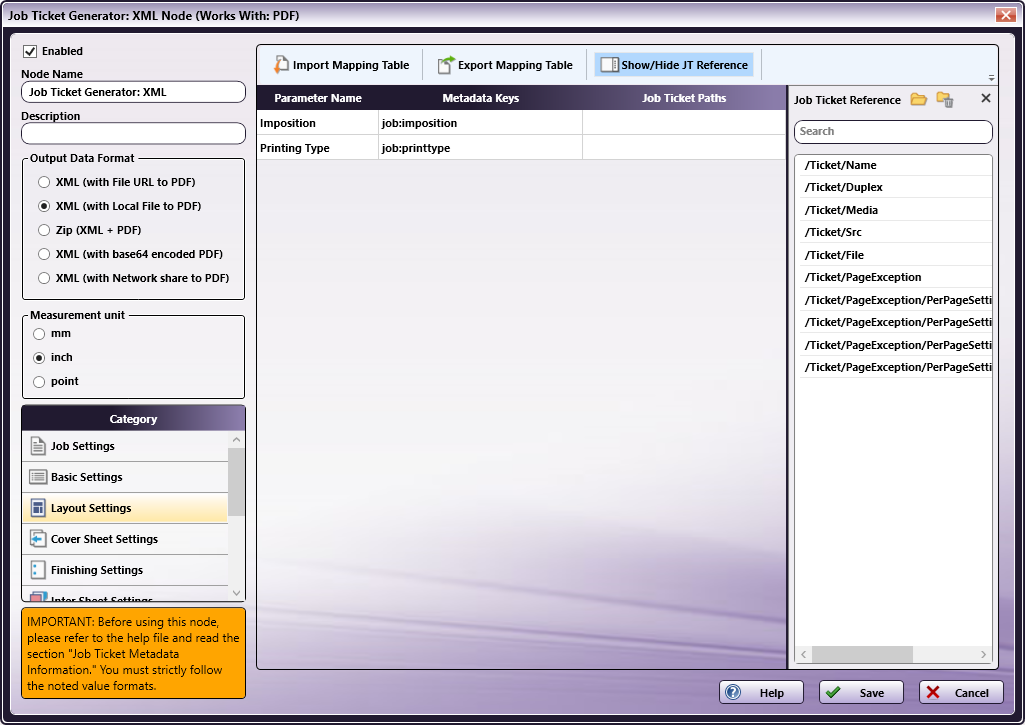
In the Category panel, click the Layout Settings option. The Parameter Name/Metadata Keys, and Job Ticket Paths fields display in the main panel:
-
Values from the Job Ticket Reference panel need to be moved to the Job Tickets Paths column, to the open cell that corresponds to the value’s Parameter Name.
-
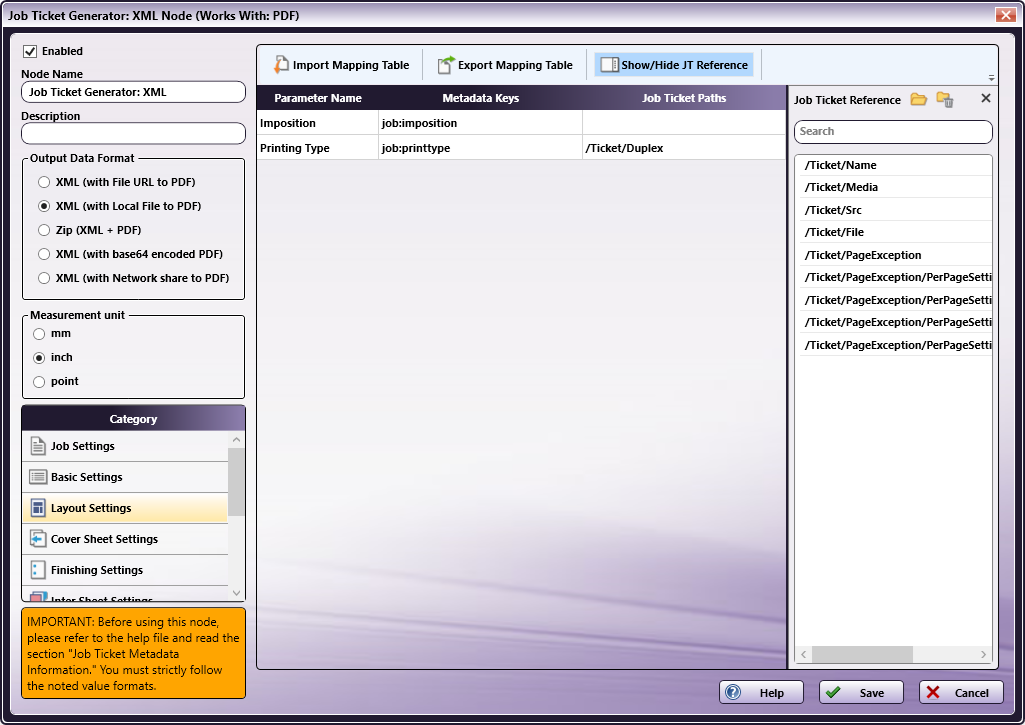
Drag-and-drop /Ticket/Duplex to the Job Ticket Paths cell of the Printing Type row.
-
All values that were dragged-and-dropped from the Job Ticket Reference panel are removed from the panel.
-
Repeat the same procedure for other Category options, as required.
Mapping Inter Sheet Settings Parameter Name/Metadata Keys Values
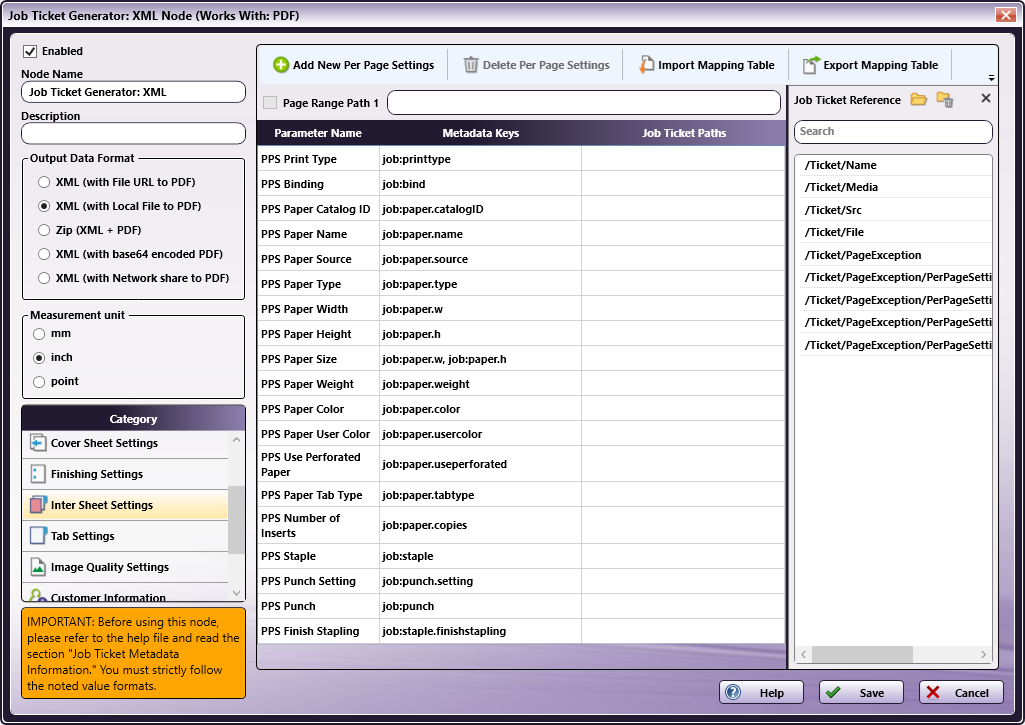
The Inter Sheet Settings Category is used to configure Per Page Settings. Enable and then map the XPath values to activate these settings. These Inter Sheet Settings generate page-level metadata.
-
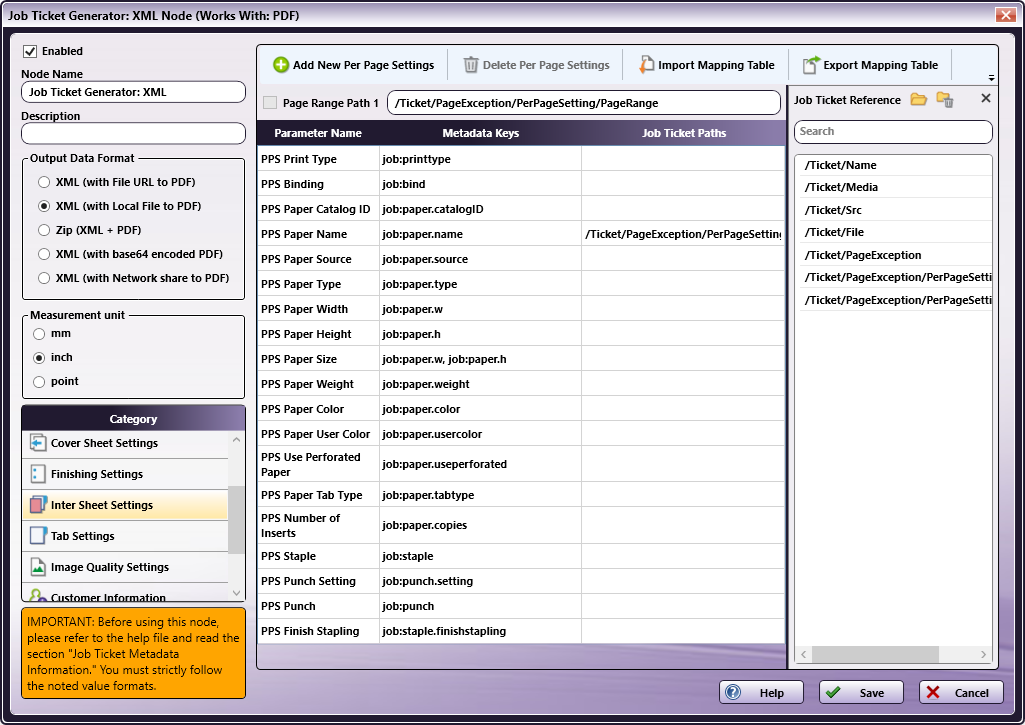
In the Category panel, click the Inter Sheet Settings option. The Page Range Path 1 field and the Parameter Name, Metadata Keys, and Job Ticket Paths columns display in the main panel:
-
From the Job Ticket Reference panel, drag-and-drop /Ticket/PageException/Range to the Page Range Path 1 text box.
Note: Page Range Path value should start with “/Ticket/” pattern.
-
From the Job Ticket Reference panel, drag-and-drop /Ticket/PageException/Media/PaperName to the Job Ticket Paths cell of the PPS Paper Name row.
-
Once these actions are completed, the screen will appear as shown in the following image:
-
All values that were dragged-and-dropped from the Job Ticket Reference panel are removed from the panel.
-
Repeat the same procedure for other Category options, as required.
Mapping Job Download Parameter Name/Metadata Keys Values
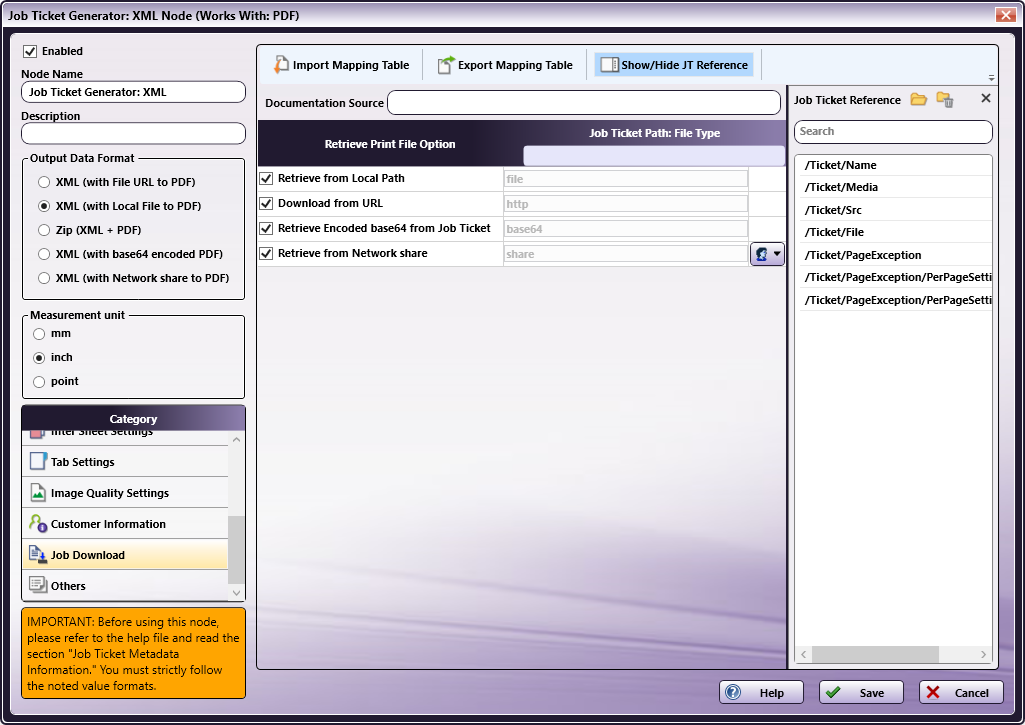
The Job Download Category is used to enable the input sources from which a job’s PDF file can be received. Four values are supported: Retrieve from Local Path, Download from URL, Retrieve Encoded base64 from Job Ticket (the PDF data in the form of embedded base64 code) and Retrieve from Network share.
Enable and then map the XPath values to activate these settings.
Sample XML Job Ticket Files
The following examples show how the code will display the PDF file for each of the job download options.
Retrieve from Local Path
• <Src>C:\Temp\Testfile.pdf</Src>
• <File>file</File>
Note: The file type keyword “file” and the file type keyword written in the input job ticket file must match.
Download from URL
• <Src>http://10.146.171.98/testapp8/Testfile.pdf</Src>
• <File>http</File>
Note: The file type keyword “http” and the file type keyword written in the input job ticket file must match.
Retrieve Encoded base64 from Job Ticket
• <Src>xxddgdfexdgfgngn…</Src>
• <File>base64</File>
Note: The file type keyword “base64” and the file type keyword written in the input job ticket file must match.
Retrieve from Network share
• <Src>\\11.12.13.14\Temp\Testfile.pdf</Src>
• <File>share</File>
Note: The file type keyword “share” and the file type keyword written in the input job ticket file must match.
Based on the UI output data format selection, @File and @Src values are updated in the generated XML job ticket file as noted above.
-
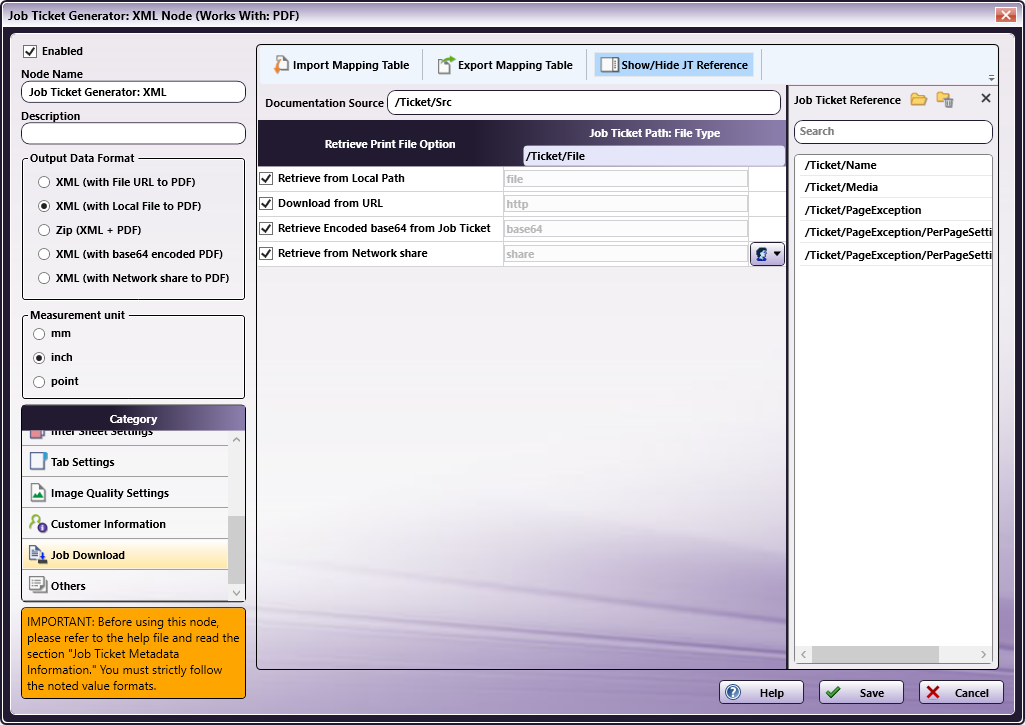
In the Category panel, click the Job Download option. The Documentation Source and Job Ticket Path: File Type fields and the Retrieve Print File Option checkboxes display in the main panel:
-
In the Retrieve from File Option column, select the checkboxes of all four options: Retrieve from Local Path, Download from URL, Retrieve Encoded base64 from Job Ticket and Retrieve from Network share .
-
From the Job Ticket Reference panel, drag-and-drop /Ticket/Src to the Documentation Source field.
-
From the Job Ticket Reference panel, drag-and-drop /Ticket/File to the Job Ticket Path: File Type field.
-
Once these actions are completed, the screen will appear as shown in the following image:
-
All values that were dragged-and-dropped from the Job Ticket Reference panel are removed from the panel.
-
Repeat the same procedure for other Category options, as required.
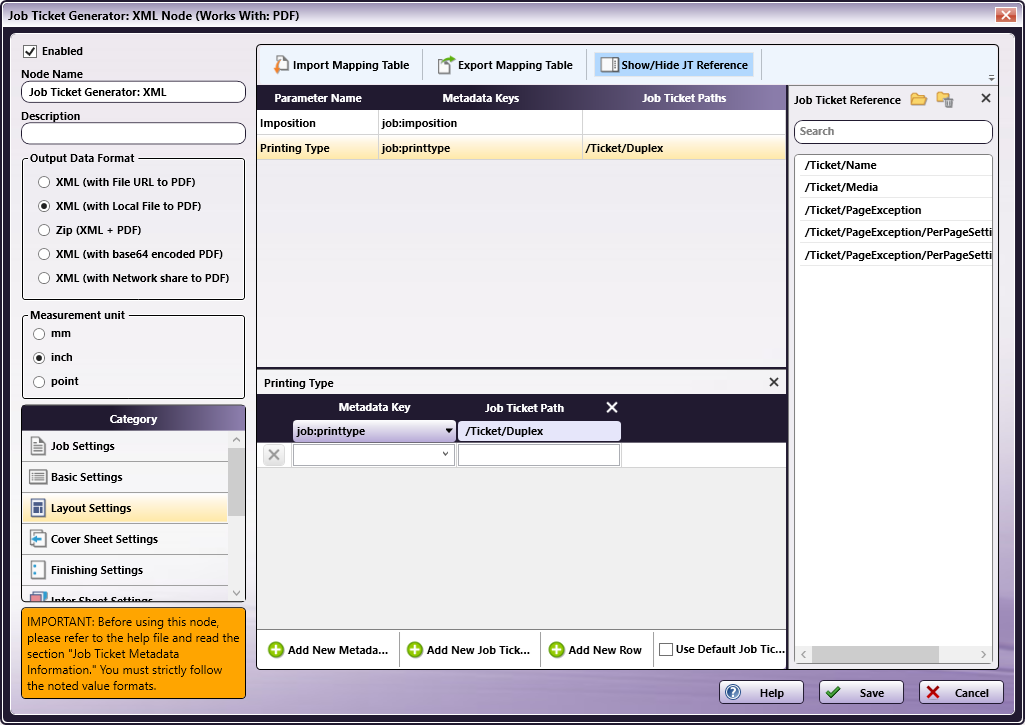
Value Map Configuration
Use this feature to configure one or more values for job ticket paths. In the example that follows, Printing Type’s XPath value is mapped. Once that is completed, the setting is then edited to specify the value map for Duplex.
-
In the Category panel, click the Layout Settings option.
-
Click on the Printing Type row to open the Value Map panel:
-
By default, a single value map row displays. Since there are two values that need to be mapped, click Add New Row to add the second value map row:
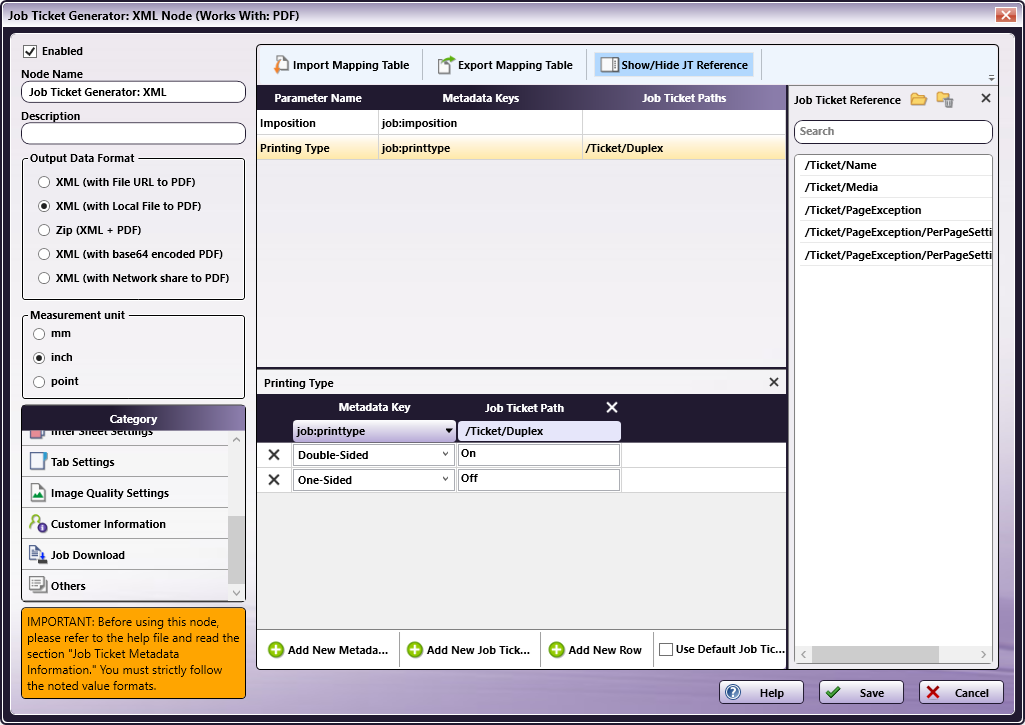
-
In the first row, select Double-Sided from the Metadata Key drop-down menu and enter On for the Job Ticket Path.
-
If a job is sent to a node that has a Duplex On value and Double-Sided printing is selected, then Double-Sided printing is output in the metadata.
-
In the second row, select One-Sided from the Metadata Key drop-down menu and enter Off for the Job Ticket Path.
-
If a job is sent to a node that has a Duplex Off value and One-Sided printing is selected, then One-Sided printing is output in the metadata.
-
When finished, click Save. To undo the changes, click Cancel.
Sample of a Job Ticket Generator: XML Node Workflow
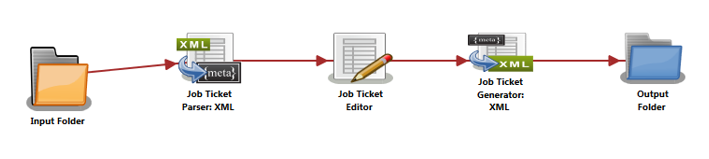
In the workflow above a job ticket file (e.g., xml_sample_jobticket_file.xml) is moved to the Input Folder. This is sent to the Job Ticket Parser: XML node where the XML job ticket is converted to job ticket metadata using the mapped values that have been created using the Job Ticket Parser: XML Node’s set-tings. When this is completed, the data is transferred to the Job Ticket Editor Node where the Copies value is changed to 100. From there, the job moves to the Job Ticket Generator: XML Node where an XML job ticket file is generated from the metadata. Depending upon the Output Format specified, the converted file is then sent to an Output folder.
Input Folder Node: Configure the Input Folder to collect files and forward them to the Job Ticket Parser: XML Node.
Job Ticket Parser: XML Node: The Job Ticket Parser: XML Node is used to parse the information in a XML file then write the parsed information as metadata. The XML file should contain a job ticket field and a job ticket value field. The node reads the job ticket field and its corresponding job ticket values, and then updates the metadata. A mapping table is used to map the job ticket data to the metadata values.
The PDF file location is noted in the XML file’s URL field and the PDF file is downloaded to the node using that information. If input file is a ZIP file (XML + PDF) then the file is unzipped, and then the XML file is processed.
For complete details, see the Job Ticket Parser: XML Node topic in this Help file.
Job Ticket Editor Node: Use this node to modify the Copy count of the job:
-
Double-click the Job Ticket Editor node to view the settings:
-
From the left panel, select Basic Settings.
-
Click on Copies and drag it to the right-side panel:

-
Change the Metadata Values to 100.
-
From the If metadata already exists drop-down, select Replace.
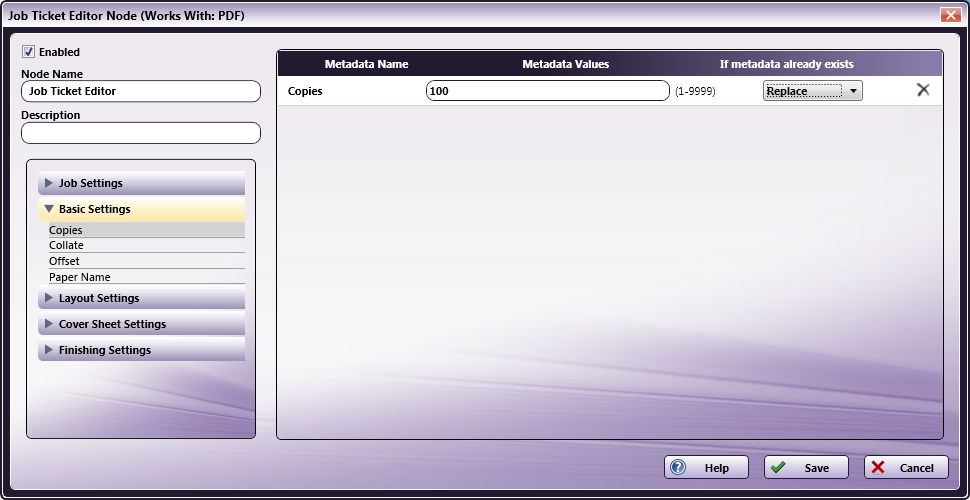
-
Click Save to apply the change.
Job Ticket Generator: XML Node: The purpose and instructions for setting up this node are provided in the discussion that precedes this section.
Output Folder Node: Once all workflow processes have been successfully applied, a job is routed to the folder path configured in the Output Folder Node.
The output metadata that follows is based upon the settings noted in the previous sections of this document:
<Ticket>
    <Name>Sample XML Job</Name>
    <Quantity>100</Quantity>
    <Duplex>On</Duplex>
    <Media>
    	<Color>Yellow</Color>
    </Media>
    <Src>C:\ProgramData\Konica Minolta\conopsd\var\blox\node_4\tmp.d\Testfile.pdf</Src>
	<File>file</File>
    <PageException>
        <PerPageSetting>
        	<PageRange>1-5</PageRange>
            <Media>
                <PaperName>A4</PaperName>
            </Media>
        </PerPageSetting>
    </PageException>
</Ticket>