OnBase Connector

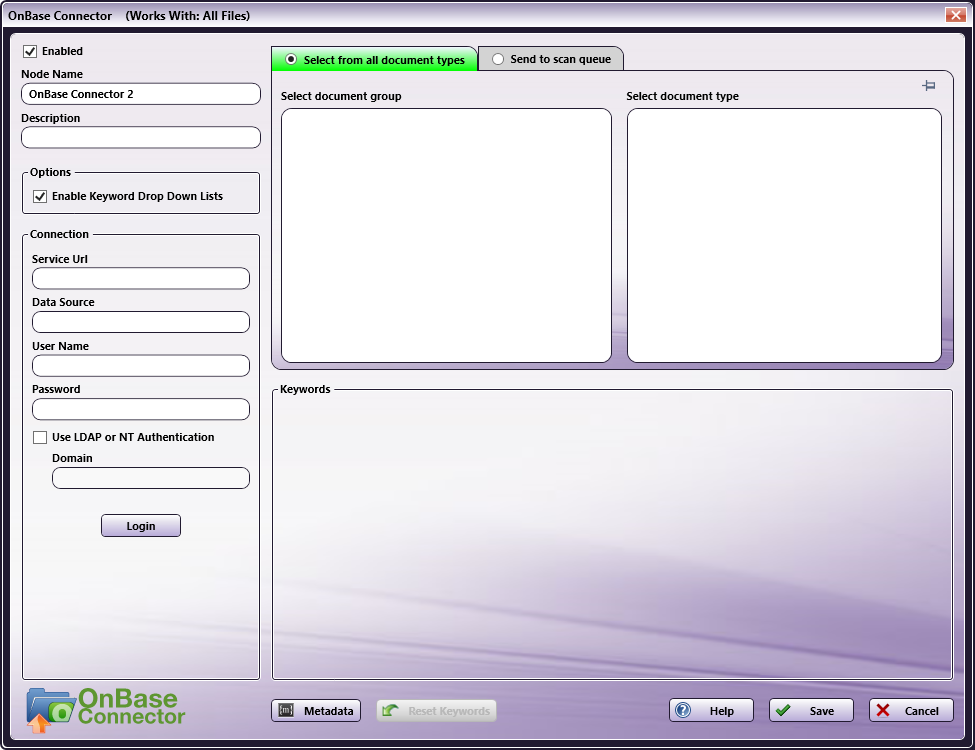
The OnBase Connector node allows you to store and retrieve documents and other data to an OnBase database. Documents can be sent to OnBase via an automated workflow, or you can log into OnBase, set OnBase attributes, and enter keywords for the documents directly at the MFP panel.
Requirements include:
-
Supported Versions: Hyland OnBase Server Components version 12.0.3.227 and above.
-
License Installed: The “Integration for Konica Minolta Dispatcher Phoenix” license must be purchased from Hyland Software and installed into the OnBase database.
-
Scan Size: The maximum scan size supported is 100 MB. If the scanned document exceeds this maximum, a message will appear, alerting the user of this limit.
Important! Please ask your OnBase Administrator to confirm the version of Hyland OnBase Server Components installed since the version of your OnBase Client or OnBase Unity Client could be different. If you have any questions, please contact your OnBase Administrator or Hyland Support Representative.
To open the OnBase node’s properties window, add an output node for OnBase to your workflow and double-click on it.
-
Check the Enabled box when using this node. When unchecked, this output will be ignored. While the workflow will still validate, documents will not be output and may be lost.
-
In the Node Name field, enter a meaningful name for the OnBase node.
-
In the Description field, enter a description for the OnBase node. Although this is not required, it can be helpful to distinguish multiple processes from each other. If the description is long, you can hover the mouse over the field to read its entire contents.
-
In the Options area, check the Enable Keyword Drop Down Lists box to display a drop down list for Keyword Types configured as drop down lists on the OnBase server. This box is checked by default. Note that this option can only be enabled/disabled while not logged in.
Connecting to OnBase
To begin, you must first connect to OnBase. In the Connection area, do the following:
-
In the Service URL field, enter the URL of the OnBase application server.
-
In the Data Source field, enter the name of the ODBC data source used by the OnBase application server to connect with the OnBase database. This field is optional.
-
In the User Name and Password fields, enter the user name and password that is used to connect to the OnBase server.
-
Check the Use LDAP or NT Authentication box to enable LDAP/NT authentication.
-
If LDAP/NT authentication is enabled, you must enter the domain to use when logging onto OnBase via LDAP/NT authentication in the Domain field.
-
Select Login to verify the connection credentials. If the credentials are correct, the available document groups will appear in the Select document group box.
Classifying Documents
-
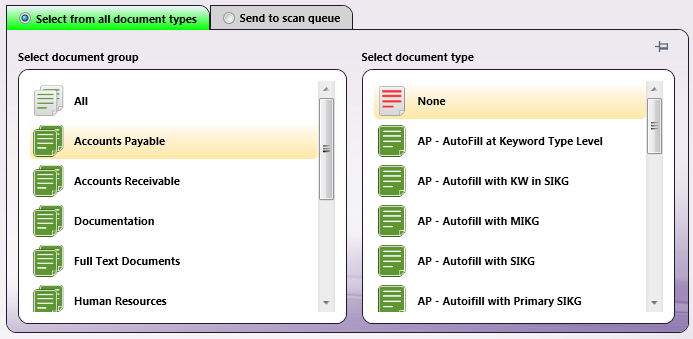
Select from all document types - If this tab/radio button is selected, available document groups will appear in the Select document group box. Document groups are used in OnBase to organize similar document types together and are usually associated with an organizational unit or department within an organization.
Once you select a document group, a list of associated document types will appear in the adjacent column, as in the following illustration. The document type controls the keyword fields that are available for indexing. Once you select a document type, a list of associated keyword fields that are available for that specific document type will appear, and the Select document group and Select document type boxes will automatically collapse.
You can disable the auto-collapse feature for these two boxes by clicking the thumbtack icon
Note: Mandatory OnBase fields will not be displayed as “required” in Dispatcher Phoenix for both “Manager” and “Admin” users since they have privileges for those kind of keywords (required, hidden, and read-only).
See the following illustration for an example:
-
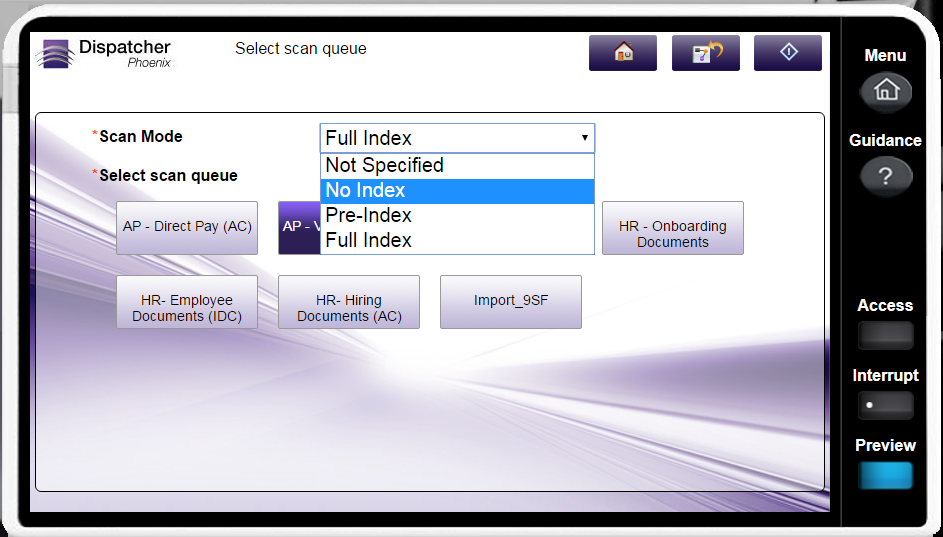
Send to scan queue - If this tab/radio button is selected, available scan queues will appear in the Select scan queue box. An OnBase scan queue is predefined for specific document processing and indexing. See the following illustration:

For OnBase 16 or newer servers, you can choose a scan mode from the Scan Mode drop-down list, allowing you to configure the initial indexing status of documents that are entering a scan queue. You can choose:
-
Not Specified. If this option is selected, no Scan Mode will be sent to the OnBase Server. The OnBase server will then use the default scan mode of “Full Index.” This option should be used for OnBase Servers version 15 or older.
Note: If you choose any scan mode option other than “Not Specified” for OnBase 15 or older, the workflow will fail to process the document.
-
No Index. Select this option to perform manual indexing after documents have been scanned to OnBase. The uploaded documents will be in OnBase’s Awaiting Index state without a document type or keywords associated to them. If this option is selected, the Select document type and Keywords section will be empty (since they are not applicable).
-
Pre-Index. If this option is selected, you can specify the Document Type and enter Keywords. The uploaded documents will be in OnBase’s Awaiting Index state.
-
Full Index. If this option is selected, you can specify the Document Type and enter Keywords; however, the uploaded documents will bypass any indexing queues and move to OnBase’s Awaiting Commit state. This is the default behavior.
Note: The states listed above are based on a default configuration. The actual state may change based on the OnBase configuration (e.g., selecting the Full Index option may send uploaded documents to the Awaiting Advanced Capture state if that option is selected for the Scan Queue).
-
The Scan Mode feature supports metadata. Users can enter a metadata key manually or by dragging-dropping metadata from the Metadata Browser window onto the field. You can open up the Metadata Browser by clicking on the Metadata button at the bottom of the window. The metadata selected must contain one of the following values:
- NotSpecified (for the Not Specified scan mode option)
- NoIndex (for the No Index scan mode option)
- PreIndex (for the Pre-Index scan mode option)
- FullIndex (for the Full Index scan mode option)
-
Once you select a scan queue from the Select scan queue column, a list of associated document types will appear in the adjacent column. Once you select a document type, a list of associated keyword fields that are available for that specific document type will appear, and the Select scan queue and Select document type boxes will automatically collapse. To disable this auto-collapse feature, click on the thumbtack icon on the left-hand side of the screen.
-
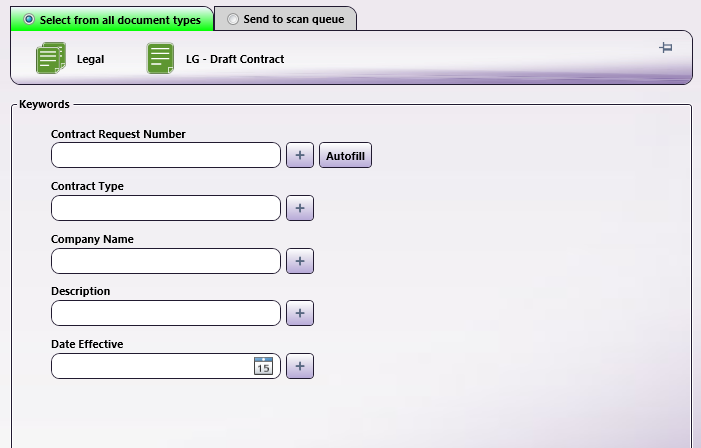
Keywords
You can enter values for keyword fields that are associated with the document type that you’ve selected.
Notes:
-
Metadata - You can click on the Metadata button to open up the Metadata Browser window and drag-and-drop metadata variables into the Keyword fields, if desired.
-
Required keywords - Required keywords are displayed in red, as in the following illustration:

-
Duplication/Cloning - You can duplicate keyword fields numerous times in Dispatcher Phoenix’s OnBase Connector node and also at the MFP panel. Do the following:
-
To duplicate a keyword field in Dispatcher Phoenix, put the cursor in the keyword field that you would like duplicated and either click the + button or press F6.
-
To duplicate a keyword field on the MFP panel, press the + button next to the field.
Duplicating Fields In Dispatcher Phoenix:

Duplicating Fields On MFP:

-
-
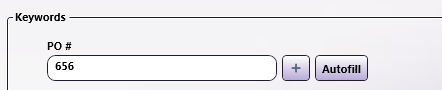
Autofill - OnBase can auto populate keyword fields based on the first value entered. For example, if a keyword is entered at the MFP panel, other keywords associated with that document type can be auto-populated based on a query that uses the first field’s values.
Keyword fields that can be used to auto-populate other fields will have an Autofill button next to them. You can enter a specific value in that keyword field; then click the Autofill button to auto populate other keyword fields. See the following illustrations:
Autofill In Dispatcher Phoenix:
Autofill on MFP:

-
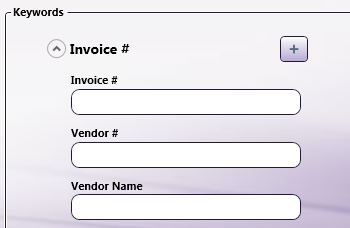
Nested sections - Keywords can be grouped into sections that can be expanded and collapsed by clicking on the arrow button next to the section name. Sections can be duplicated by clicking on the + button next to the section name. See the following illustration of a nested section on the Dispatcher Phoenix OnBase node properties window:
-
Reset Keywords - Click on the Reset Keywords button to clear all the keyword entries that have been entered.
-
Validate Keywords - When you click on the Save button in Dispatcher Phoenix or the Scan button on the MFP, the keywords will be validated against the OnBase server. If a validation error occurs, OnBase will return an error message. Note that this validation will not occur in Dispatcher Phoenix if metadata is used.
-
Date Keywords - Date keywords require a date format of YYYY-MM-DD. For example, 2013-03-01 is March 1, 2013.
Using with Index Form
When using the OnBase node on an Index Form, the window will be automatically populated with the variable names of the fields on the Index Form. Although you cannot edit the fields on this window, you can click on the wrench tool button to go to that section or field in the Index Form Builder. See the following illustration:

Using OnBase Index Form with Multiple Inputs
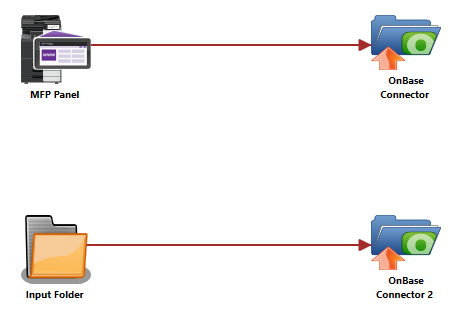
Once you associate your OnBase Connector node with a MFP Panel node’s index form, all the information necessary to connect and route to OnBase is entered at the MFP. Because of this, you cannot connect any other types of collection nodes (Input Folder, MFP User Box, etc.) to that indexed OnBase Connector node in your workflow. In this case, if you need to add other collection nodes to your workflow, you must add a new OnBase node that is not connected to an index form. See the following illustrations for examples:
Example 1. In this illustration, OnBase configuration is entered at the MFP panel AND files are automatically collected from an Input Folder and routed to a predefined OnBase server:
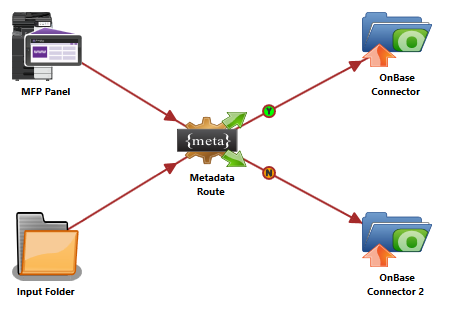
Example 2. In this illustration, the Metadata Route node is used to determine which OnBase node the files should go to. All files that come from the MFP Panel node automatically go to the indexed OnBase node; all other files are routed to the other OnBase node:
Creating an OnBase Index Form
You can create an index form that allows you to upload scanned documents to OnBase at the MFP. Do the following:
-
Make sure that your workflow includes a MFP Panel node and OnBase node.
-
Open up the Index Form Builder from the MFP Panel node. You should see an OnBase Connector button under the Workflow Index Fields area.
-
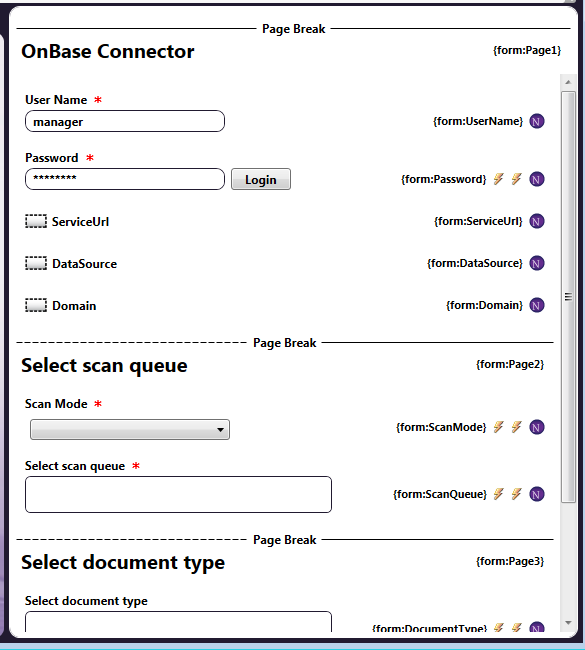
Drag and drop the OnBase Connector button to the Index Form work area. If the OnBase Connector node has already been configured, an index form with pre-populated fields will appear; otherwise, an index form with blank fields will appear, as in the following illustration:

-
Assign default values to the Service URL, Data Source, and Domain fields.
Creating an OnBase Index Form for Scan Queues
You can also create an Index Form for sending documents to OnBase Scan Queues. Do the following:
-
Make sure that your workflow includes a MFP Panel node and OnBase node.
-
Configure your OnBase node with connection details; then choose the Send to scan queue tab.
-
Open up the Index Form Builder from the MFP Panel node. You should see an OnBase Connector button under the Workflow Index Fields area.
-
Drag and drop the OnBase Connector button to the Index Form work area. An Index Form with fields for specifying the Scan Mode, Scan Queue, Document Type, and Keywords will appear, as in the following illustration:
-
The MFP User can then choose a Scan Mode at the control panel. If “Not Specified,” “Pre-Index” or “Full Index” is selected, the User will also be able to specify a Document Type and enter keywords at the panel. See the following illustration for an example of what the MFP interface looks like:
Enabling Keyword Drop Down Lists for Workflows Created Prior to Dispatcher Phoenix 6.3.4
If you created your workflow prior to the release of Dispatcher Phoenix version 6.3.4, follow these steps to enable keyword drop down lists:
-
Stop the workflow.
-
Edit the workflow.
-
On the Workflow Builder toolbar, click Forms.
-
Click the OnBase Index Form.
-
In the Index Form Builder, click Select Document Type field.
-
On the left side of the window, under the Field Properties tab, scroll down to Expand section with dynamic content area and select the Edit button. (outlined by the red box in the illustration below)

-
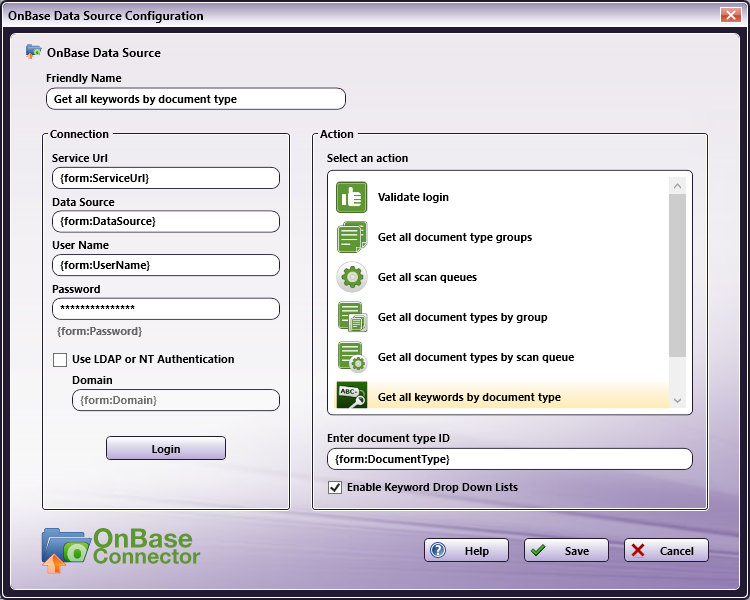
On the OnBase Data Source Configuration window, check the box for Enable Keyword Drop Down Lists as shown in the illustration below:

OnBase Index Form on MFP
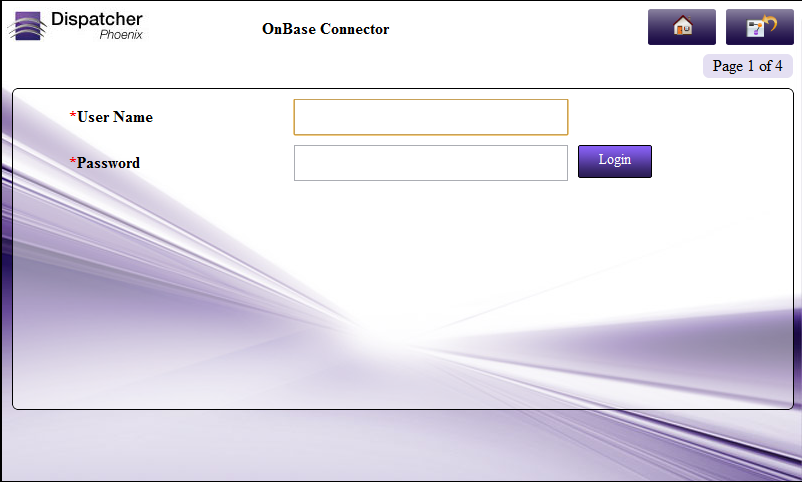
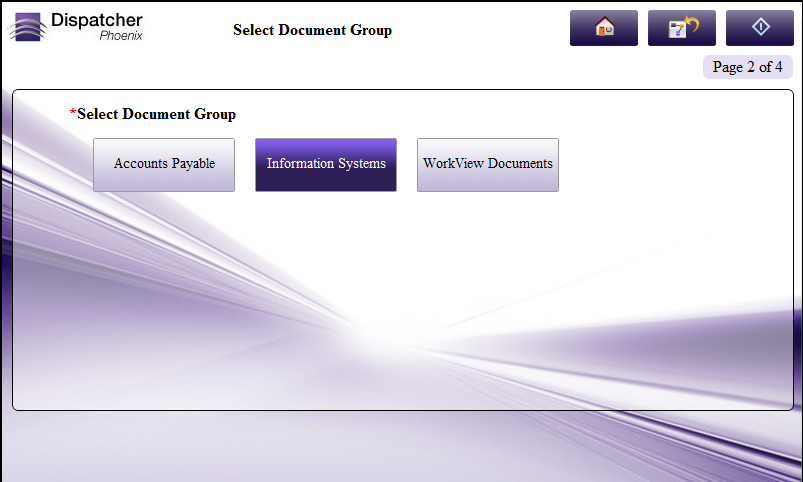
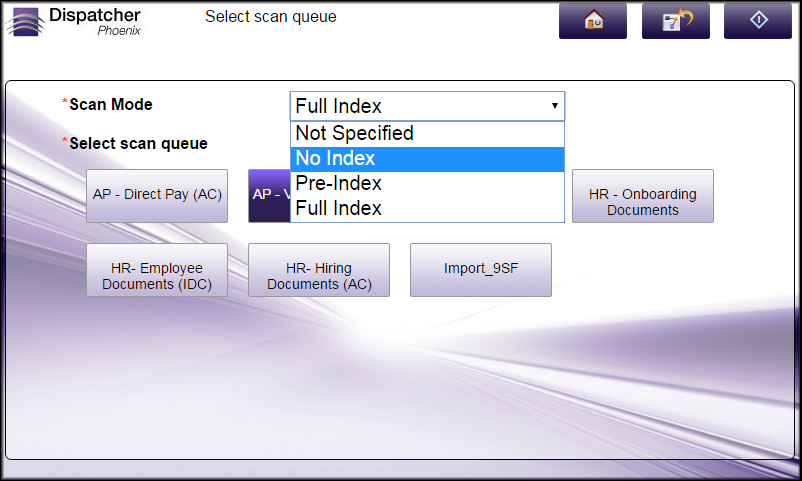
At the MFP, the OnBase Index Form will be separated into four separate screens, as follows:
1st screen: User logs into OnBase
2nd screen: User selects a Document Group
Scan Queues
If distributing files to an OnBase Scan Queue, the following screen will appear, which allows the MFP User to choose a Scan Mode and a Scan Queue.
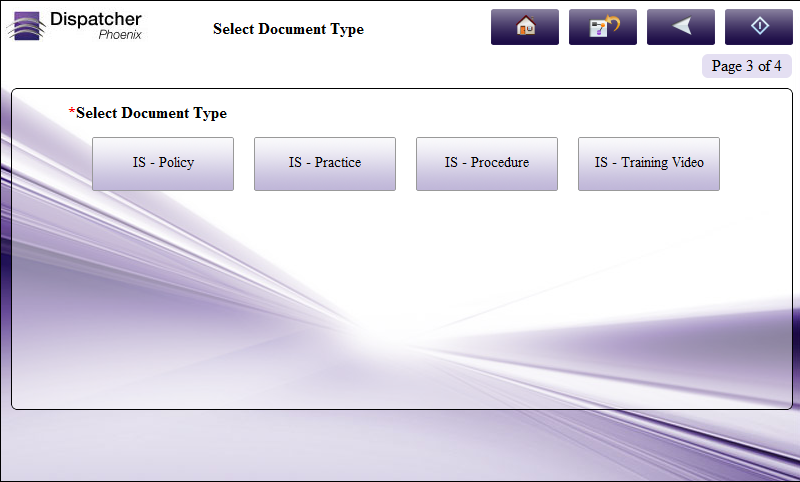
3rd screen: User selects a Document Type
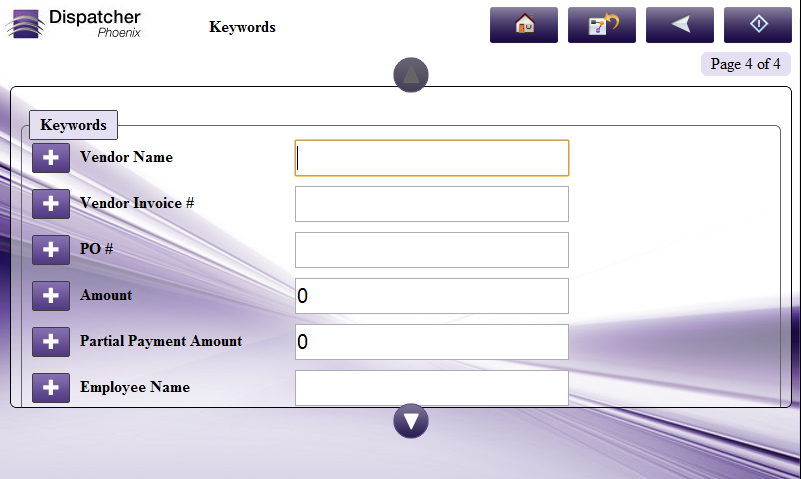
4th screen: User enters keywords for the documents
Database Browsing - OnBase Configuration
You can also manually configure a query to retrieve data (e.g., list of folders, validation, etc.) from OnBase. Using the Index Form Builder, do the following:
-
Add a new field, such as a drop-down list.
-
Define an On Load event for the field; then add a Query.
-
Choose OnBase Data Source from the Query drop-down list.
-
The OnBase Data Source Configuration window appears, which allows you to perform specific actions in order to retrieve data from OnBase.
Do the following:
-
In the Friendly Name field, enter an identifying name for the OnBase data source configuration.
-
In the Connection area, provide the information necessary to connect to OnBase.
-
Select the Login button to make sure that you are connected properly to OnBase.
-
In the Action area, choose what kind of action to perform on the OnBase data source. Options include:
-
Validate login - Use this action to validate the login credentials that are entered at the MFP (user name and password) against the OnBase data source. This action returns the following records:
-
[result] - The result of the login: true or false
-
[message] - Text regarding a successful or unsuccessful login.
-
-
Get all document type groups - Use this action to display a list of the document type groups available within OnBase.
-
Get all scan queues - Use this action to display a list of all scan queues available within OnBase.
-
Get all document types by groups - Use this action to display a list of all document types associated with a specific document group within OnBase. You will need to enter an ID to specify which document group to use.
-
Get all document types by scan queue - Use this action to display a list of document types associated with a specific scan queue within OnBase. You will need to enter an ID to specify which scan queue to use.
-
Get all keywords by document type - Use this action to display a list of keywords associated with a specific document type within OnBase. You will need to enter an ID to specify which document type to use. Check the Enable Keyword Drop Down Lists box to display a drop down list for Keyword Types configured as drop down lists on the OnBase server. This box is checked by default.
-
Validate keywords - Use this action to validate the keywords that are entered at the MFP against the OnBase data source.
-
-